I am experiencing a problem with Adobe Premiere which destroys the quality of Canon 1D C footage. It’s a problem which has always been attributed to the camera and others like it – banding with an 8bit codec. But actually, could the software you use to edit material play a role?

Banding is something we see a lot with 8bit cameras that shoot with compressed codecs. The effect is ugly, to create stepped rather than smooth gradients from darker tones to a light over a large area of the image (like a blue sky). With the most horrible banding there’s also an uneven discolouration of the transition – bands of purple-grey in what should be a black-to-white gradient for example or muddy green casts in skin tones.
The traditional consensus is “the codec is only 8bit” and you “don’t get this problem with 14bit raw”.
The 1D C records 8bit footage. A lot of people, myself included said that for $12,000 Canon should have tried a bit harder. I am sure they will be back soon to sell us another $12,000 1D C with a 10bit codec, while under $1000 Blackmagic have given us 10bit ProRes with their Pocket Cinema camera!
Dig a little deeper though and you may wonder why the same severe banding doesn’t occur in full resolution JPEG stills. These are 8bit too.
You may wonder why 14bit raw doesn’t show banding on your display. That’s likely 8bit too.
Actually banding is caused by a lot of things, chief of all compression, least of all 8bit colour depth. In the case of my experience with the 1D C, the prime suspect is even more unlikely – it’s Adobe Premiere.
Luma range re-mapping
In reality the difference between 8bit and 10bit for outright image quality is very subtle. Most banding is caused by compression and scaling. Compression blocks two or more subtly shaded bands into wider ones of a single shade to save space and scaling can throw image data away too.
But there seems to be another factor and one I hadn’t considered before – that’s the ‘broadcast safe’ luma range and how it differs from the ‘data range’.
The MJPEG codec on the 1D C records 4K video in a full luma range of 0-255, known as the ‘data range’ rather than the ‘broadcast range’ of 16-235. In 8bit the brightness of each hue of colour is determined by 256 steps of luminosity (brightness). So for example from black to white you have a maximum of 256 shades in any one transition.
To complicate things the 1D C records 4K using a decoding matrix that is not the HD standard of ITU Rec.709. It uses the ITU BT.601 matrix. Why it does this I have no idea and I’m not sure it causes the problem in Premiere but it’s worth noting anyway.
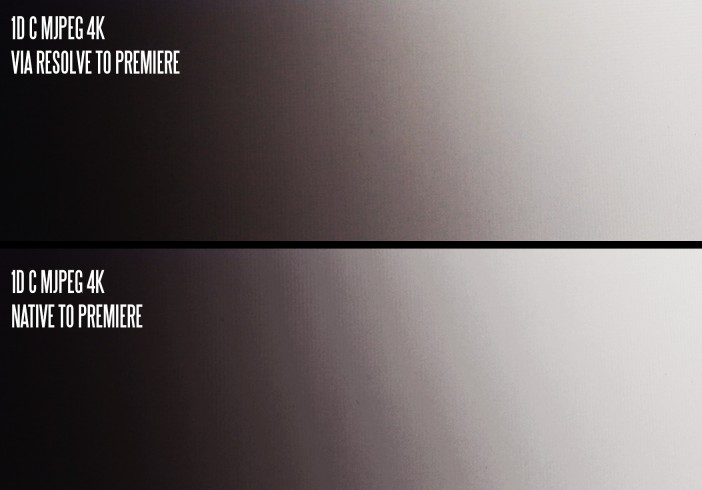
So back to Premiere and let’s open the MJPEG 4K file from the 1D C… here we see that infamous banding, which is especially noticeable when there’s no sensor noise (below ISO 400) to dither the bands together with grain or in Canon LOG which produces shades which are much closer together with a lower contrast right across the frame.

Now we are going to make it go away…
Diagnosis
First move was to change my display. I connected a 4K LCD monitor to my Mac.
I know from the small LCD on the back of the 1D C that banding is exaggerated on there. I wondered if scaling (from 4K to just 640 x 480) makes banding worse. I think it does.
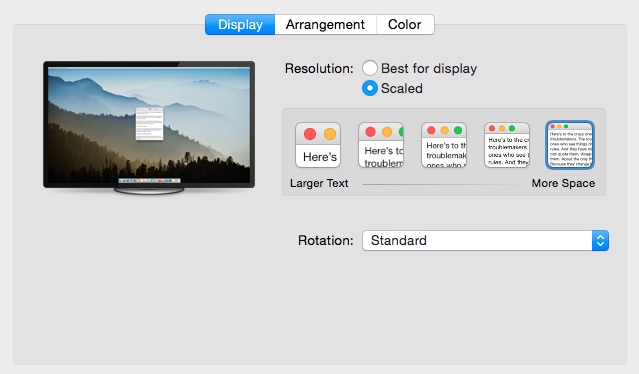
A Mac Retina display has hardware scaling built in and it makes sense to eliminate this as a variable by turning it off. Although the Mac feeds the full resolution of your Retina display when scaling is turned on, windows and images are digitally magnified or reduced depending on the size of the user interface.
“Best for display” will scale what you see on the screen. Selecting “Scaled” and the further right-most option for “More Space” actually turns this scaling OFF on my 4K monitor via Thunderbolt / DisplayPort connected to my Macbook so that Premiere, Resolve and Photoshop use 1:1 pixel mapping for images. Therefore a 4K frame viewed at 100% will be mapped 1:1 to the display pixels and not scaled up or down to fit the UI!
Then I opened a 1D C 4K MJPEG file in Quicktime to see glorious 4K image at it’s native resolution on the 4K display, 1 camera pixel for one screen pixel. Sure enough it was smooth. Lovely gradients (almost like raw or on a 10bit Blackmagic camera). Although the limitations of 8bit and of compressed file formats (even at 500Mbit/s) in LOG still don’t produce 100% perfect gradients they improved a hell of a lot – more even, more natural and the discolouration had gone. It still helps to stay above ISO 400 in LOG mode though.
With this setup I thought I’d cracked it BUT in Premiere the banding returned!! Most worryingly it wasn’t just on the preview monitor or timeline it was on the export to 4K 10bit ProRes as well, and even uncompressed Animation in Quicktime wrapper or TIFF. Even when viewed at 100% on the timeline the 4K 1D C material in native MJPEG format had the problem. Then I used 5DtoRGB to see if converting to the 1D C’s files to 10bit ProRes and opening these for editing in Premiere would fix it. Surprisingly it didn’t. The same banding was present in the ProRes files when viewed in Premiere.
5DtoRGB presented the first clue… With the luminance range in this app set to 0-255 the problem still existed with Premiere when I imported the resulting ProRes 4444. However setting the luminance range to 16-235 in 5DtoRGB cured the banding. The fix was short lived because instead of remapping the luma to fit the reduced spread, it clipped it. The result was a burning of highlights and crushing of shadows.
What I think Premiere might be doing is remapping the 0-255 MJPEG material to the broadcast standard 16-235 and doing a poor job of it, or possibly a flat out broke job of it. That’s only a theory though. Until Adobe themselves say what is going on here, I have no idea what is really going on to break the 1D C’s footage where Quicktime Player doesn’t. The same problem occurs on my Windows rig.
When exported from Premiere CC and presented as a 1080p image the banding looks even worse. Not good for Vimeo. Your audience will definitely notice and be distracted by it.
The fix
Next I tried Blackmagic DaVinci Resolve 11* (download from Blackmagic here). This ingested the 4K MJPEG without displaying any banding whatsoever. It was then able to quickly transcode the files to ProRes and when I opened these in Premiere they were handled correctly with no banding introduced. Whatever Resolve is doing, it’s doing it well. It really cleans up the footage.
Another alternative is the iFFMPEG transcoding app (download here), a OS X graphics user interface for FFMPEG and costs just over $20. I can render on this using 8 cores, 8 clips simultaneously so it’s just as fast as Resolve and it cures the banding problem. You have to dig a bit for the ProRes LT option though, it’s in Advanced settings, ProRes, rather than on the codec config panel where it should be.
The workflow in Resolve is also simple. You put the 4K MJPEG files from the Compact Flash card in the media pool on the first creen, create an empty timeline on the second, add the clips you want to transcode to the editing timeline in a sequence all in one go and select the Deliver screen and render them out as individual ProRes files. I choose LT at around 400Mbit because it saves me space over the 500Mbit MJPEGs without losing any quality or padding out the files with extra weight that isn’t needed like in ProRes 4444, which is total overkill given the 8bit 422 source.
Since the MJPEG files need transcoding to ProRes anyway to be smoothly playable on the timeline in Premiere, this workflow doesn’t ‘get in the way’. I would be doing it regardless of whether it fixed banding or not.
You might want to try Resolve with other cameras that shoot 8bit 4K to see if you get any improvement in image quality compared to Premiere CC and I hope it will support H.265 from the Samsung NX1 soon.
It could be that the problem is specific to the 1D C in Premiere but it is all very fishy!! What I am seeing is not normal!
After these problems I’m actively considering Resolve 11’s full blown editing features and may cancel my Creative Cloud subscription.
* Mac / Windows notes
Unfortunately on Windows, Resolve wasn’t as good. It didn’t have decent performance with the 1D C MJPEG 4K files at all and ProRes encoding isn’t available out of the box. Avid’s DNxHD is an alternative for Windows but this appears limited to 1080p and won’t do 4K in Resolve 11 on Windows. Therefore for Windows users I’m not sure what the best workflow is for the 1D C to avoid the banding. Feel free to make some suggestions on the EOSHD forums.


