Leaderboard
Popular Content
Showing content with the highest reputation on 11/02/2017 in all areas
-

The correct way to expose for SLOG3 when using 8bit cameras
EthanAlexander and 4 others reacted to Gregormannschaft for a topic
Figure I'd upload a few screengrabs from a recent project using the SLOG2 + SLOG3.cine combo we're talking about here. I used a DeLUT as a starting point to grade - most aren't great but I love Downton Alt. Tends to give very natural colours without doing too many weird things with grain or colour blocking. These were all shot using a Tiffen BlackPro Mist 1/4, which at times was possibly a bit much. But when it works I really love the effect it gives.5 points -
An extensive review of the EVA1 by Newsshooter... http://www.newsshooter.com/2017/11/01/panasonic-au-eva1-hands-on-review/ As color rendition is a top priority for me, I was happy to read Matt's assessment: "In my personal view (feel free to disagree with me in the comments!) the EVA1 has the most accurate colour rendition of any of the sub $10K cameras that are out there. The colours are very reminiscent of the Varicam LT and you would struggle to tell the two apart." Camera's not without its flaws but I expect I'll be pretty happy with it. Here's a short doc Matt shot with it.2 points
-
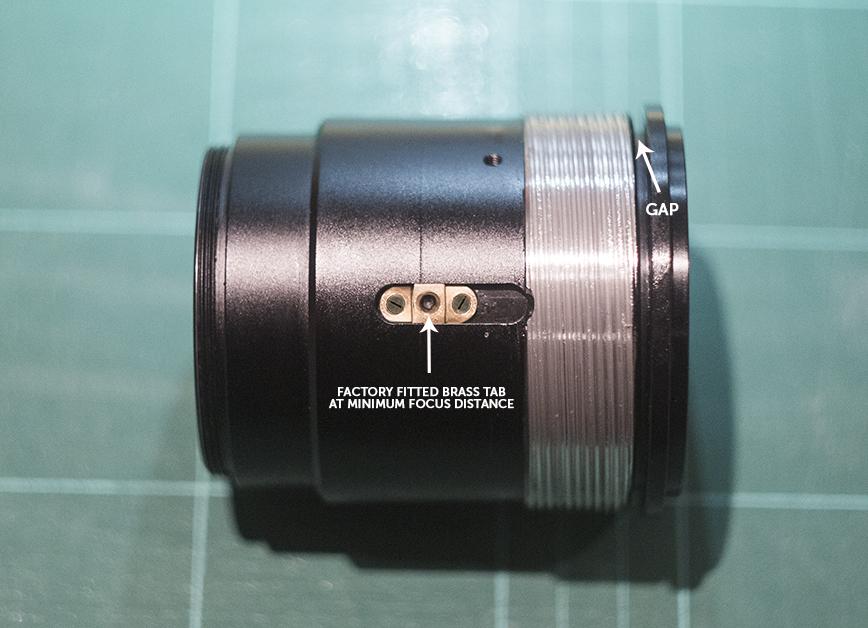
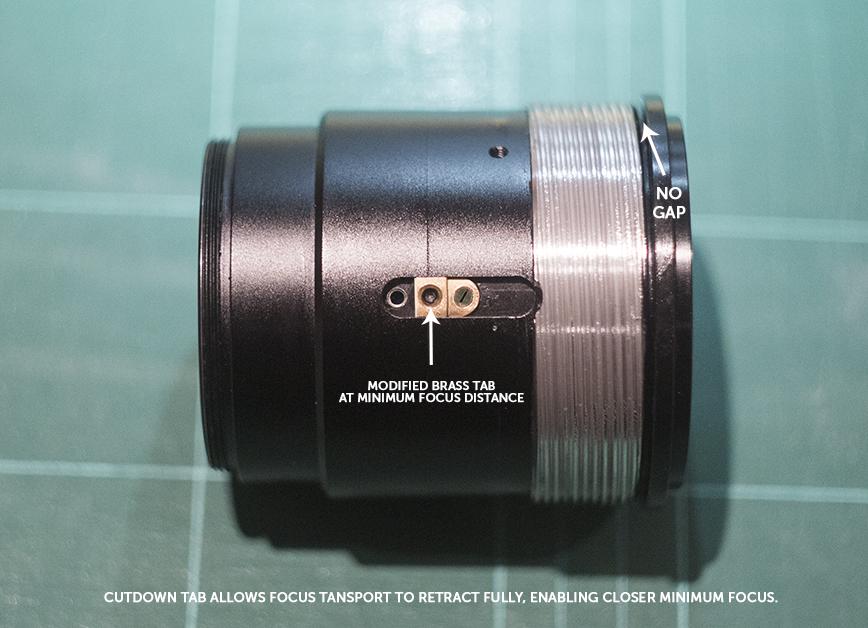
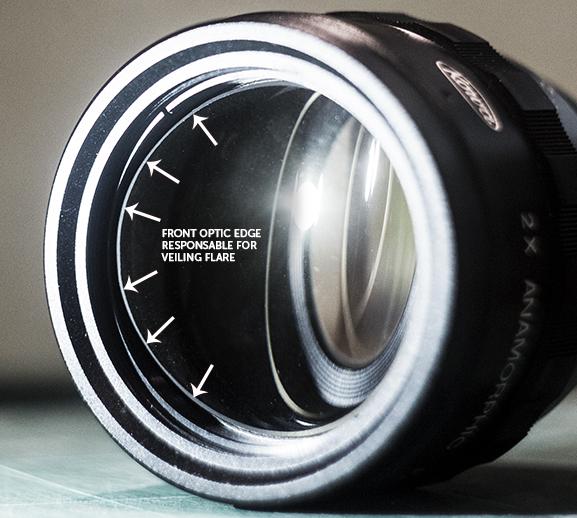
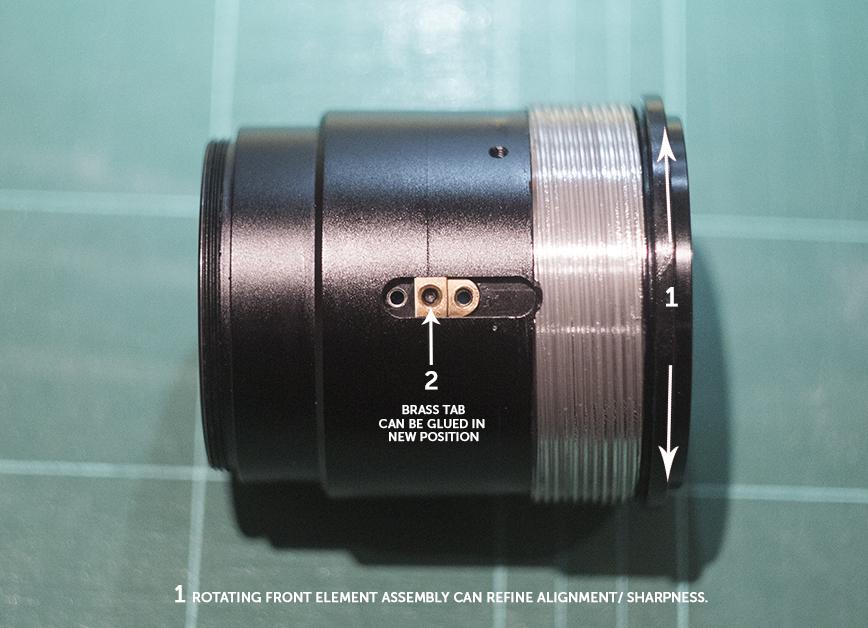
Kowa B&H Close Focus Mod & other 'Tweaks' Recently I picked up a very cheap Kowa B&H that needed a lot of internal cleaning and a fresh re-lube. Since it was my 'Spare' Kowa, I have a chance to illustrate/share my findings on some simple modifications that I discovered a couple of years ago on another lens. Since I already have a 'Standard' Kowa to compare with, it should prove easier to illustrate the difference in performance before & after modifying such a lens. These principles will work on many lenses of this type that share a similar construction. Following these steps are at your own risk. The modifications allow: * Minimum focus to be reduced from 5 feet down to 3 feet. * Reduction/elimination of 'Veiling Flare/ Barrel Glow' that is common with Kowa lens types. * Overall sharpness improvement. Close Focus: To achieve closer focus from the 5 foot factory standard is pretty easy.The focus mechanism transport is done by a helicoid pushing/pulling the front element that is seated within a tube, guided by brass tabs/stoppers within slots in the housing.These brass tabs/stoppers ensure that the linear travel is straight and true (ensuring correct alignment with rear optic). By cutting these tabs to be shorter, the travel of the front optic assembly is allowed to seat closer to the body - allowing closer distance between front and rear optic. This allows an increase in optic proximity to be achieved. This modification effectively allows the focus ring to turn to it's maximum close focus position, and not restricted by factory limits. Veiling Flare/ Barrel Glow - Reduction: A common artefact of Kowa lenses in bright light situations seems to be a strong Veiling glare. It is similar to a strong vignette of light that happens when the front optic is hit with off-axis light. Although this can be a desirable artefact, often it is too overpowering to the image when purposely flashing the lens to pop a flare for effect. A simple solution I found is to blacken the edge of the front optic - this is the edge that gets hit by light and pools the image with a 'Barrel glow'. Taking a fine tipped marker pen does the job well (without needing to disassemble lens) - even better would be black paint and a fine brush and a steady hand if you wanted to eliminate glow completely. I personally tried the marker pen method, as you can carefully remove or thin the ink with a tiny amount of lighter fluid on a brush - creating a reduction/dulling effect, rather than remove the glow effect completely. At least it is good to know how to minimize the glow effect, especially when shooting in bright sunlight without a mattebox and you don't want everything to be washed out all the time. Overall Sharpness Improvement: This came from a few year back when playing on another Kowa lens and is the nicest find I've discovered so far (about most projection anamorphic lenses). I found that when removing the brass tabs that are used for alignment, you can separate the front and rear optic assembly for cleaning etc. But If you do not re-install the tabs into the pre-set positions (using the screw holes aligned in the factory) - you can often tweak the alignment and fine focus to be even sharper. As a pure guess, I can only presume that back in the day when most of these lenses were made the tolerances for alignment were only considered for image projection, rather than image acquisition (iscorama/bolex types an exception) I found that by freehand rotating the front optic assembly (when attached to camera) - It is possible to achieve more finite sharpness from the alignment. Using high magnification on my camera and additional magnification on my EVF + focus peaking at a reference at infinity - it was possible to rotate the front element assembly to what is probably fractions of a millimetre from the factory alignment, then glue the brass tabs into a very slightly new position. Glue works well, as it does not require additional holes to be drilled to re-seat the brass tabs, or forever alter the lens. The glue does not bear any load of consequence, mealy seats the tabs to prevent rotation. The lens can be easily returned to its original alignment by dissolving the glue with solvent and returning the tabs to factory position. I’ve found that the very slightest tweak to factory alignment in 3 out of the 4 of these Kowa lens types I've owned, improves the sharpness noticeably.1 point
-
Hey guys, So 2 years ago I filmed a documentary about myself filming at a film festival in France, using my trusty Canon XF100. I then quickly forgot about the footage because I bought a new camera and wanted to edit with that footage instead of going back to the XF. - Bad planning on my part, but better late than never I guess. Recently I found I had some spare time on my hands so decided to actually do something with this film, and here is the result. I'd love some feedback! Is it too long? Does it give enough info? What's missing? Is it even interesting? Disclaimer: I've never spent anytime in front of a camera, so that was a novel experience for me. enjoy! I planned, wrote, presented, filmed, audio-ed, edited and voiceover-ed the whole piece. In fact the only thing that not me is the music... but I did chose it. The watermarked clips, while shot by me, were for another company. Thankfully, they've kindly let me use that footage with the watermark. Please, don't hold anything back.1 point
-
1 point
-
Gear list
EthanAlexander reacted to Kisaha for a topic
I agree. I do that as an exercise as well, having only 1 or 2 lenses with me, or going for a photo shoot (not professional) with only one legacy lens. But for a workhorse combo, that one will use for most things (and that he ain't going to spend his own money for), a good zoom lens can save a lot of time, and money.1 point -
C300 vs F3
IronFilm reacted to BenEricson for a topic
Yes, I own that setup and have used it for about a year. I am working on a long form project, but have done a few random freelance jobs with the setup. I some b-roll here. The first 15 and last 15 seconds have some examples. There is one flaw. The bottom line of pixels flickers in 60p. You have to zoom in to 100.5 to remove it. Other than that, the 60p is not much different than the C300ii in 60p.1 point -

The correct way to expose for SLOG3 when using 8bit cameras
EthanAlexander reacted to Gregormannschaft for a topic
I got a 1/4 filter. Which doesn't have a huge effect on people's skin, a slight, very pleasing smoothing effect. Outside, it's also pretty pleasing, really softens the extreme highlights. The only time it's super exaggerated is when you're inside and there's a bright window nearby - then the highlights tend to bloom quite a lot. I like the effect, and it's probably exaggerated on my shots because I'm also using vintage glass. I think kidzrevil is using a slightly different filter with a subtler effect that you might also want to look into. Either way, whatever you settle on, I think it's a great idea to buy one. I have loved the footage I've gotten since I got one.1 point -

The correct way to expose for SLOG3 when using 8bit cameras
kidzrevil reacted to EthanAlexander for a topic
Cool. Yeah I'm beginning to think that SL2 got a lot of bad rep when really it was SGamut the whole time! Here's a guy that really helped change my shooting and post process: https://vimeo.com/user23501770 I like the poster frame with the new grade, but in general think your manual grade was WAY better BTW, @Gregormannschaft, do you think a 1/8 would have been better? You've convinced me to get one.1 point -

The correct way to expose for SLOG3 when using 8bit cameras
kidzrevil reacted to Gregormannschaft for a topic
I only bought the filter after reading all your posts on here. Has made a HUGE difference. For me it basically simulates the look of higher end productions, improves roll off, tonal graduation. Really top stuff. You're totally right. There's some macro blocking on the wall behind that's very noticeable if you zoom all the way in. But for a smaller sized project where you want good images on a low budget I think it works well. This was a very small setup.1 point -
The correct way to expose for SLOG3 when using 8bit cameras
Gregormannschaft reacted to cpc for a topic
Nice shots @Gregormannschaft But this also illustrates the technical problem with s-log + low bitdepth + compression. Skin is really thin on the last image, for example, and the wall is on the wrong side of the banding limit.1 point -

The correct way to expose for SLOG3 when using 8bit cameras
kidzrevil reacted to EthanAlexander for a topic
Nice grade. Skin's looking good. So are you liking the SL2/SG3.C combo? @kidzrevil1 point -

The correct way to expose for SLOG3 when using 8bit cameras
kidzrevil reacted to Gregormannschaft for a topic
I'm also using primarily vintage glass - I find that with 4K you want as much character as possible in the image, even if it's not technically perfect. So I have a few FD lenses, a lovely Zeiss Jena 35mm and the cheapest lens I have which is probably my favourite - a 50mm Zeiss Tessar f2.8 which I picked up for 20 bucks. So that's what I'm working with, and I've found that -3 is probably my limit in terms of in camera sharpening. I eventually settled on -4 as a happy medium for vintage glass. It could be slightly lower on the A6500 but might be worth a shot. Even -5 made a noticeable difference.1 point -
Blade Runner 2049 bombs at box office
kidzrevil reacted to Bioskop.Inc for a topic
By defending these sorts of films you are legitimising them & their racisit narratives/ideologies. It's very sad in this day & age - what's worse is that they probably don't consider themselves to be racist, but are quite happy to find excuses to defend racism. If you dig a little deeper into what Griffith said about why he made the film, he stated that he wanted to bring to light the injustices of the Reconstruction Years that followed the Civil War - apparent injustices towards Whites by Blacks. Laughable really when we look at the suffering & degredation that slavery brought down upon a people whose only crime was the colour of their skin. I think visually the new film is more stunning than the original, but that might be because it isn't embued with that gloomy darkness of the original. I suppose this difference can be seen as a direct correlation between the themes that lie behind the narratives of the 2 films: the first is a dark & gloomy film (more akin to a film noir type style) that signals the end of an era in replicants; whilst the new one is brighter presenting a more hopeful vision, a new beginning for replicants maybe.1 point -

The correct way to expose for SLOG3 when using 8bit cameras
kidzrevil reacted to Gregormannschaft for a topic
Interesting. That "mushy" feeling was exactly what I've always experienced. When I brought it up to about -4, I found a bit of structure was brought back to my images, especially helpful for uploading to YT or Vimeo. But your footage looks really nice, very organic and sharp. Perhaps on the A6500 it's not such a bad thing to have -7, as you're already downsampling 6k footage. On the A7SII you don't have that. I've also really enjoyed using Geoff's GFILM settings, might be worth a shot trying out for yourself. I'd be curious what you could do with it.1 point -
Yes, the BMD VA can do 1080 ProRes HQ 60fps. It is right there on the spec sheet. So? Even if the Arri Alexa Mini is a couple of odd millimeters or so bigger (and I'd have some health skepticism as to if that is even true, recommend double checking it) , *so what*?? Doesn't matter. I'd be very worried you're wasting money in places if you're basing your hiring decisions on factors such as "having a bigger sensor than the F3/C300". As for PL mount, why? Do you own PL lenses?1 point
-
GH1/GH2 Hack
PannySVHS reacted to Ricardo Constantino for a topic
I can start with this one All G7 with 12-35mm, handheld and flycam nano dslr. Natural all -5, graded with filmconvert and lumetri.1 point -
Always time for another thread ;-) As heck, how many GH series threads are there? :-P1 point
-
Gear list
Kisaha reacted to fuzzynormal for a topic
For me, it's not a debate about what sort of lens offers better IQ. Rather, it's that 1 or 2 focal lengths for an entire production offers a sense of visual cohesiveness. The limitation of focal length, and shooting a manual lens, is ultimately an asset. It's just a notion I currently have and it's where I'm at personally with how I shoot my stuff.1 point -
C300 vs F3
redimp reacted to BenEricson for a topic
Black Magic Video Assist works great if you have the 444 model, 7Q will do 24/60 with dual SDI and the 2016 7Q firmware.1 point -
Kowa B&H Close Focus Mod & other 'Tweaks'
Juank reacted to mdominic20 for a topic
Here's some tips, based on my experience with the sharpness tweak: I'm not sure if this is the case with every lens, but with mine, it was possible to adjust the sharpness without even removing the brass tabs. Just by loosening all 6 screws, but leaving the tabs in place, it created enough rotational play in the front optic for me to fine-tune the sharpness. This is because the holes in the brass tabs are ever so slightly bigger than the screws, so you have a little room for rotation. For me it was just enough. Once you find the sweet spot, simply re-tighten the screws. No glue needed. Be careful that the act of re-tightneing the screws doesn't nudge the optic. This took me a little while to get right. Once everything is tight, check the image again to make sure it's still sharp. As Tito says in his video, it's easiest to judge the sharpness using a long lens at (or near) infinity, and stopped down to 4 or 5.6. In my case, I could never get a sharp image with the Kowa and taking lens at infinity. I had to focus both lenses slightly less than infinity to get a super sharp image. This is very important, especially if you are using a single-focus solution. Don't blindly trust the infinity marks on your Kowa or your taking lens. You might be able to get a MUCH sharper image by adjusting them slightly under infinity. I'm sure this will vary from lens to lens. Hopefully this helps!1 point -
More love for the Sony A6500?
Thomas Hill reacted to markr041 for a topic
More Standard, straight from the camera colors:1 point -

Nikon D850 vs everything
kaylee reacted to Don Kotlos for a topic
1 point -
Yes, sharpness absolutely can be quantified. Image quality is a vague term that doesn't really mean anything from person to person.1 point
-
My personal feeling is sharpness is objective1 point


