Leaderboard
Popular Content
Showing content with the highest reputation on 05/15/2018 in all areas
-
Make it 40... to me this camera doesn’t even exist. Eventually we’ll have footage from John Brawley or Frank Glencairn or Noam Kroll and the footage will look amazing. More people will love it but a few will find something wrong with it... Eventually card info will be released, and more people will complain. Eventually AF tests will show up comparing this camera to the PDAF of the a6500 and more people will complain. Eventually low light tests will show up comparing this camera with the GH5s or the a7sii and more people will complain. At the end, when it’s released, a bunch of people will complain because they hate that they have to use an IR Cut filter and they will complain that they only get 45-60 minutes of battery life and that they wish it had IBIS... And eventually the usual suspects will be the only people that have the camera and the footage will be absolutely gorgeous. The End.8 points
-

Sony A7 III first impressions - what is going on with metering in video?
arson519 and 2 others reacted to Andrew - EOSHD for a topic
A fantastic piece of kit, but this camera is not without issues. Read the full article3 points -

Blackmagic Pocket Cinema Camera 4K
Nathan Gabriel and 2 others reacted to LORDD for a topic
And while people talk about cameras and more cameras, they stop recording and doing work, while others with cameras from 5 years ago, do amazing jobs.3 points -
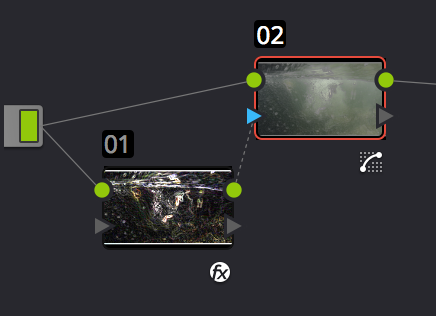
Ok, figured it out. Here's how to key out the edges and apply any Resolve adjustments to just the non-edges. This will allow NR without blurring edges (or any other adjustments you want to make). In the Colour panel create two nodes Add the EdgeDetect OFX plugin to one of them to make it the "key" node (Node 1 below) Connect the video signal like this: Make the adjustments you want to in Node 2 (eg, chroma NR) Adjust the settings in Node 1 to refine the mask that gets applied in Node 2 (I recommend adjusting Brightness to maximum to get a strong mask) The above setup excludes edges from being processed in the node, but it seems like you can also exclude other areas as well by adjusting the masks in Node 2 like qualifiers or power windows too, so you could (for instance) use the above to de-noise non-edge shadow areas by having the Qualifier in Node 2 exclude brighter areas of the frame. Enjoy! I wish I had worked this out before so I could do heavy NR processing without heavily blurring the video!!2 points
-
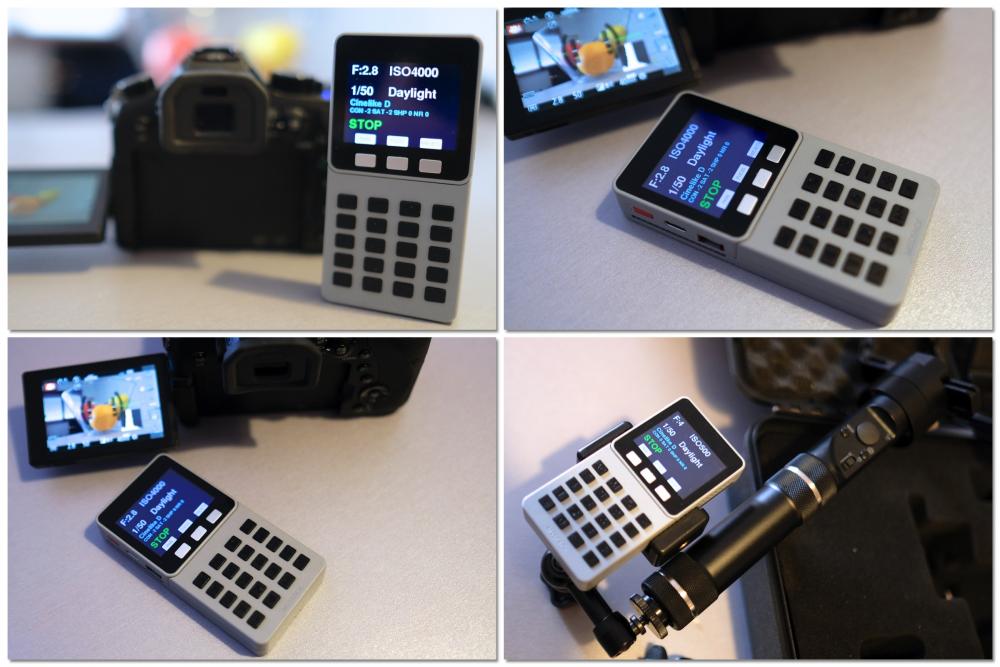
As someone less than politely pointed out on the other thread, I appear to have been a bit of a lazy arse in the almost 12 months since I tripped over and found the Cinelike d thing. You may recall it happened because I was researching making a hardware controller and after several iterations, here it finally is. And yes, it does look rather like a calculator doesn't it? The different iterations (including an Android app at one point!) have been in pursuit of making something small, standalone, self powered, fast connecting, push buttons and with an integrated screen at a lowish cost and, well, here we are. Here is the finished spec and features : Compatible with all Panasonic Lumix cameras that can be controlled by wifi Integrated USB rechargeable battery Full colour screen 20 keys with 3 bank switch keys giving 60 direct switch operations of functions Control of Aperture, ISO, Shutter Speed, White Balance, Colour Profile, Contrast, Saturation, Sharpness and Noise Reduction. Automatic unlocking of Cinelike D and Cinelike V on GX80/85, LX10/15 and TZ10 Control of manual focus in fine and coarse steps Control of One Shot AF Control of Record Stop/Start Store and Recall 8 focus points 4 selectable transition speeds between focus points Store and Recall 8 setup presets (each consisting of Aperture, ISO, Shutter Speed, White Balance, Colour Profile, Contrast, Saturation, Sharpness and Noise Reduction) Presets are stored in non-volatile memory so are available in any session. Boot time to camera connection and control under 2 seconds. Wifi control range tested to 20m. Optional accessories : Interface module to support Nintendo Nunchuck controller for manual focus control (native lenses and adapted lenses with smart adapters) and zoom (integrated lens cameras and power zoom lenses only) Wireless interface module to sync remote record and stop on supported Tascam, Zoom and SoundDevices audio recorders. The controller fits a regular cheap cellphone to threaded adapter holder so as well as being used handheld it can be mounted to anything you have a need for with the right attachment so could be on a cage or a gimbal or whatever. I'm going to be doing some more testing of it in anger in the next couple of weeks and I'll put up a video of it in action then. So, I have been a bit less lazy than first imagined By the by, the controller has both wifi and bluetooth so it begs the question would anyone be interested in a version of it for the Pocket 4K ??1 point
-
I bought the A7Riii and I wanted to make this thread into a resource where I can learn from others and share what I have I've learned. There is enough overlap in video with A7iii that I think it would benefit both camps. I bought mine $300 less than the MSRP via GreenToe. If you're not familiar it's like Priceline for buying gears. You place your price and if it's reasonable, sellers match your price or make a counter offer. I placed a bid for $2750, later increased it to $2780 and I got an offer for $2890 which I accepted. It's from a US Sony dealer. I've also heard people buying some zeiss lenses about $200 blow MSRP. You can go to Greentoe.com or if you follow my affiliate link, I think I get $25: https://gtoe.me/YsjOxVWyaM So I like to discuss camera settings, picture profile people are using, AF settings, post processing, LUTs, noise reduction techniques, etc. I start with what @Don Kotlos replied to my question on his picture profile settings: setting suggestions by Sony Global Ambassador: a setting used by a youtuber: and by another YouTuber: Understanding picture profiles: PDF version: HTML version: http://helpguide.sony.net/di/pp/v1/en/contents/TP0000909109.html Picture profile comparison: One YouTubers recommendation for Cine4 profile settings: Exposing SLOG2 for skin tones: Wolfcrow's explanation and reasoning for his Slog exposure process: Cine4, Slog2/3 comparison video: Some good reads from XDCAM, they're not specific to A7Riii but still very informative: http://www.xdcam-user.com/2014/10/using-s-log2-from-the-a7s-in-post-production/ http://www.xdcam-user.com/2014/03/understanding-sonys-slog3-it-isnt-really-noisy/ http://www.xdcam-user.com/2017/09/why-is-exposing-log-brightly-beneficial/ http://www.xdcam-user.com/2017/09/why-are-sonys-isos-different-between-standard-gammas-and-log/ http://www.xdcam-user.com/2017/12/using-luts-for-exposure-choosing-the-right-lut/ http://www.xdcam-user.com/2018/03/banding-in-your-footage-what-causes-it-is-it-even-there/ http://www.xdcam-user.com/2017/12/more-on-frame-rate-choices-for-todays-video-productions/ Not specific to A7Riii but relevant to getting a correct exposure:1 point
-

My LUMIX Hardware Controller Is Complete
Orangenz reacted to Andrew - EOSHD for a topic
This is quite amazing. Congrats BTM_Pix! It looks lovely and ergonomic. It also has a bit of style. Looks like a Gameboy from the 90's updated for 2018 In a good, minimalist way. I am all for stand-alone physical interface to an app. Touch screen and apps in heat of the moment can let me down. May I ask how many have you made? Would you like a guest blog post about it on front page?1 point -
1 point
-
Kind of like the story of MLraw. I still look at footage I shot with MLraw vs GH5 and think it looks better somehow... and that's comparing 1080p to 4K.1 point
-
Blackmagic Pocket Cinema Camera 4K
TwoScoops reacted to Jim Giberti for a topic
I'm pretty sure that doctors talk about medicine when they're not doing surgery and pilots talk about airplanes when they're not flying. And by the way...shouldn't you be recording and working right now1 point -

Sony A7RIII & A7III tips, tricks and best practices
salim reacted to Don Kotlos for a topic
I have mentioned that before, but I will do again here: When playing with picture profile settings it is important to change the exposure from -3 to +3 stops in order to observe any potential color shits. Some combinations produce more color shifts than others, so adjusting the exposure for skin is a good tactic in general.1 point -
Sony A7RIII & A7III tips, tricks and best practices
salim reacted to Mark Romero 2 for a topic
My limited input is basically just a recap of wolfcrow's hour-long video on slog 2 exposure (which is well worth watching): In a nutshell, use spot metering and expose whatever you consider important at 40 IRE or above, and set your zebras to 70 IRE for your skin tones (for Caucasian folks). He cautioned against the generic "expose two stops over" or the generic "expose to the right" because you might have inconsistent skin tones (and he was assuming that is what most filmmakers would care about), and with inconsistent skin tones one would have to do more work to match skin tones from scene to scene. That kind of makes sense to me. Say you have a shot with someone with darker skin and a not overly bright sky, and you just expose two stops over (or you expose to the right using multi-segment metering). Then your next shot features a lighter-skinned actor and a bright sky, and again you decide to expose to the right. The overall exposure is lower than the scene with the darker skinned actor and the dark sky, and the skin tones will be off. He mentioned that slog 2 was designed to have a filmic look when handling highlights / over exposure Anyway, I have watched it like three times and that seems to be the main gist of it. The info also seems to jibe with the information from the article by Allister Chapman that you linked to here: http://www.xdcam-user.com/2017/09/why-is-exposing-log-brightly-beneficial/1 point -
I still use the LS300 almost daily for interviews. It's a great camera, and I've said before, I prefer using it to the FS5, although that might be due to lens choices on either cam. We only have the Sony 18-105 on the FS5, which I hate, but the LS has Sigma 18-35, and Canon 50mm 1.8. So that's of course going to change the image ALOT. As far as if that camera is a good buy in 2018, I wouldn't buy it again now, unless they can squeeze RAW output. It's been a great cam for me in the 2 years I've had it, and I've loved using it every time I have, but with the little devil of a camera coming out (hopefully) soon, I'd rather get two of those than an LS300 with the Ninja V. I'll definitely keep and use my LS300 for a little longer though, it really is a great camera and I love the form factor.1 point
-
Yes, and that also says something about state/need of readers/listeners of a good story1 point
-
Hang on a minute - I never agreed to that!! Show me evidence in writing!! **jumps up and down demanding evidence in true EOSHD style**1 point
-
I have both the 1dx2 and c200, it defenetly a step up from 1dx2. Way more DR, cleaner footage etc.1 point
-
It is very strange that a product so late in its life cycle is getting such a significant push behind it. I am going to put on my tin foil conspiracy hat (my favorite hat to wear!) and put forward a theory: The JVC LS300 mk2 is not too far away down the road... perhaps nearer the end of this year? However the JVC300 never saw the success it deserved, thus JVC is behind the scenes trying to give the LS300 one last push to gain attention for its efforts to then use as a platform of existing interest in JVC cinema cameras to build off from when they launch the LS300 mk2. Rather than letting the JVC300 languish and disappear, then having to restart again from scratch in getting people's attention to be interested in the new LS300 mk2. Just saying. Exactly.... it is so weird this sounds like a conspiracy! ;-)1 point
-
@kidzrevil what is the super scale feature? And what program do you use for Chroma Noise? I can usually fight it with ETTR but as I am starting exterior night shots in my film, I’m afraid of that blotchy chroma noise in the shadows. @squig in that scene you shot for your film where the guy was tied to the chair, did you have a lot of shadow noise? I assume you lit that scene but I remember the scene was designed to have pockets of light and shafts of shadow, were there any issues, or did your lighting design compensate for ETTR and chroma shadow noise?1 point
-
Thanks! The ISO noise in the RAW files is a COMPLETELY different beast from the ISO noise when using the same ISOs in Canon stock video mode. This noise is filmic and soft and, perhaps most importantly, has a fine texture. That same noise once scaled and compressed in the Canon stock mode is just horrible. In the above video I did do NR and added some noise before export (on the recommendation from @kidzrevil) but even without that treatment the noise isn't a bad thing. One thing you might want to do though is to remove the chroma noise (colour noise) which doesn't have that nice feel.1 point
-
Mumps with the Kowa 16h/8z/B&H
Zalem reacted to Bioskop.Inc for a topic
"Anamorphic Mumps" occur when you're doing a close up of, say, a person & was a common feature of early Cinemascope lenses, which was later fixed in some makes, but not all. The Mumps doesn't appear at longer distances. It's basically to do with the fact that at closer range, you loose the x2 squeeze ratio & when you go to desequeeze in post you get the mumps. What @ken, said is probably correct - the fact that they were also projector lenses would have meant that they would hardly have ever been used to project at close range. Don't know if one Kowa branded adaptor is different from another, but am guessing that they won't be - I was always led to believe that the B&H branded ones just had better QC on the glass used. So, I'm guessing user error/misunderstanding is to blame for the examples of the mumps that you've seen on the B&H, rather than one example being worse than another. This is common when people start to use anamorphics & is compounded even more by people using wide angle lenses with these attachments to do close ups. So many quirks, not enough time or energy to explain everything. The mumps is summed up best thus: "The Problem and the Fix... The problem was called "CinemaScope Mumps", in which the center of the image received less horizontal squeeze when the lenses were focused at short distances. When projected, the center of the image was expanded more than its original compression. In the early days of anamorphic photography close-ups were avoided. When they were deemed necessary, the actor was placed either to the right or left of center where the inconsistent squeeze would pose no problem. It is easy to see what Gottschalk and his team at Panavision were able to accomplish. The upper image is a close up taken with an early Bausch and Lomb CinemaScope lens and the lower image is a 35mm reduction print taken from the newly developed M-G-M/Panavision process. We can thank Panavision that this beautiful woman and all others photographed with anamorphic lenses don't look like broadcaster Cokie Roberts. This promotional photo was produced by M-G-M to promote the new system. The difference between the two photos is at the same time accurate and deceiving. While the system did yield a CinemaScope compatible print without the distortions of contemporary Bausch & Lomb lenses, in fact the low anamorphic squeeze factor of 1.25x would never have created such distortion had it been applied to the B & L design. By the same token, the prismatic anamorphic design would also never create the distortion even if it was 2:1." (above quote taken from) http://www.widescreenmuseum.com/widescreen/wingup1.htm And David Mullen's explanation: "I don't know the exact mechanics but the squeezed bokeh is actually the byproduct of fixing a problem with early CinemaScope lenses, called the "anamorphic mumps". Basically what happened was that as you focused near minimum, like for a close-up on a 50mm anamorphic (the first focal length made for CinemaScope), the squeeze ratio dropped below 2X. But the unsqueezing is always a consistent 2X by the projector, so the end result was that faces looked slightly fat in CinemaScope. Panavision solved this with some cams in the lens barrel that compensated as the lens rotated towards minimum focus so that the object in focus is always squeezed consistently by 2X -- but the side effect was that objects out of focus now got squeezed more than 2X and thus look skinny when unsqueezed by 2X during projection. John Hora explains it in the ASC Manual. It has something to do with the fact that the vertical plane of focus is spherical and thus focuses at a different point than the horizontal plane of focus which comes from the anamorphic elements. Using two astigmatizers and counter rotating the anamorphic elements when focusing, Panavision kept a constant 2X squeeze on the subject but caused out of focus objects to get more than a 2X squeeze. So the squeezed bokeh effect is more obvious as you focus closer and when shooting at wide apertures, which is why the lens breathes as you rack focus." (above from) http://www.reduser.net/forum/showthread.php?99606-ANAMORPHIC-ARTIFACTS-amp-SQUEEZE-RATIO-QUESTION/page21 point -
Blackmagic Pocket Cinema Camera 4K
Emanuel reacted to MurtlandPhoto for a topic
39 now... because it still needs to be said. It's insane to me that people are actually analyzing this footage.1 point -
As for frame drops in that test shots, why don't we take into consideration that, that unit was pre-production model, it might not have been fully ready (both software and hardware)?1 point
-
Hey austinchimp, how do you like V2? By the way, I want to recommend to all Premiere users to avoid the Lumetri Luma curve. Instead use the Shadows/Midtones/Highlights sliders of the Color wheels section, or Obsolete RGB Curves. This was added to the PDF for V2. One of the elements of the project is to identify anything which will compromise the color pipeline, to ensure everyone is getting the best image, despite NLE. When I was coding the color engine, I implemented a 'common sense' algorithm to alter luma. It turned out, I had a lot to learn. The common sense algorithm was distorting the color space, and I was distraught for two weeks trying to figure out where I went wrong. It nearly destroyed me. I figured it out; that color and luma are intrinsically interlinked. A month later, in Premiere's Lumetri luma curve I recognized the same common sense algorithm. They didn't catch and fix it. The Color Wheel section's sliders are much better in this regard: Luma Curve Shadows/Midtones/Highlights Sliders - No color modification1 point
-
New music video for British legends "The Damned", shot on GH5
graphicnatured reacted to Oliver Daniel for a topic
The video was shot with a single GH5 (with a little A6500 in there) in 10 hours, edited, graded and effects done in 4 days (by me). The new album (last I heard) was at No.7 in the official UK chart. I'm a big fan of what Panasonic has done with this camera. That said, the shining star of this video is the band.1 point -

Cinemartin Fran 8K Global Shutter Camera
Xavier Plagaro Mussard reacted to Grimor for a topic
Cobarde, pecador!!!1 point -
Heh, I just today got asked "WHAT ARE YOU DOING??" when I pulled out my iPhone to snap a few pics in a pet shop to send the pics of kitties to my gf on my FB messenger. But once I explained it to her though, she was all cool with it. Anyway, my point is you can get given sh*t for using ANY camera! Just ignore the haters.1 point
-

New music video for British legends "The Damned", shot on GH5
graphicnatured reacted to Teemu for a topic
Great work, nice images! This was done under Jäger Music right? I noticed the Jäger logo in the beginning. Could you share what kind of budget that Jäger Music was providing if involved. But I understand if you can’t share that information. Shot on what glass? My experience to fight against this a lot talked about ”digital look” is done by choice of lenses to use. Quite obvious. But that, lighting and art design makes a big difference. My recent musicvideo shot with GH5 with Kowa anamorphic:1 point



.thumb.jpg.13b1725740b37b01ce877de62c3ad4fa.jpg)
