Leaderboard
Popular Content
Showing content with the highest reputation on 10/30/2020 in all areas
-
Canon Cinema EOS C70 - Ah that explains it then!
Adept and one other reacted to currensheldon for a topic
This does look great. Hard to argue with this camera. Canon has been on a roll (outside of the overheating R5 debacle), and this camera may be their best offering in their year of amazing offerings (C500 II, 1DX III, C300 III, R5, R6, C70 and a silly amount of lenses).2 points -
I think this is the best sequence so far for showing the camera in a variety of situations:2 points
-
Nikon Z6ii and Z7ii are to shoot 4k blackmagic Raw 60 fps
SteveV4D reacted to herein2020 for a topic
That makes sense, I rarely shoot weddings they just don't pay enough in my area, but I do shoot a lot of random weird projects that typically need b-roll that I can use from a different project. Also I live in FL...we don't have a winter or a summer it all looks the same year round, so even that works for me. Its always interesting to see how other's workflow works based on their geographic location and the types of work they do. For weddings you definitely cannot reuse most if any of that footage so I'd skip metatags too in that scenario.1 point -

What are the 'correct' skintone values in IRE for HLG acquisition?
Mmmbeats reacted to hyalinejim for a topic
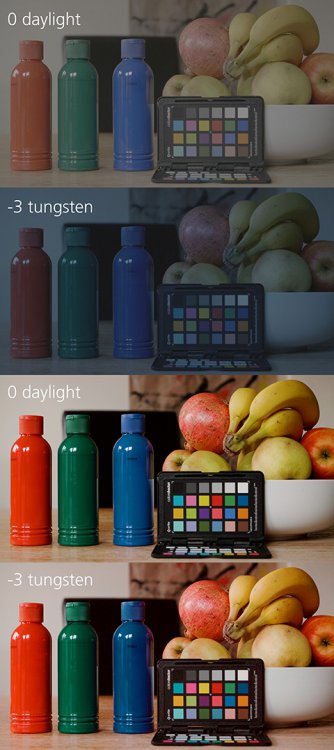
I also do a lot of run and gun type stuff and don't have time to be faffing about with getting perfect exposure. I take a glance at the exposure meter (with the camera pointed towards the ground rather than the sky), the zebras (set to 80 so I can see what's actually clipping in the file) and sometimes I switch on the waveform for a quick look at that. And I also base a decision on the LCD or viewfinder (it's quite easy to see if things are overexposed but underexposed can still look fine, so it can be misleading). So I end up with a variety of exposure levels but I'm usually within one stop. Sometimes it's two stops, which is pushing it a bit, but that's life! When it comes to colour correction, having something two stops off in V-Log can be a real pain in something like Lumetri in Premiere. The exposure slider does not behave like, say, the exposure slider in Lightroom when adjusting RAW. So the best way around that I've found is using an ACES workflow in After Effects, where as if by magic you can reliable make RAW-like (ie; rational and consistent) adjustments to exposure, contrast and white balance. And if I'm feeding the signal into a good LUT, then that's all I need. It's an extra step in the workflow though, so usually I don't bother. Or don't need to, if I've already got exposure and WB quite close while shooting, so that Lumetri doesn't fudge things too much. I imagine that in Resolve it's possible to make proper adjustments to Log or HLG (so that if I underexpose 2 stops I just need to add +2 in post and I get the same image, but noisier, than if I had exposed correctly)... but I haven't made that move to Resolve yet. But it's a real pleasure to be able to do that when needed. Here's an example of the same scene shot at correct exposure with daylight WB, and then 3 stops under with coolest WB. This would be a nightmare to correct with conventional methods but with ACES it's very, very close. There is a red tint in the darkest areas of the corrected underexposed shot, but I think that's due to red chroma noise being boosted.1 point -
Nikon Z6ii and Z7ii are to shoot 4k blackmagic Raw 60 fps
Geoff CB reacted to herein2020 for a topic
My C200 shoots RAW and I've never shot a project that needed it. As others on this thread have mentioned, personally I think RAW is overrated, the H.264 options are good enough for my clients and everything I do in my workflow is for speed. I use folder organization for speed and storage efficiency, I use metatags for speed and searching efficiency regardless of where the footage is stored, etc. My camera choice and codec is not dictated by VLC at all, it just so happens that VLC has always been compatible with my camera choices and codec. For example I tested the R6, if it had worked out for me and was perfect for my uses I would have switched to the 5K player and kept the R6....but as it turned out it did not meet my needs in any way. I'm not shooting the next Hollywood blockbuster, I am shooting for clients that are not paying me 1 penny extra if I take longer to complete their project or if their project size is 500GB vs. 10GB, and those facts are what dictate my camera choices and workflow. I was perfectly happy with 8 bit from the GH5 and the only reason I am shooting 10 bit now is because the S5 can do 10 bit 4K60FPS. If internal RAW becomes the norm, by the time I start using it (5-10yrs from now) if ever, then there will probably be a way to add support for it in the Windows OS just like they support RAW photos so if I ever do make the jump to RAW my current workflow will probably support it just like it supports 8 bit and 10 bit LongGOP. If you WB properly and get the exposure within the limits of the sensor's dynamic range you can make most H.264 footage look just as good as most RAW footage. I went into more detail with my particular workflow here: https://www.eoshd.com/comments/topic/47655-davinci-resolve-lock-adjustment-layer/?tab=comments#comment-381308. This is just my opinion, but the spreadsheet approach sounds terrible to me, I'd much rather be able to just type into a search field and find every single clip with a waterfall in it across 100TB of storage and 6 different storage locations and hundreds of projects vs. looking at a spreadsheet; and my current workflow lets me do that. It also lets me clean up my storage once a year across all of the projects for the year by deleting every single clip and every single image across all of my storage devices that was not used in the final project. As far as VLC being quirky, the R6 was only the second time that I had any problems and that was because it shot H.265 which cannot be HW accelerated. The only other time I had problems with VLC was with the GoPro H.265 footage and for that I also have to use the 5K player.1 point -
What are the 'correct' skintone values in IRE for HLG acquisition?
hyalinejim reacted to Mmmbeats for a topic
Yes, that's more or less the technique I used, though middle grey has a slightly different reference point for HLG (38 IRE is what I used). The way I usually do exposure is by looking at the talent and figuring out where I want their skintone relative to 'normal'. This is influenced by whether or not they are in shadow, whether it's a moody scene, the shade of their skin, etc. I rarely drop it more than a stop below 'normal'. Once that is established, I take a look at the highlights and whether they need protecting. If they do, I make some kind of compromise - either I allow some elements to blow out, or I allow the skin tone to drop further than I would like. This just depends on the aesthetic of the shot (for example I might let quite a big window blow out, but I would hardly ever let a big section of sky blow out). Finally, if I think there is important stuff going on in the shadows I might make an adjustment to try to help them a bit (while making sure to continue to protect the highlights). I very often skip this stage and just let the shadow area fall where it may. Sounds long winded written down, but all of that happens very quickly and automatically. I prefer to use false colour, but am happy to use zebras if that's all I have access to. As you say, spot metering is a really good alternative too (though you have to work out over/under values to make it work on most of the cameras I use). No way am I faffing about with a grey card - I want a technique that works the same across events, doc, fiction, etc. (obviously there are somewhat different approaches required for each). If the skintones are in the ballpark of where you want them in the final grade then I find the post route is a lot more straightforward. You're also less likely to damage them by pushing or pulling. That's another reason why I prefer them as a starting point for exposure than middle grey. Having said that, I do sometimes push my exposure up a bit if I have the headroom - a kind of ETTR-lite! (the coward's version 😉). I don't really think that 'exposing properly' means always providing end goal exposure levels in-camera. It's virtually impossible to preserve both highlight detail and ideal skin tone exposure in a large percentage of shots, unless you were to shoot on an Alexa or something (out of my budget range!).1 point -

What are the 'correct' skintone values in IRE for HLG acquisition?
Mmmbeats reacted to hyalinejim for a topic
I don't know for sure, but if X Rite says that the second large chip is "40 IRE" then surely it must be 18% grey.1 point -
Got mine ordered. Hope delivery will stay on schedule. I have a no budget feature I'm starting in the New Year that this will be perfect for.1 point
-
Hey Sven, I was lucky and purchased the camera directly from a friend who was not using it. Gave me a great deal on the condition that I not turn around and sell on eBay for a profit because I've been working with him. Always good to buy used from keh/adorama/b&h. Saw a good deal on a S1R +24-105 on ebay that currently has some low bids, which is supposed to get a 5k update soon, but that is a roll of the dice.1 point
-
To follow on from this, does anybody in the UK? I pre-ordered in mid-September from Jessops and they still haven't received stock...1 point
-
So true. Screwing around with VNDs and lens hoods/clamp on matte boxes is a PITA. But unless you've got internal ND control, a VND is a must in a fast-moving doc style shooting situation. Just another reason why the C70 is an attractive option for a low-budget pro shooter, if you can swallow the Canon pill.1 point
-

Development Update - AFX Focus Module For PBC
BTM_Pix reacted to chico braz for a topic
you guys ever think about adding sensors on actors or objects (that could be in any area of frame) and incorporate that with your technology , to get even more solid focus system , that would be a dream , maybe you guys already planing on having options for this system.Thanks for making this possible1 point -
No, as with the the electronic lenses on the P4K/6K, everything is done on the AFX itself with the controller. You tape a focus target on a wall (nothing fancy, anything contrasty will do so you can just put a piece of newspaper up if you want), focus the lens at minimum focus with the controller operating the focus movement, mark the point using the A button on the controller and this stores the focus point with its associated distance. Move back, re-focus, re-mark etc until you reach infinity and thats it done. Takes no more than 5-6 minutes per lens and only has to be done once as the calibration is stored on the AFX in its database and re-loaded when you put that lens on. In the case of the P4K/6K it is done automatically as it can read the lens name but for motor versions you just select it from a list. If you want to re-calibrate for any reason, you can pick the particular lens from the database in the setup menu, delete it and re-do it. As above, no app required as everything is mapped to buttons/joystick positions on the controller. Left Stick - Toggles between AF-S and AF-C Right Stick - Cycles through focus transition times for QuadLock Stick Up/Stick Down - Manual Focus (far/near) Top Trigger - Record Start/Stop (P4K/P6K Only) Bottom Trigger (Short Press) - AF ON/OFF (in AF-S mode re-triggers focus) Bottom Trigger (Long Press) - Engage/Disengage QuadLock focus target limiter A (Long Press ) Store current focus position in QuadLock Position A B (Long Press ) Store current focus position in QuadLock Position B C (Long Press ) Store current focus position in QuadLock Position C D (Long Press ) Store current focus position in QuadLock Position D A (Short Press) Move focus to QuadLock Position A (sets target to A if focus target limiter engaged) B (Short Press) Move focus to QuadLock Position B (sets target to B if focus target limiter engaged) C (Short Press) Move focus to QuadLock Position C (sets target to C if focus target limiter engaged) D (Short Press) Move focus to QuadLock Position D (sets target to A if focus target limiter engaged) In addition, the operation mode for buttons A,B,C,D can optionally be set to Command mode for P4K/6K where functions such as Aperture/ISO/WB etc can be mapped to them.1 point
-
The 40mm and 28mm along with the 20mm 3.5 and 90mm 3.5 is my favorite set of lenses. Great separation, smooth rendering, and extremely light. Highly recommend them. With low light performance getting better and better I think they will become more and more useful.1 point
-
You do this after you've got "a best" mic. That's when you acquire even more.1 point
-

Sony PMW-F3 with 2500 hours on it. Should I buy it?
TheRenaissanceMan reacted to IronFilm for a topic
As soon as the FS7mk1 got released, that killed the resale value of the F5. Made many F5 owners pissed. Have done that hack myself! But would be a rare and unusual F5 for sale that hasn't had the normal paid update to do 4K. Yes, but no, depends on how much a person wants E Mount and lighter weight. In most other regards the F5 is better than the FS7. At US$4K-ish secondhand, if you're a working professional in the right market segment to move up to an F5, then it could still be a good ROI for you. (although yeah, the far more popular FS7 would likely do a better ROI for you)1 point -
The URSA Mini Pro 12K
TheRenaissanceMan reacted to majoraxis for a topic
First off, this is a great question, which I had not thought about from a cost benefit ratio. If the question was: would you purchase this camera to shoot a conference - I agree, it would not be my first choice. Regarding the technical benefits of using this camera for shooting a conference, The entire URSA mini pro line, due to b4 lens compatibility options, makes it a good choice for shooting a conference. If I were purchasing a Blackmagic camera on that basis alone, I would probably buy the URSA mini broadcast. if I owned a 12k and it was not being used on another higher paying job, I would adapt a b4 lens to it and shoot the conference. Seems like this would also be cool for shooting concerts or festivals, if shooing all day was a requirement, shooting at lower data rates may be just the ticket. (Pun intended.)1 point -

The URSA Mini Pro 12K
TheRenaissanceMan reacted to Neumann Films for a topic
To rationalize charging more 🙂1 point -
Panasonic S1 V-LOG -- New image quality king of the hill
PannySVHS reacted to HockeyFan12 for a topic
1 point


.thumb.jpeg.76adb14c4cec25a39ed619b0761133b5.jpeg)
.thumb.jpeg.705b8048d6327458371504694b1fb8be.jpeg)
.thumb.jpeg.e0bf90166db1960511e663975168b94a.jpeg)