

BTM_Pix
-
Posts
6,140 -
Joined
-
Last visited
Content Type
Profiles
Forums
Articles
Everything posted by BTM_Pix
-

LOG, IBIS, 10bit, AF, does it really make for better footage?
BTM_Pix replied to Andrew - EOSHD's topic in Cameras
It refers to the reflexive and tedious whataboutery responses on forums when someone mentions a camera that doesn't have some or all of the features listed in the original post. In most cases the dismissal of the camera in question based on these omissions is also based on zero actual direct experience with it. -
LOG, IBIS, 10bit, AF, does it really make for better footage?
BTM_Pix replied to Andrew - EOSHD's topic in Cameras
But her emails ? -
Leaving aside the variables of the user, the focal length and aperture of the lens, lighting conditions etc it is no more difficult than on any other camera. It has focus peaking in a range of colours and variable sized PIP so it has the tools to assist. As with most other mounts (aside from Nikon Z obviously) adapters with electronic control are very limited. When I say limited I mean there is only one to my knowledge which is the Novoflex which works with a very limited range of the newer Nikkor E-type (as opposed to E series) lenses but no third party lenses. Oh and its €600 https://www.novoflex.de/en/products-637/lens-adapters//adapterfinder-products/adapter-nikon-e-type-nikkor-lenses-to-leica-sl-cameras.html?rgerg=38 Manual focus adapters are, as with other mounts, cheap and abundant.
-
Panasonic 24-105 and 70-200 both have IS as do the longer Sigma zooms but thats about it. However, the very practical two in one solution for the Fp (or anyone that doesn't want to take the risk of unpredictable and uncorrectable image artefacts from an IBIS system) is the Fotodiox EF-L adapter which lets you use the plethora of EF lenses that have IS, retains the AF capability and also includes a variable ND built into the adapter. For reasons unexplained, but which come with dire warning from Fotodiox, just don't ever ever ever put it on a Leica camera.

-
Did you ever get that PZ E-1 servo zoom adapter for it?
-
Got rid of the pinned topics, contribute your ideas next
BTM_Pix replied to Andrew - EOSHD's topic in Cameras
Wonder if it might be worth picking up the RX100 style GC100 Android compact they did to experiment with that ? They are cheap and plentiful on eBay and it seems you can root it. https://androidmtk.com/root-samsung-galaxy-camera-ek-gc100 -
Got rid of the pinned topics, contribute your ideas next
BTM_Pix replied to Andrew - EOSHD's topic in Cameras
If you've still go it then it would definitely be worth doing a retrospective review blog post about it ! -
Got rid of the pinned topics, contribute your ideas next
BTM_Pix replied to Andrew - EOSHD's topic in Cameras
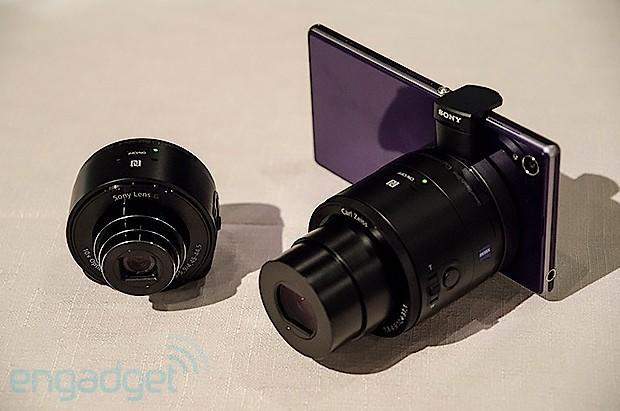
Or just drip feeding depending on your level of cynicism 😉 The mad thing is that Sony had the integration solution between real cameras and smartphone nearly 10 years ago with the QX cameras. It was possibly ahead of its time when it launched but I've no idea why they haven't resurrected the concept in the meantime.
-
Got rid of the pinned topics, contribute your ideas next
BTM_Pix replied to Andrew - EOSHD's topic in Cameras
Panasonic announcing that they are now officially exiting the sub GH6 market completely is the official end of that era. Their rationale is that anyone wanting to take high quality photos and videos will now buy a €1200 smartphone. I'd sooner have a €1000 camera and a €200 phone but I'm not the market so I can see their point. They caused this themselves by still even now having terrible integration with phones when the writing has been on the wall for years about how people would make and share imagery. -
The state of the art - which still doesn't actually match the requirement of full RAW shooting at 24fps - would be the Sony A1 which in APS-C mode can shoot at 20fps in compressed RAW with an unlimited buffer. Not a small price but neither is the requirement. There is also the matter of the memory card usage and battery life restricting the practical usefulness of it. The €400 160gb CFExpress card will give you five minutes of that 20fps APS-C compressed RAW storage but the bigger issue being the battery on the A1 being rated at 430 shots which will give you about 21 seconds of footage before it gives up the ghost. It may be that interpolation improves dramatically over the next few years but it will likely still take something fairly high end (i.e. a sports camera) to make it viable because even at a reduced frame rate it will still need a big buffer so until then the closest option is paying €7.5K for a camera that shoots just above the frame rate of a Super 8 cine camera and chews memory cards and power at an alarming rate. There is, of course, a stills camera that exists that gives you a "burst rate" of up to 30fps RAW in full frame with very modest power requirements and far more affordable media where that €400 will buy you closer to five hours of footage rather than five minutes. For about 20% of the price too. To demonstrate the diminishing returns of stills RAW burst vs internal RAW on the same camera, I've just taken this comparison of an uncompressed RAW in stills mode on my Sigma Fp with the 12bit cDNG RAW frame in cine mode. For me personally, such differences that are there are definitely insufficient for me to take the ball ache of trying to make the stills mode into a cine mode.
-
There is nothing off the shelf but what you need to do is fabricate a simple box shroud that protects the ports from being touched in transit. Something like this very crude representation I've done here. Obviously you would have holes in it in the required positions to enable the cables to pass and make it sufficiently deep so that the ports are far enough away. To make it easily removable/re-mountable then take advantage of you having a cage and put magnets around the base of the shroud. These will provide sufficient strength to keep it in place when knocked into but make it easy to remove by hand. In terms of actually designing it, if you are comfortable with 3D design then you can do it yourself or use Fiverr to find someone who will design it to your spec. As it is a very simple design then it will cost around €10-15 for this service. In terms of it then being made from the design, there are a ton of 3D print bureaus that will handle that for you and they have a range of different materials from Nylon PA12 plastic (which will be the most appropriate one for this) up to more exotic metal replacement materials. Price is dependent on the size of the finished design and the 3D print bureau (local in person service will likely be more expensive than an online provider) but I'd guestimate at sub €40 as a one off part.
-
It likely won’t be for a lot of other people either. These days I wouldn’t as I don’t do that work anymore but when I did there would be a number of scenarios where it would have been an issue when I was looking for maximum coverage on a job. Press conferences for example when the team manager/player/fighter/rider etc are being asked questions I would be filming the answers and taking stills during the translation of the question. Boxing press conferences are where the fast ability to switch between modes as you never knew when it would kick off between the two fighters. So you’d be taking stills of both as some benign question was being asked and then the answer might cause a table turning chair throwing brawl. The switchover time in that instance would be a major issue with a big financial hit. Training sessions would be another one as you are only allowed in for 15 mins and have to make the most of it. Filming players half heartedly jogging about leaves you with functional but barely sellable footage so you make the revenue up with profile stills of the players which end up having a longer shelf life in the agency library. So, whilst it’s moot because I don’t do it anymore, the R5 would be the better solution for my needs. The more salient point for me, though, is how Canon made a virtue out of the cine/stills switch in their launch video showing users merrily switching between modes to no doubt push its “modern content creation requirements” whilst in no way reflecting the time it takes to switch. Not the biggest piece of dishonesty they’ve done with the R5 range of course but a shithouse trick nonetheless.
-
And with the R5 you don’t have to give it two days written notice if you want to switch from cine to stills mode.
-
Reading the leaked sensor spec sheet, it is a special mode designed for shooting cinematic B-roll of the legendary and ubiquitous Ikea bookcase.
-
There are some here. Can't vouch for them if they are any good but the reviews look OK https://www.aliexpress.com/item/32662428205.html
-
To be fair @kye I was answering @leslie question about what it was he had seen. And also saying that it would not be sufficient to cope with that amount of movement you are describing which by extension would not be able to protect the camera. Back in the mists of time when dinosaurs and DJI Phantoms without integrated cameras roamed the earth, we all used a product called MoonGel to try and offset the vibrations coursing through the direct mount to the GoPro. MoonGel was originally a dampening solution for drums and when placed between the drone and the mount was quite effective in reducing the jellovision produced by the GoPro getting vibrated to within an inch of its life during flight. If you are fashioning/modifying a mount for the scooter then you might want to look at incorporating a similar solution to reduce the vibration transmitted to the camera. With regard to the GX85, the big danger will come if you ride along without the camera being powered at any point as without power the sensor will be left to flop about which will potentially cause a problem. Worth remembering that the GH5s came about in large part, apparently, because shows such as Top Gear wanted an IBIS-free version of the GH5 to deal with the vibration issues shooting in cars causing a problem with the image of the IBIS version so if you have got a non-IBIS camera then I would probably look at that as an option.
-
I think you might be referring to a z axis stabiliser add on ? I did this quick test of the Ulanzi one for my Osmo Pocket here. It certainly helps with the bobbing when walking with an Osmo Pocket so also helps with other types of shots where there would be unwanted up/down motion. It can be modified easily enough for an iPhone but whilst its good (and tuneable) for controlling the unwanted motion, I'm doubtful how useful it would be with more extreme cases.
-
Yeah, you can't draw back the curtain for normal people to read what goes on here 😉
-
The WD disk I use is the 1tb version and there can be speed differences with the lower capacities of some drives so that could be an explanation. With the drive/enclosure combination that I am using I can record 12bit/24fps cDNG until the battery or drive space runs out so it could be in play here. However, I have also had problems in the past with T5s with cables so that is something to check if you have a different one around. With regard to the higher frame rate stuff, its not something I use but testing it just now I did experience issues at 100fps up where it would record for a short time and then stop. I resolved this in the following way : In SYSTEM1 menu, there is an option setting called "Memory Media" where you can select between "Standard" and "Custom". Switching it to "Custom" is to enable you to use a broader range of media than their authorised ones. When you are set to "Custom", the USB indicator on the screen is lit in orange instead of green. It might well be that changing to "Custom" will resolve both your long 4K recording and unable to do any recording above 60fps issues in one fell swoop.
-
I have this one and its a solid all round option for general use, particularly when travelling. These frames are from using it on my OG Pocket.
-
I'm guessing that you originated the C settings whilst in one of the PASM modes then? When you do this, then upon recall of the C setting you are locked into the exposure mode with which it was originated, hence why the option is greyed out. It is only when you originate the C setting whilst in Movie Mode, that you are then free to change the exposure mode after you recall the C setting.
-
MENU>>VIDEO CAMERA ICON>>PAGE 2>>EXPOSURE MODE When you've changed it, then go to the first Wrench menu (with the C next to it) and overwrite it in Cust.Set Mem. in the same slot if you want to make it permanent.
-
I got them both locally for a few Euros cheaper but there's not a huge amount in it with Amazon prices and prices do fluctuate a bit. https://www.amazon.es/WD_BLACK-SN770-hasta-velocidad-lectura/dp/B09QV692XY https://www.amazon.es/Sabrent-Carcasa-Type-C-Tool-Free-EC-SNVE/dp/B08RVC6F9Y Pretty sure there are better deals out there and some savings could be made by buying one of the many alternatives to the Sabrent, particularly on Aliexpress.
-
Depends on the camera/cage and situation but for me personally it would impede the quick release plate that I would generally have on for monopod/tripod/gimbal mounting. Will likely end up with flat or coiled but as either of those would need a few different ones being bought to test with (USB C cables that look pretty can often be flaky as I've found out to my cost) so I wouldn't rule out the existing cables with plastic cable ties looped through the cage holes !
-
I've got a bunch of Samsung T5/T7 drives for the Fp and Pocket cameras and, as small as they are, they are still a bit cumbersome and in the case of the T5s I've had a couple fail on me. This is not exactly a unique or challenging DIY project to make my own alternative to the T5/T7s but thought it might be useful for anyone looking for something similar that is both faster and, for my purposes, a bit more ergonomic. Enter the Sabrent NVMe enclosure and the WD SN770 NVMe drive. The Sabrent takes both SATA and NVME in sizes 2242/2260/2280 and is tool-free so you just pop it open and then insert the drive. Once you've done that, simply snap the case shut again and you have a ready to go drive which, for me at least, is a far better form factor than a T5/T7 for mounting on a camera and is easily swappable in the field for another NVMe if you run out of space. To be able to mount it to a camera, I decided that the most appropriate and versatile route would be via a standard 1/4" 20 thread so I designed and resin printed an adapter that will take a screw and which is then bonded to the bottom of the drive case. With that in place it can now be mounted to the camera cage horizontally or in the case of the Pocket cameras, directly into the thread on the top of the camera. For my own use, I much prefer mounting it in this orientation but, of course, with it now having the 1/4" 20 mount it can be mounted anywhere. In terms of price, the 1tb drive and the housing came to around €125 so it is certainly very competitively prices compared to the Samsungs. Oh and there is the small matter of the quoted write speed being 5,150MB/s which makes it significantly faster than even the gen2 T7's speed of 1,000 MB/s. In terms of actual real world performance, I shot all day with it on the P4K earlier in the week at 5:1 BRAW and it didn't miss a beat. As I say, not unique, not challenging and not for everyone but it fills a need for me. Some better cable/cable management required now though.


.jpg.72fda1558c636f0aa161fe3851a5e4a9.jpg)
.jpg.00d46988ebfa2d2f123321a736dc5b9e.jpg)
.jpg.ec6e7c3cbe513888828f9bc372f704d9.jpg)
.jpg.fe23bc890625598c60a12bce1463212b.jpg)
.jpg.18f4c8c813c6b96cb0d6d5e3bd60fa22.jpg)
.jpg.5b975f1a575226187dce8067f690e5cf.jpg)
.jpg.301b86693f2344ead4f2f882d920ce24.jpg)