kye
-
Posts
8,224 -
Joined
-
Last visited
Content Type
Profiles
Forums
Articles
Everything posted by kye
-
I was really happy when I realised that the GH5 2x in 1080p was downsampled - it is even downsampled in the 1080p60 too, so if you shoot 1080p ALL-I codec then you get full-readout and 2x digital zoom downsampled in every framerate, and you also get the 1:1 ETC which is a ~2.5x zoom. How odd that the larger cameras don't have as good video modes in this way. The GH5 was the flagship though so maybe the S1H has those modes? Fascinating about the 16-bit output. I guess it might depend on the sensor mode. IIRC other sensors sometimes have a higher bit-depth readout mode with limited fps, and then a reduced bit-depth mode where they get higher fps readouts, so maybe the 16-bit can only happen at 10fps or something. It would be great to see if that's possible at the 60fps speeds that the DR boost feature can do for video. That makes sense. Potentially then it's quite a different equation for your ND setup, but I keep thinking that all you need to do is work out what the maximum and minimum amount of ND you will need in daylight and just buy a fixed ND that compliments your vND to give you that range. Then after sunset you remove the fixed ND and your vND should cover the range of shooting under artificial lights. ISO 2000 should be a good base ISO for most low-light situations, so you should be using your vND even after dark anyway. The GH6 is 5760 x 4320 and the GH5 is 5184 x 3456 so if you multiply those out then you get a 38% increase in total number of pixels, or a 11% increase in width, so not entirely sure where they're getting that number either. Still, it's more pixels, and not stupidly more pixels, which is probably the right balance. Yeah, odd, but I agree that the GH6 is a winner. I see so many tiny little improvements they've made - I was contemplating writing a summary of what improvements I see that would be relevant to me in the real world and how I shoot. The ISO performance on the GH6 is pretty darn good!
-
Makes sense. That means that 3 extra stops of ND are required between modes, but would someone really be swapping between them? Most likely someone would already own a different camera and have the NDs setup for that, so it would be dependent on the ISO they currently shoot in, wouldn't it? You're the first other person I know that shoots 1080p and uses the 2x digital zoom to get a downsampled 1080p from the ~2.5K middle part of the sensor. The quality is so nice and the 2X is so handy that my lens collection has evolved to make full utilisation of those, by having a 17.5mm as my default lens which gives a 35mm FFE FOV and a 70mm FFE FOV from the same lens with just a button press.
-
True, but I'm not sure what you were referring to? I've heard that most professional productions shoot Prores rather than RAW, and that RAW is typically only used by the big budget productions and by amateurs. I'm keen to hear more about that. it makes sense to me, but my experience of the internet camera ecosystem (YT, social media, forums like this) and also of most solo-operators is that they're completely insulated from the industry proper, who interact in parallel discussions like liftgammagain.com, the CML mailing list, etc, and who have very different working methods and mindsets to the whole topic of making films.
-
Great stuff - thanks for posting! Very nice overall production and really nailed the whole 80s aesthetic. Some great lens flares in there too, and some vertical streaks (at 2:30 from the neon sign) - how did you get those? are they a normal property of the Kowa? and, of course, I have to ask.... did you get to ride in the Ferrari??? 🙂
-
Absolutely! I find that most camera discussions happen in a vacuum, where there is little consideration of anything else involved in the process, which is especially perplexing considering that the camera is one of the least important parts of making a good film. In terms of workflow, I shoot the GH5 using its 1080p ALL-I codec, in preference to the 4K IPB one, because of workflow considerations. I'll definitely be exploring the Prores options of the GH6, but will also be quite tempted by the Prores on the new iPhones, which are probably one of the cameras that would benefit most from having a larger bitrate and some gentle encouragement not to process the living hell out of the image before it's compressed and saved internally.
-
The older I get the more I realise that people seem to operate without much consideration (or often knowledge) of history and the broader context. Changing your mind on a subject you've already expressed a position on also requires admitting you were wrong, which seems to be an unacceptable cost in many cases too. The human condition is a strange thing!
-
This is where I get confused - there are actually 4 base-ISO settings aren't there? V-Log with DR boost and without, and non-V-Log profiles with DR boost and without. I thought that the ISO 250 was the Base ISO for non-Vlog profiles, and the 2000 was for V-Log and DR boost? The reason I raise that is that if you're talking about NDs, then people will be setup to expose with whatever profile they were using before, so V-Log GH5 -> V-Log GH6 DR boost. Very few people are going to have NDs for GH5 normal profiles and want to move to V-Log DR boost on the GH6 (and if they do then getting new NDs isn't unreasonable). Pity about the eND... it's basically the only thing that will get me to shoot manual mode rather than aperture priority, and I'd like to, but having to manually fuss with NDs is one step too far for me.
-
I did consider that but didn't think that you'd be doing anything as radical as a green screen or background replacement etc. What kinds of secondary adjustments would you really notice a poor quality codec? Genuinely curious. It all depends on what you're doing and the application of the format. Really this thread is relevant for people who aren't really sure of why Prores is a good feature, and often they're satisfied with h264 or h265 because they're "better", but if you're going to be doing work where you're really seeing the differences between these codecs then you're not the one who needs convincing! Sadly, lots of people start with the position that 'newer is better' and 'more is better' without actually applying those statements to the entire pipeline, to the implications on set or in post. I'd say that the quality of the encoder is probably more relevant in this case. As an example, the C100 provided an image that compared favourably to other cameras with double the bitrate, so obviously Canon had really made the encoder work hard and really get a good result. Cheap cameras can produce horrific results with heaps of bitrate. The difference that 8-generations of compression made was far far smaller than the difference between a C100 image and most other cameras, even those downsampling 1080p from a 4K sensor, so that's why I didn't consider it to be particularly relevant. I'm super happy the GH6 has prores and think it's one of the (many) great upgrades over the GH5, so I'm definitely with you on this one!
-
Absolutely. In the real world we're probably talking about the difference between 100Mbps h265 or 240Mbps h264 ALL-I (both from A73) vs 700Mbps All-I Prores HQ, or similar. Or, comparing Prores HQ with RAW but where RAW requires an external recorder and costs many hundreds of dollars and requires cables, extra batteries, more things to charge, etc etc.
-
DO NOT EVER THROW AWAY A WELL REGARDED LENS WITH GOOD GLASS IN IT!!! Seriously, I'm on the VLFV Facebook group and there are people constantly on the lookout for vintage lenses to re-house, and if it's a classic zoom then that may include those models too. Even if the front element is scrap there's probably another copy somewhere else where the rear element is scrap and together they'd made a great finished lens. These things aren't being made any more and are only going to get rarer. As the price of Leica R and CZ sets go through the roof people are talking about other lens lines more and more, eventually they'll get around to EF and zooms I'd imagine. Cool test - thanks for posting. If acting ability was critical for lens tests then I'd be sitting at my desk looking worried and compulsively drinking coffee too!! Especially considering that it looked like espresso shots with every sip being a bottoms-up situation!
-
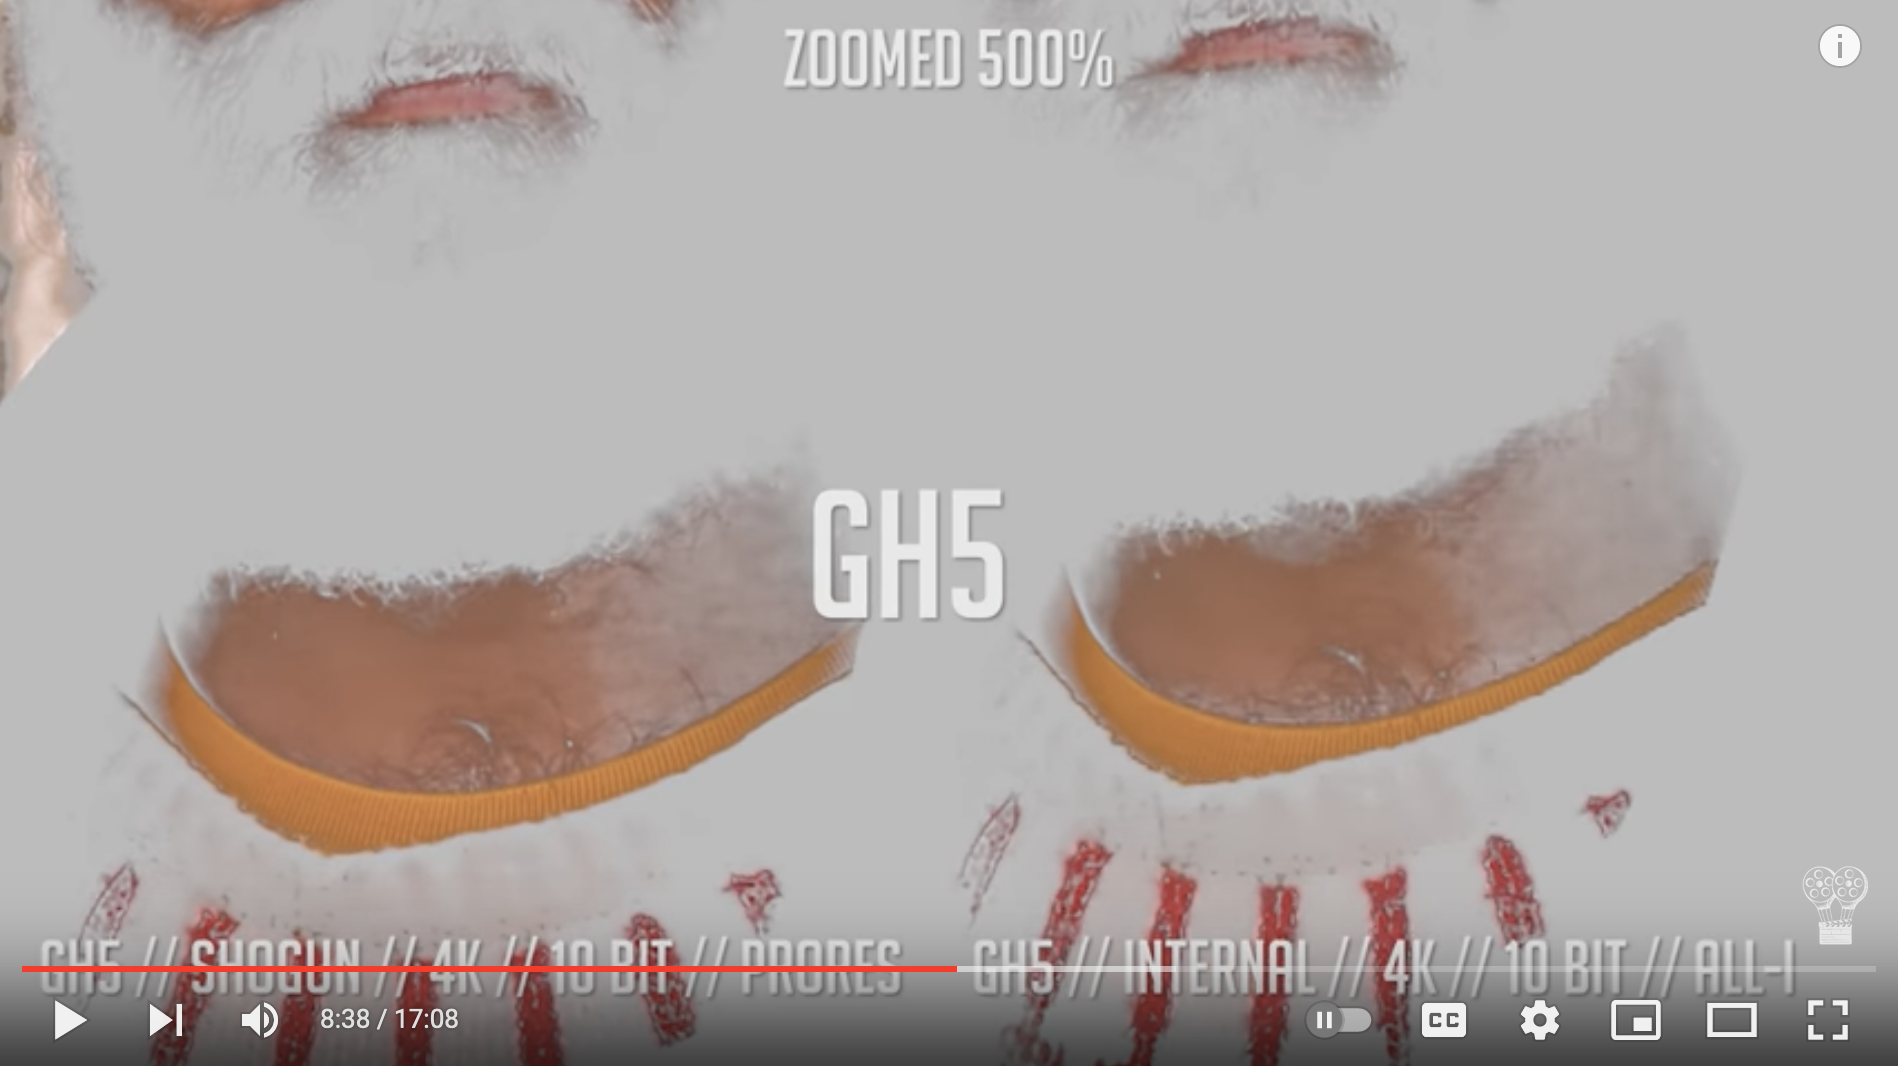
The GH5 is relatively unique in that it offers a good selection of ALL-I codecs, which I use and are just wonderful in post. I guess other cameras would benefit from this though, as not many other models/manufacturers seem to have this included. Interestingly, I thought for the test I would encode and re-encode each codec over and over again until one of them started breaking down, but I setup ffmpeg to do that on a 1080p version (to save processing time) and after 8 generations on h264 IPB at the same bitrate as Prores HQ I had to pause because the file looked the same. At first I thought that ffmpeg was being too clever for me and just copying the stream instead of re-encoding it, but when I zoomed in crazily (something like 800%) there were subtle differences. So really, all else being equal and when given enough bitrate, they all do a great job, so it's really the other factors that I highlighted in my post that are the deciding factors. I suspect you are talking about this video? This is probably the part you're referring to? I found it hard to tell TBH, even with it moving, but that is a comparison between Prores on the Shogun, which is either HQ at 700Mbps or Prores 422 at 471Mbps vs the GH5 codec which is 400Mbps, so there's not much difference in the bitrate there. The 400Mbps is on the high side compared to most cameras bitrates, and with the GH6 in 5.7K they'd be looking at 1500Mbps or 1000Mbps, which are significantly more again, so the bitrates really are pretty serious. TBH, there's a point in diminishing returns with bitrate, not just because of accuracy vs bitrate, but also that if you multiply the resolution and bitrate by 9x (1920 x 3 is 5.7K) you're not increasing the size of the screen that the viewer will view the image on, so actually, once there is sufficient bitrate to render the screen to a certain optical quality it doesn't really require much more if you increase the resolution on the same display, or at least, it doesn't need to increase by a factor of 9. Of course, if you're doing green-screen or other hard-edged keying, cropping in post, stabilising significantly, compositing and other VFX operations then that's a different story, but those are specialist applications and not general ones.

-
I don't have any experience with those power zoom lenses, but one feature that I think would be of huge benefit from them is the ability to hold down the zoom rocker just a bit and do a smooth zoom during a shot. The more serious MFT lenses are nice, but I'm not sure that the manual zoom ring is damped and smooth enough to really pull off a flawless zoom during a shot, certainly my second-hand 12-35mm and kit 14-42mm zooms aren't. That was a thing that those ENG lenses were really good at weren't they? Definitely agree there. In terms of firmware updates, do we even know when the camera will be shipping? I haven't seen anything about it so am curious. No point having firmware updates if no-one has the camera!! I'll be curious to see what the math is like for shooting at, say, f0.95 in bright sun, at ISO2000 for high DR mode, and what that equates to in an exposure time. I did note that they improved the shortest shutter time of the camera, so maybe that is why. Not much good having a camera that can't expose properly in aperture priority mode while wide open at noon - that would be seriously embarrassing I'd imagine! In terms of ISO2000 compared to 800 (wasn't 800 the native ISO for Vlog on the GH5?) isn't it only slightly more than a stop more exposed? If so, you only need to add a single-stop of ND to your setup and it's the same. Or am I missing something?
-
I must admit, I'm not that surprised that a bunch of folks on a forum don't understand the market as much as they think they do! Still, it bodes well for both OM and also the MFT system in general, which by extension is good for all consumers as it encourages competition. As much as FF enthusiasts are quick to point out that FF is now a serious competitor to MFT in specs, I wonder if it wasn't for the MFT manufacturers pushing things forward if FF would be nearly as advanced now as it is.
-
I think it was the combination of the screen and the fan. I'm super happy with it as it's not too much larger and it's not larger from the front, which is what matters from the perspective of shooting in public and not gathering too much attention. By the time you put a lens on a camera, then depth of it is huge so a few extra mm isn't a big deal. My suggestion is to start with how and where you shoot and work backwards. For events you'll probably be valuing flexibility over other performance, so you're probably talking about zooms. Then the question comes of how much you care about having a long zoom range vs having a faster aperture. At one extreme you've got the 12-35mm F2.8 which is the fastest but shortest zoom, then things like the 12-60mm F2.8-4, then all the way to 12-100mm F4 and even the 12-200mm F3.5-6.3. I don't shoot events but my understanding is that mostly there is decent light, and many here have commented that the longer zooms work best because you're always just a zoom adjustment away from the shot. Especially with the improved low-light from the GH6.
-
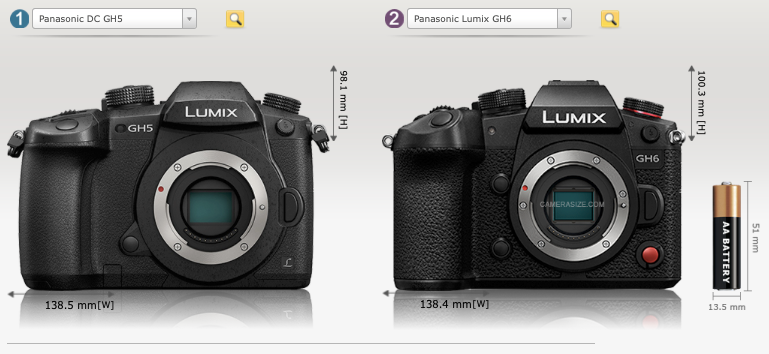
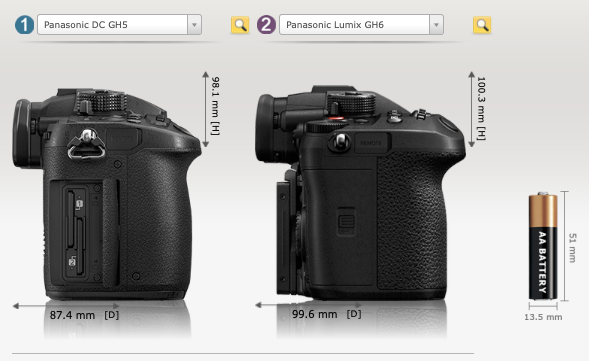
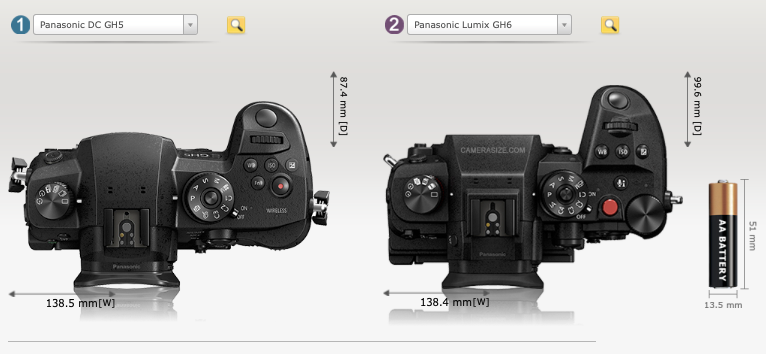
The size comparison is available now on camerasize.com: https://camerasize.com/compare/#698,888 Panasonic DC GH5 is 0% (0.1 mm) wider and 2% (2.2 mm) shorter than Panasonic Lumix GH6. Panasonic DC GH5 is 12% (12.2 mm) thinner than Panasonic Lumix GH6. Panasonic DC GH5 [725 g] weights 12% (98 grams) less than Panasonic Lumix GH6 [823 g] (*inc. batteries and memory card). Panasonic DC GH5 dimensions: 138.5x98.1x87.4 mm (camera body only, excluding protrusion) Panasonic Lumix GH6 dimensions: 138.4x100.3x99.6 mm (camera body only, excluding protrusion)
-
In addition to the above, one thing I saw recently (can't remember where though!) was that someone was shooting film and wanted to have much lower saturation skies instead of bright-blue skies, so they overexposed the film and then developed it darker to normalise the exposure. This gives much less saturated skies as it pushed all the highlights up into the highlight rolloff where there's much less difference between the R G and B levels, and thus less saturation. The skies were a pale blue rather than saturated and it gave a kind of look to the skies vaguely reminiscent of the bleach-bypass look. That's also the kind of thing you can do with a Film Emulation LUT - raise the levels beforehand and then lower them afterwards and see the effects.
-
There are a few advantages to using in-camera EIS, so it's worth experimenting with (on non-critical footage) to get a feel for it, but mostly doing EIS in post is more flexible as it's not burnt in and you can try different things to see what works.
-
This forum is also social media.
-
A key point that I feel is worth mentioning here is that you can't expect a LUT to grade your film for you. What I mean by this is that you should be adjusting the image before putting it through the LUT (grading "under" the LUT) and potentially adjusting the overall levels after the LUT too, for more overall adjustments. Grading under the LUT is simply adjusting the images exposure, WB, contrast, and other attributes, which is the same as adjusting the lighting ratios on set, the exposure of the camera and WB of the scene while shooting on film. If you don't like the amount of contrast in a LUT, lower the contrast after you apply the LUT and adjust to taste prior to the LUT. If you want a stronger look then increase the contrast before the LUT and lower it afterwards and you'll get a more pronounced look, or do the opposite. These are creative tools, not one-click grading machines 🙂
-
@PannySVHS I read somewhere that early on Canon were much pickier about which lenses got the 'L' designation and there are a number of non-L lenses that would have been given the L status if released decades later. In that sense it's really down to reading the reviews and looking at sample images.
-
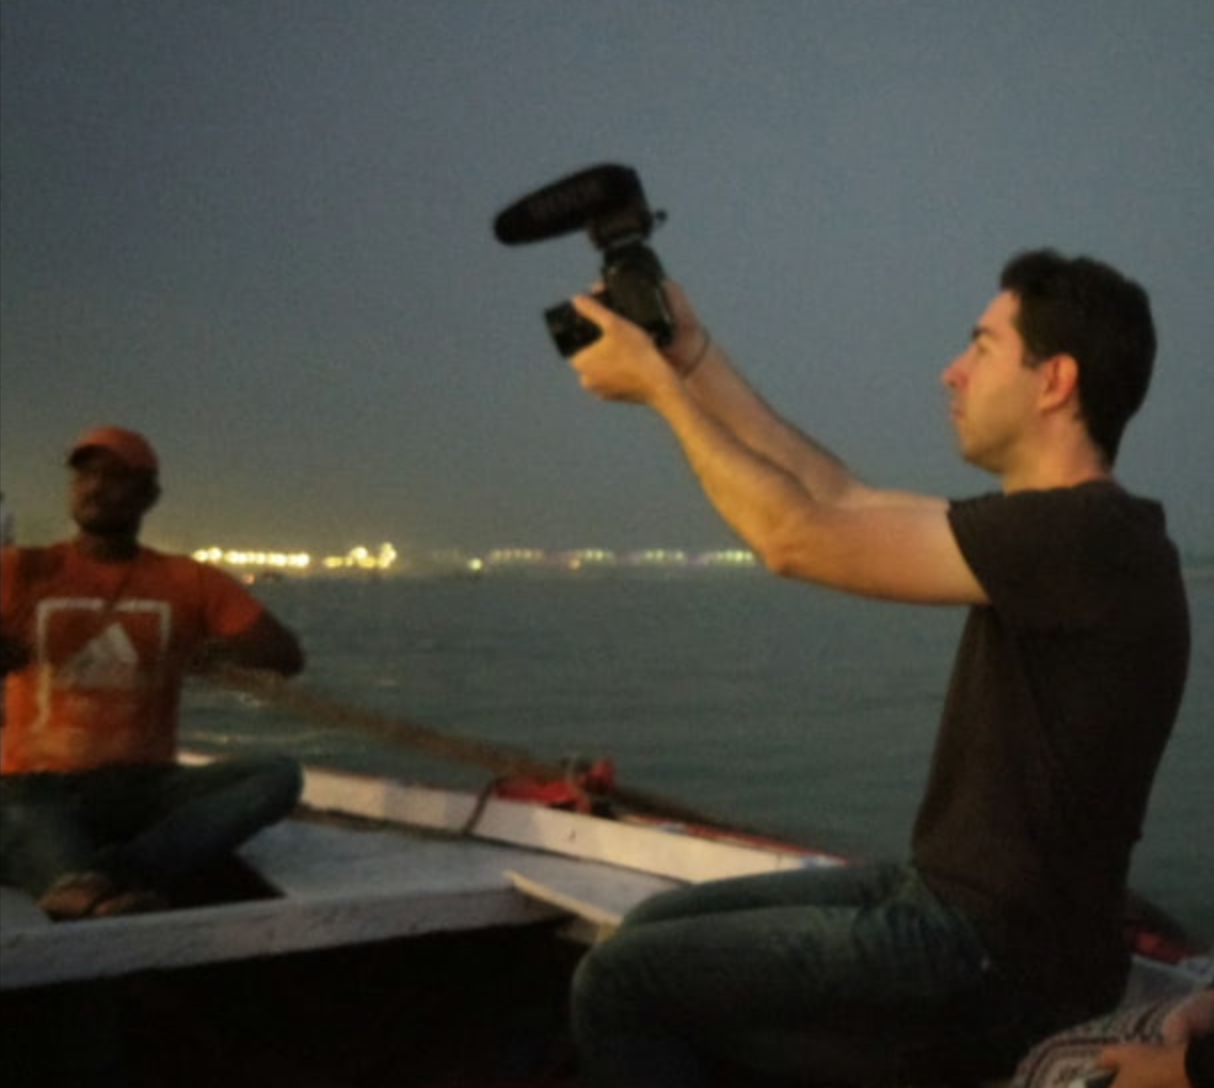
I do... but I'm not about to jump around saying that it's a critical feature for everyone. I think it's about shooting in available-light. I currently own a GH5 and have f0.95 primes to get as much light into the camera as possible, but it's a stretch. I shoot auto-ISO so I don't know the exact values, but I can tell you that I've pulled the camera up to my eye in a low-light situation and as I've adjusted the aperture from F2.8 (which it might have been during the day) to f095 I see the image go from looking like the worst colour science in the world to looking lovely with rich colours and a nice contrast. Here's a few previously posted frame grabs that show the lighting conditions. This was maybe 50m or more from the banks of the river and the only lighting was the lighting from the shore: and a BTS of that shot, taken with a smartphone camera: Another: I find that essentially the GH5 sees slightly better in low-light than I do when paired with an f0.95 lens, so it is an equivalence to human vision. Unfortunately, getting lenses that are still sharp at f0.95 is very rare, and also you have no head-room for seeing anything that is hard to see with the naked eye. There's still heaps of noise in those images though: IIRC this was shot with the 4K 150Mbps LongGOP codec on the GH5 in HLG, so there's already likely to be NR applied in-camera and also some detail loss from the 150Mbps codec too, so in reality it was noisier than this. I might have even applied my own NR in post on this image already, I can't recall. So, it's unlikely to be at baseISO here, which means that the image could have been better with better low-light. Once again, I'm not claiming that everyone needs amazing low-light, but I certainly use it and will benefit from the improvements in the GH6 over the GH5.
-
Cameras are starting to get Prores, and opinions range from "prores is irrelevant" and "prores is old" to "this is the best thing ever!". So which is right? Actually, both. Why Prores is irrelevant... Prores isn't better quality than h264 or h265. Here's a test I did. I took an 8K RAW clip from RED Helium and put it on a 4K timeline and exported it as uncompressed from Resolve, then took that 4K uncompressed and using FFmpeg (which is much better than Resolves export quality) and created 4K versions of the clip in Prores HQ, 10-bit h264 IPB, 10-bit h264 ALL-I, 10-bit h265 IPB, 10-bit h265 ALL-I, all matching the same bitrates. The results were that all the h264/5 files and the ProresHQ looked basically identical to the original - even at 300% magnification. Here's the original 8K RAW on 4K timeline (at 300%): and here's one of the h26x files (remember they all look the same): So, 10-bit h26x is as good as Prores HQ - case closed right? No. To be technically correct, the statement is "10-bit h26x is as good a codec as Prores HQ at the same bitrate". Why Prores is spectacular... The bitrate of Prores HQ in 4K is just over 700Mbps. Not a lot of cameras with that bitrate option!! Most are more like 100Mbps. Well, here's what that looks like: Ummm.... where did the detail go? Prores benefit number one... guaranteed high bitrates. But that's using FFmpeg to take as much processing time as it likes, what about when it's being done in-camera? Well, using FFmpeg to convert a 1080p uncompressed reference file to Prores HQ happened at 53fps and 10-bit h264 IPB was at 7.2fps. That's over 7x more computation to create a file of equivalent bitrate. Do cameras differ in h264 quality? Absolutely. I suspect that computation load is a factor here. If a manufacturer is compromising on quality for lowering processing requirements in-camera then the results will be worse than the 100Mbps result above. Prores benefit number two... lower processing power required, potentially meaning less temptation to compromise quality. But the codec / bitrate isn't the only thing that impacts the image - processing also matters. Specifically, NR and sharpening. This is where things get difficult to compare because not many cameras have both - typically cameras are either RAW/Prores or h264/5. However, when you choose a codec you are also choosing the processing, because cameras mostly don't give full control for sharpening and NR on all profiles. It will be interesting to see the GH6 profiles and how they compare, but mostly Prores are aware that the huge file sizes aren't for consumers and so will configure Prores to have less processing. Prores potential benefit number one... lower sharpening and NR applied in-camera. What about RAW? RAW is great. The semi-compressed RAW formats make shooting RAW wonderfully flexible, giving the benefits of RAW without being forced to spend more on media than on your camera, but once-again, RAW isn't directly comparable. ProresRAW and B-RAW mostly require an external recorder, making your camera larger, requiring extra cables and rigging, requiring additional batteries and chargers, and introducing more points of failure in your setup. Some cameras have internal RAW, some even offer compressed internal RAW, but what if those cameras don't suit your requirements or shooting style? Prores potential benefit number two... in-camera with no extra equipment or hassles. RAW is typically a 1:1 pixel readout. This means that you either shoot using the full sensor resolution or shoot with a crop. Shooting with the full sensor resolution means that you'll need compressed RAW or you'll have large file sizes (like the Sigma FP), and also that your computer may have to bear the burden of decompressing / debayering / downscaling a file with higher resolution than your timeline, which is something worth considering as I know a number of people who put all their money into cameras and lenses and are struggling with older computers to edit their work on. This will become more and more significant as sensor resolutions gradually creep up past 6K, 8K and beyond. Why not crop? Well, goodbye wide-angle lenses, and hello to an extra step on set where you have to apply the sensor crop factor and your resolution crop factor to the lens focal length every time you want to change lenses on set. If you have time on set and good systems and lots of support then that's fine, but mistakes are inevitable and the less complicated things are the less likely they are to be made. Prores potential benefit number three... in-camera downsampling. So there we are. Prores is an old irrelevant codec superceded by h264 and then by h265, but when its implemented in a camera the implications are potentially quite significant for many people, depending on what and how you shoot.
-
I think there's a chance that they'll implement the other flavours of Prores in a firmware update. They've promised to have Prores HQ in 4K and 1080p in a firmware update, and adding the other flavours would make sense at that point. I suspect that they pushed to get the 5.7K Prores HQ in-camera for the pre-production models because it's a headline feature, so that would have been a priority. I'm working on a Prores vs H264 test now, so depending on what I find I might be posting a new thread on it if I find something worth sharing.
-
I think that's a smart decision. Financially, sure, but also for the final results. Better cameras are great. but only if you know them and know how they shoot and how to expose to get the best files, and any gotchas around annoying features or battery issues or whatever that can screw things up and lose footage over. The best camera in the world, used improperly, is worse than the camera you know and trust.
-
It also works well if there just isn't much motion in the shot. You'd have to play with it to know how far you can push it, and subject to taste as well, but things like a slowly moving shot of a still scene or a wide landscape shot without a moving foreground, etc can work quite well. I've seen wedding videographers use SS to expose like this and although some scenes it's obvious, other scenes they completely got away with it, so it's really subject dependent.