kye
-
Posts
7,835 -
Joined
-
Last visited
Content Type
Profiles
Forums
Articles
Everything posted by kye
-
@sanveer @thebrothersthre3 have you run into situations where the 10-bit had issues? Or just wanting to push closer to raw? Now we're talking!! Seriously though, a 5.2K sensor should easily be enough for everyone except those who want to digitally re-frame, and even then you can still upscale to something like 150% and add a bit of sharpening and there's no perceptible difference. Another increment in the endless upgrading of modes from 420 to 422 and from 8-bit to 10-bit and from IPB to ALL-I would be great. I imagine that upgrades to the 120p mode would be very popular - anything over 50/60p from the GH5 is limited to 1080p 100Mbps 420 8-bit IPB. Even a modest bump for 120p up to 200Mbps 420 10-bit would be hugely beneficial. Reconforming 120p down to 24p means that at current you're effectively watching 24p at 20Mbps 420 8-bit IPB. If you're shooting a film then pairing 1080p 20Mbps 420 8-bit shots with 200Mbps 422 10-bit ALL-I 1080p or 400Mbps 422 10-bit ALL-I 4K is a very significant mis-match! Having a GH5 for sports is actually a great setup. You have MFT and the crop factor gives you access to much longer equivalent focal lengths for less money than the big zooms, the IBIS is great, and the viewfinder works in harsh lighting. The only real Achilles heel for sports is the codec.
-
I've moved away from the XC10 and have completely changed the way I shoot, so this is about grading footage I already have. It's ok, it's making me a better colourist as I'm getting pushed to work out how to solve all kinds of issues. My poor choices meant I pushed myself in the deep end and I think I might have just gotten to the stage of having my first few gasps of air as I learn to swim 🙂
-
You seem to be very focused on sharpness, but seem to be buying the wrong lenses for that. If you're talking about using it on your P4K (like in the other thread) then maybe you should just invest in the Sigma 18-35 1.8 and Sigma 50-100 1.8 with a metabones SB and be done with it. They're super sharp and will cover most of the range required. If you're chasing sharpness wide open and also the softer contrast of vintage lenses then the Tiffen filters can give that look quite easily.
-
Buy a 50mm F4 lens. Virtually guaranteed to be sharp wide open.
-
Obviously we're spending TheoryCoins, because this is a camera forum on the internet, but for me it's no choice, it has to be the Tokina 11-20mm. My favourite FOV is 35mm (FF quiv) and second favourite is 15mm and the Tokina is the only one in the above list that goes wider than the mid 20s.
-
Getting better! It might be a little bit too pushed in terms of sat and contrast, but I'm gradually working out the kinks.

-
That's true. Would that mean that it would be 420 colour? That's what the 5K mode is currently. Maybe it will happen and then I'll be happy I switched to 1080 - it's not like YT is good enough to tell between 4K and a 1080p up-res anyway....
-
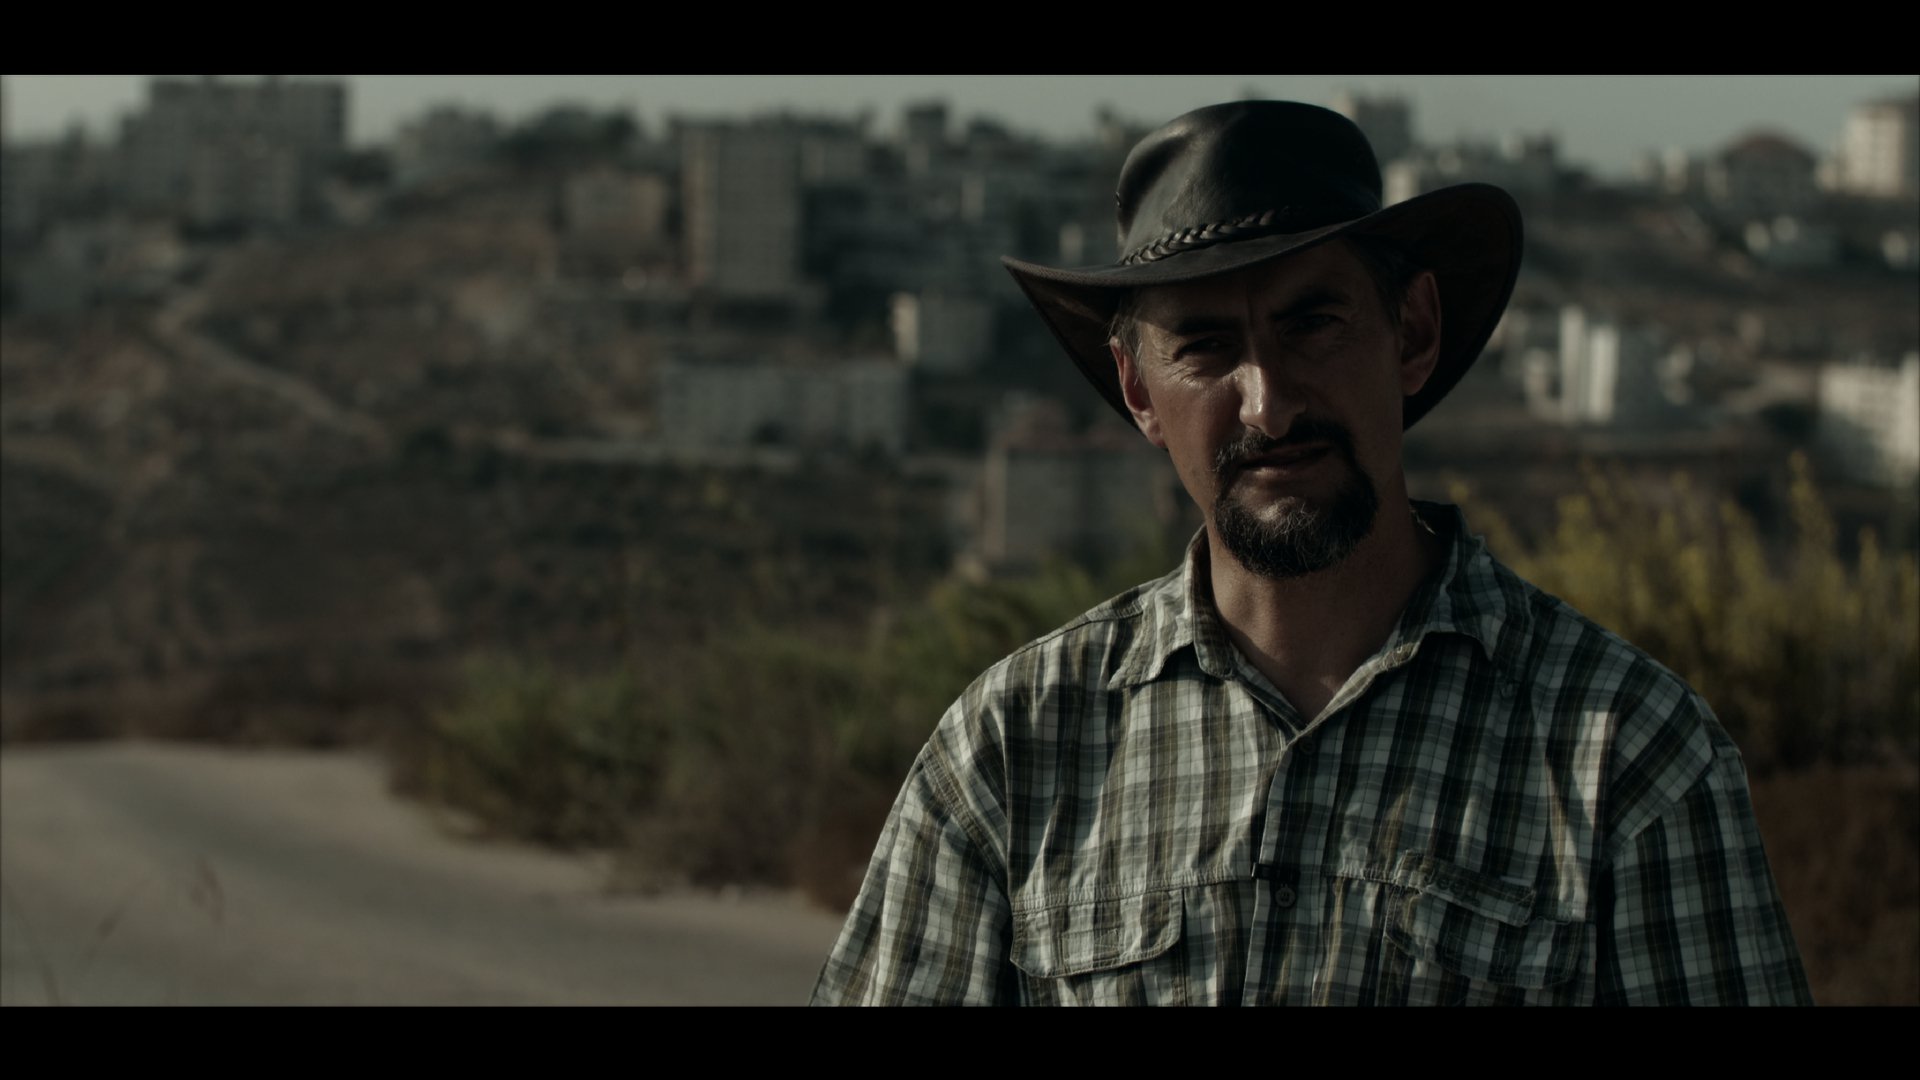
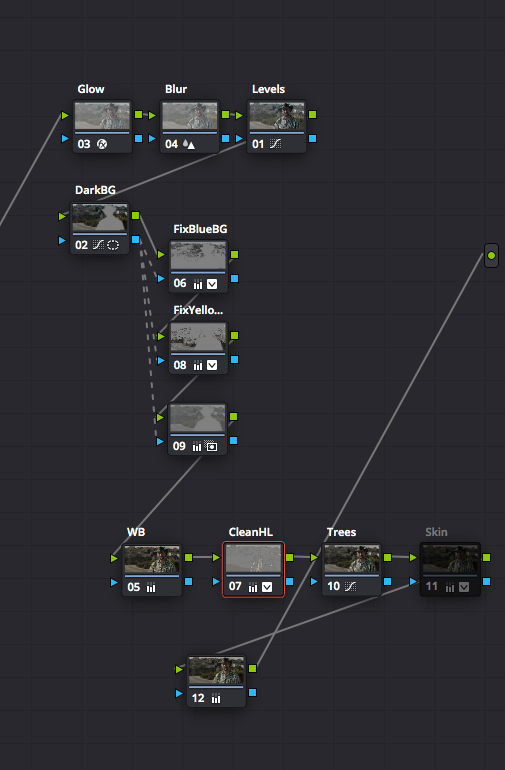
Actually it's both. The original has quite a lot of blue in it, and the reference images have no objects in them that are blue and all the colours in the reference image are in completely the opposite direction in terms of colours. You can pull a key and neutralise out the blues, but then you end up with some salmon tones, which you then need to fix, and in the end you end up with a background that is bland and may as well have been desaturated. The reference images all have darker green foliage in the background, the footage has a bright orange/blue city in the background.
-
LUTs can be tricky, and it's impossible to make them completely general purpose. I'm not surprised that when you light a scene you can get great results but that it wouldn't work so well on less manicured situations. On a controlled scene there are certain conventions that can be assumed: subject skintones will be at a certain IRE, the background will be slightly or a lot darker than the subject, there will be no heavily saturated objects, etc. When designing a LUT for a situation like that you can assume that anything warm and above 50% is skin tone highlights, and anything not skin tone and bright can be much more heavily processed, and that non-skintone darker areas can be desaturated and the colours all played with, etc etc. Take an image shot anywhere else where there are bright and saturated objects in the background and the LUT will make a screaming and clipped carnival memoire of the whole scene. Of course, if you assume there could be anything from 110 IRE down to -10 IRE then you're immediately screwed because most LUTs only go from 0-100, but even then if you can pull those things back into legal range then you'll end up with something that looks flat and awful on controlled and low-DR scenes. I have found that exposing the GH5 can be a challenge if you want to do it technically, but shoot creatively and grade each shot individually and you're fine. The more I learn to grade the more I'm learning that it's actually very simple, but with a range of techniques for solving various problems and few cool tweaks to make the image pop a little more. Of course, the biggest improvement to my colour grading has been learning to use my equipment better to capture the images in the first place. I'd still be very interested to see a before/after of the Noam Kroll LUT if you have time.
-
That's a good strategy, although it makes me a little confused as to why you would comment in a colour grading thread that there's a magic button that will match any shot to any other shot and then it can just be converted to a LUT and you're done.... Kind of like a colourist telling a cinematographer they can just take their cell phone out of their pocket and wave it around to get cinematic images, but when told why that won't work they just reply "oh I just hire people for that, I'm not interested in learning anything new...".
-
You may have read that more keyframes gives better motion cadence, which I suspect is true, but only on extremely extremely compressed files. I tried to replicate motion cadence issues but failed completely to do so. Here's the thread: The editing thread linked above showed that the difference between a cut one frame ahead and one frame on the beat is decent, but the cut ones frame ahead and the cut two frames ahead of the audio wasn't nearly as large, and there's a decent tolerance for thing being ahead, so I'd suggest doing a few test uploads and seeing how far ahead of the beat looks best. BTW: YT moves the image one frame ahead of the audio when you upload, and seemingly more than one frame on smaller resolutions. Check out the great videos by John Hess linked in the Editing thread above.
-
That would mean that shooting on the GH5 in MFT 4K was a downsampled image from 5.2K, and then shooting on the GH6 in MFT 4K would be a straight 4K and not downsampled. Ie, a downgrade.
-
WTF, that first one is totally not the emoji I picked!
-
What do I think? I think you should give it a go..... everything looks easy until it's your turn 🙂 Shade works too, but it's a pretty simple equation, if you want what they got then do what they did. If shade was the same as a diffusion panel and the shot-matching feature did 90% of the work then why would those things exist? 😬🤔🤔
-
Ultimately, the best thing to apply for this look would be one of these:
-
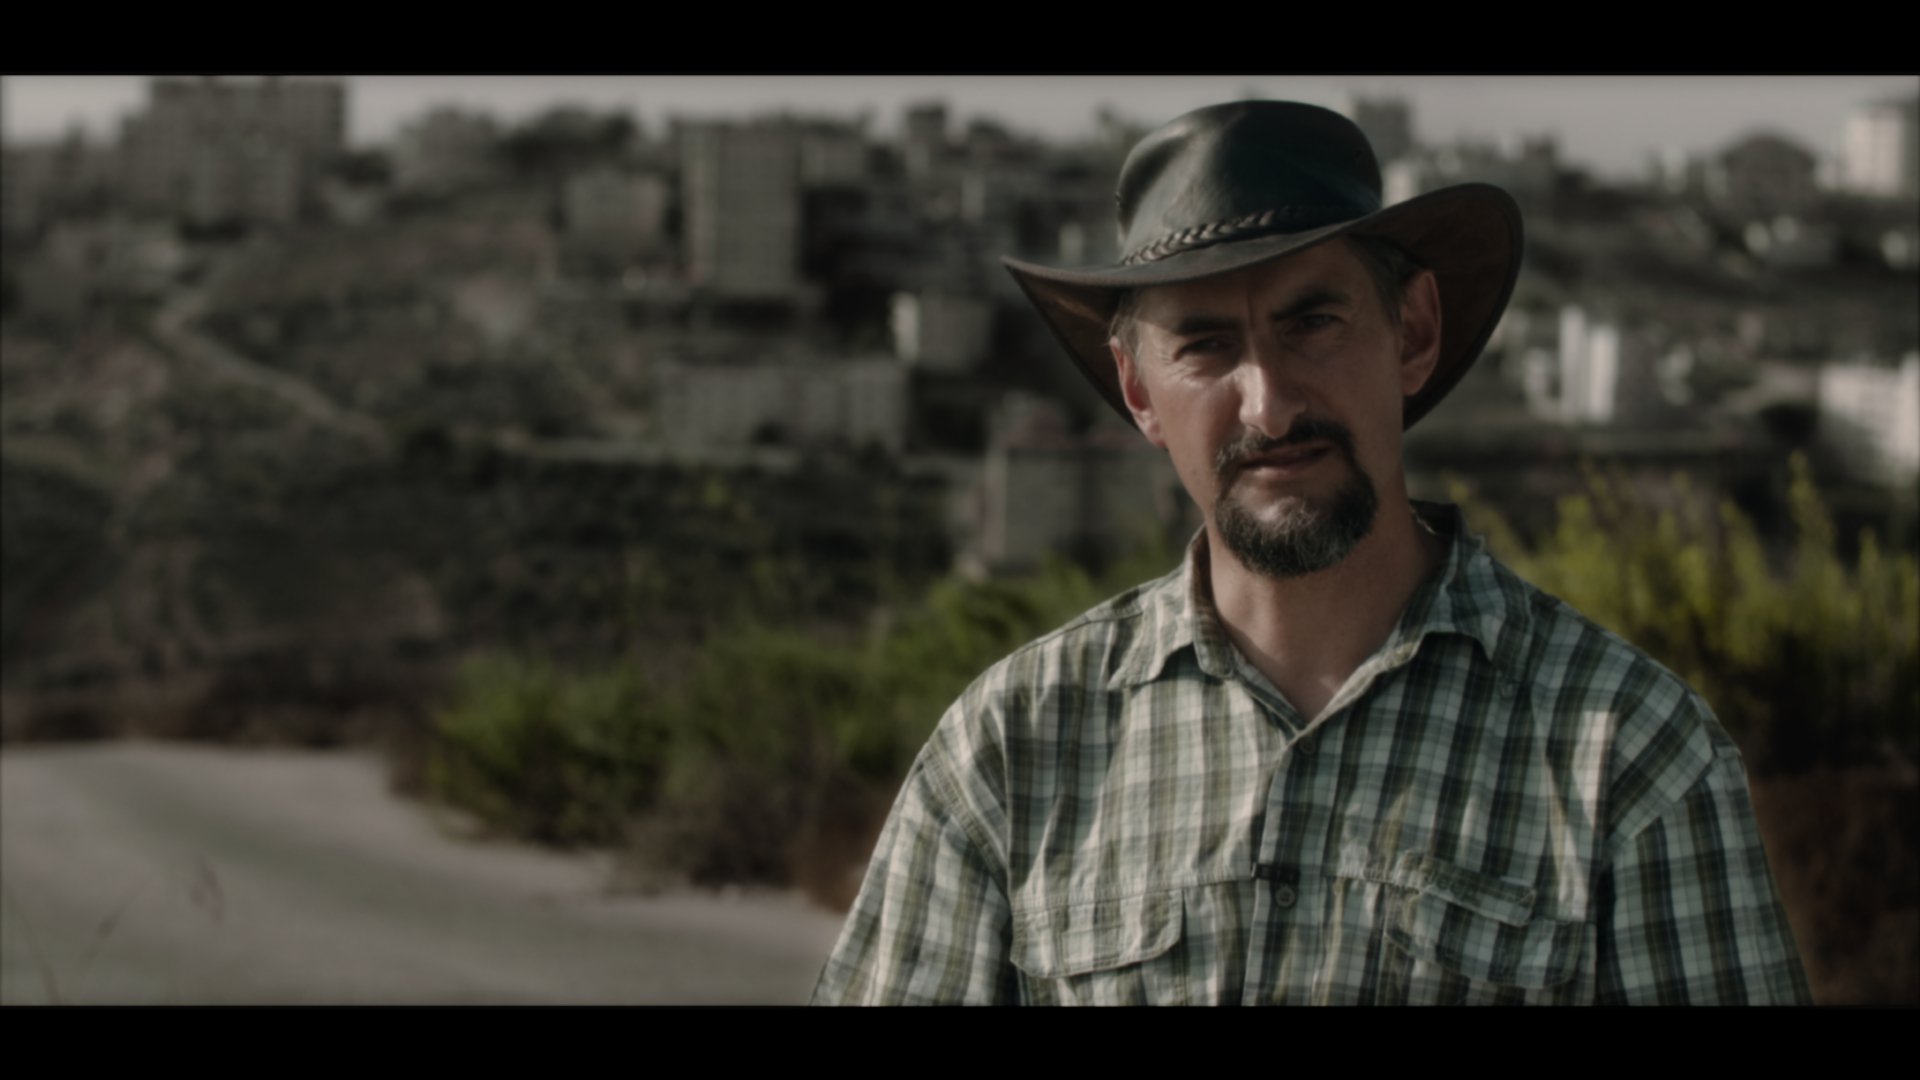
Here's the result of that Shot Match feature, just so you're aware: I think the video you're looking for from Aram K is this one:
-
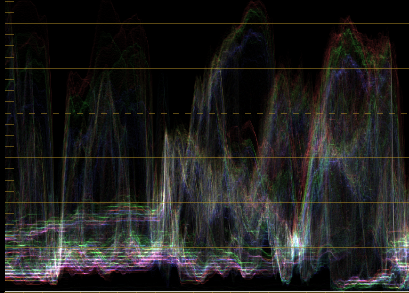
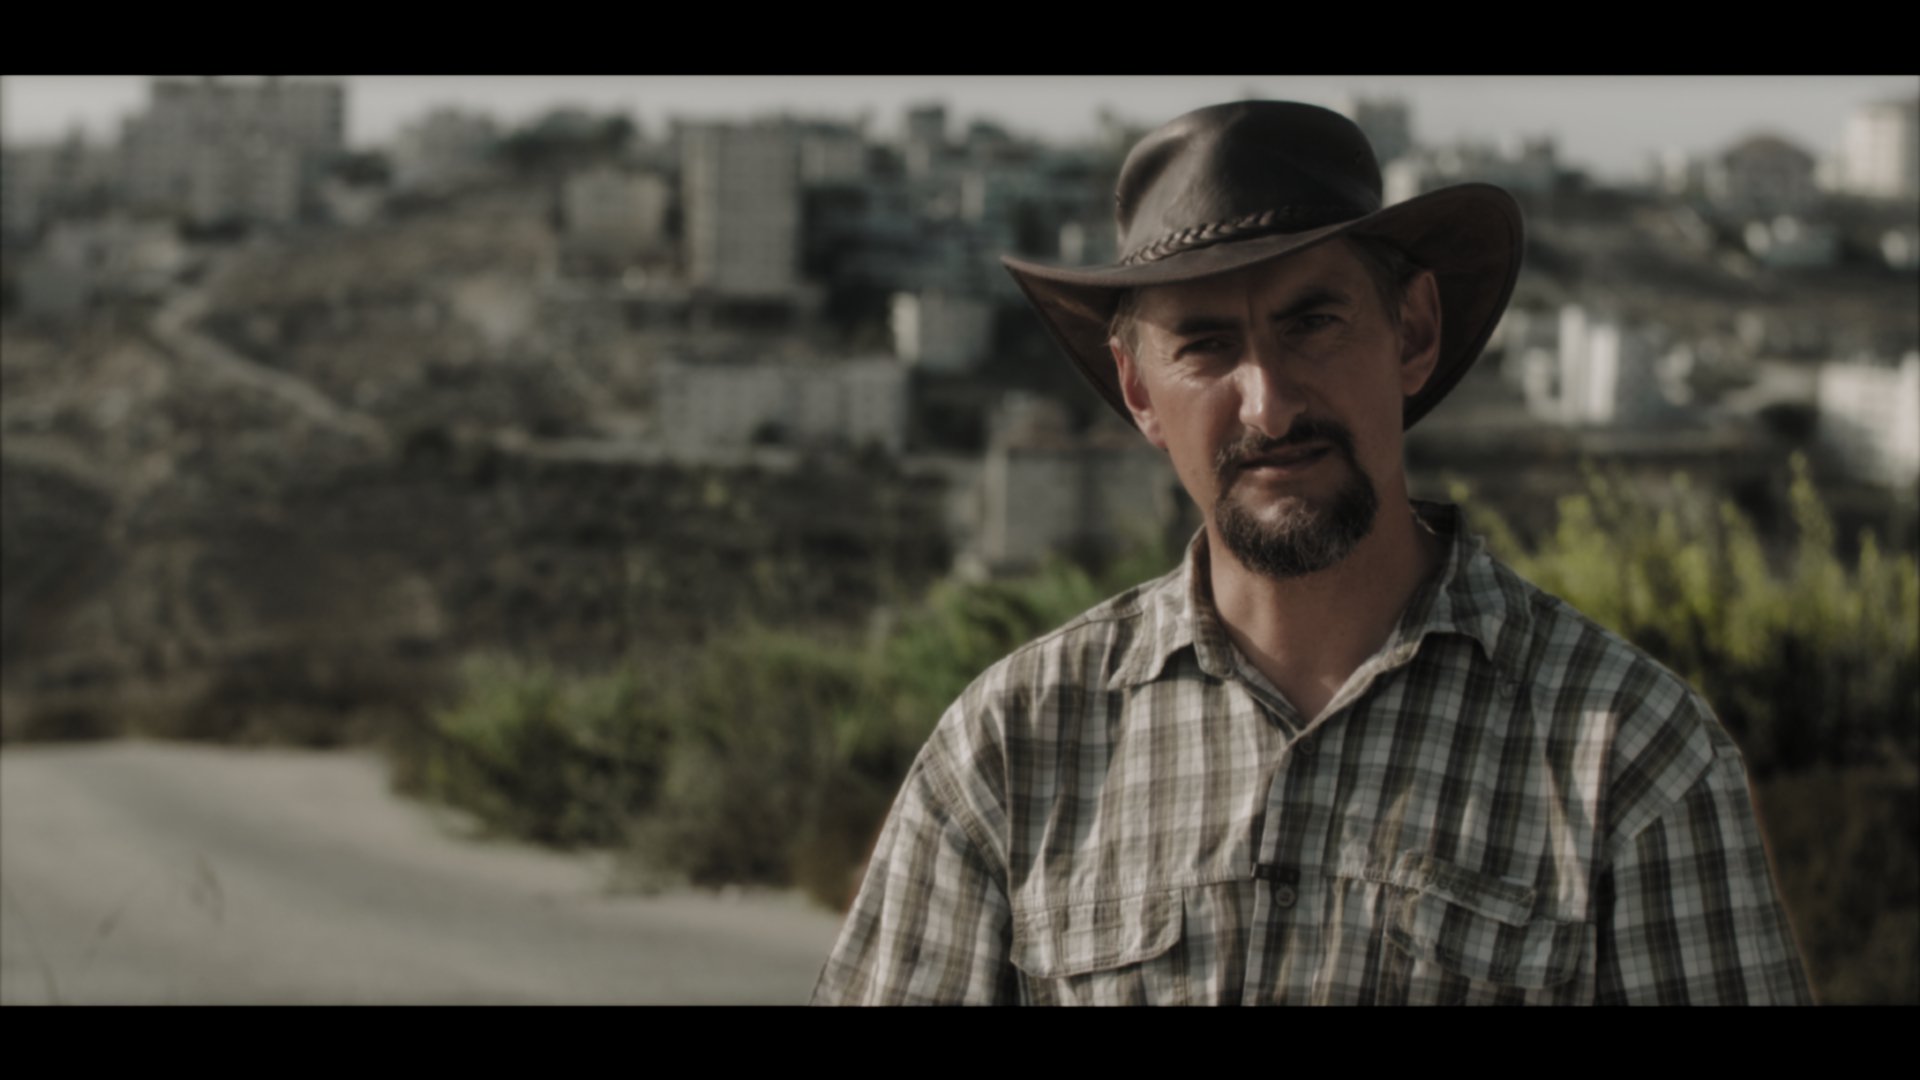
A few thoughts: Look at your scopes - look at what the waveform monitor is telling you about the levels in the image, and their colour balance. Check this out: You can see that in the shadows there is pink below green, that means that there's green in there. You can see in the middle and on the right there are much higher levels where red is highest and blue is lowest with green in the middle, that means warm tones at a higher luminance, which in this case is the girls skin tones. Put a global adjustment over your reference image and your grade turning the saturation right up, it will make your vectorscope much easier to see, and will accentuate all the colours so they're easier to see. It's like colour grading with a magnifying glass. Match the colours like that and turn it off and it will be a much better match than it looked when you were doing it. Apply an outside window and pull gain down to zero to crush the whole image (except for your window) then look at the scopes to see what just that part of the image looks like. Hover the window over the skin tones and see what the vectorsope is telling you - where is the centre of the hue range? how much hue variation is there? how saturated are they? Hover over other parts of the image too. Use a glow-style effect to bloom highlights to match the reference before you apply any other adjustments - they radically effect your shadow levels and contrast overall. When playing with shadow levels and black levels, crank the Gain right up so that most of the image is clipping and you've "zoomed into" the shadows - now 10 IRE might be up to 100IRE and you can easily compare your reference with your grade. All these are useful for grading your own footage in reference to itself too.
-
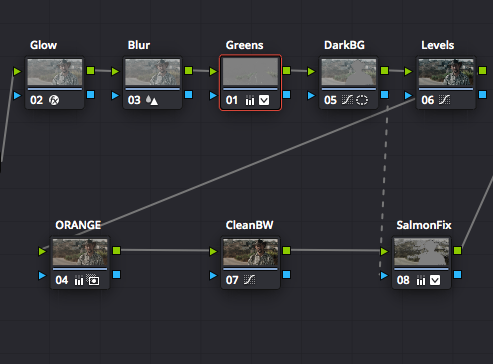
Attempt number one. Reference: Grade: and the node graph which quite obviously shows that this is the wrong way to go about such a thing: Attempt 2 Reference: Grade: Node graph - simpler but still awful: The absolute best way to match scenes is to get any camera and point it at something that looks like your reference.
-
I think it's about viewing angle. When I was getting my 32inch monitor I looked up the TXH and SMPTE specifications for viewing angle and it's quite wide, with the 32inch display being in-between the two specs when at arms length. If you're looking at a 55 inch TV at 10 feet then you're no-where near that viewing angle and won't see anything like the detail I'm seeing, or would be seen in theatres. From TXH (https://www.thx.com/faq/😞 For your viewing distance you'd need a 100 inch TV...
-
This feature, as I understand it, talks to the lens and then just crops into the sensor to only use the image circle that the lens covers. There are some issues: Doesn't work with non-native lenses, or lenses that don't talk to the camera (ie, all my lenses) The GH5 has a 5K MFT sensor. To have the same pixel density it would need 7.4K S35 or 10.7K FF. If it didn't have that resolution then there would be less pixels in the MFT image circle and I'd effectively get a downgrade.
-
That would rule it out for me. I've already invested in a lens collection that is at my preferred focal lengths, I don't want to have to re-buy my lenses to keep the same FOV as what I have (or in the case of the 7.5mm Laowa I simply cannot replicate the FOV as there is no equivalent lens). Your suggestion is half-way to suggesting a FF GH6, which exists - it's called the S1H.
-
We already have 5K in the GH5. There's only one mode that uses it, but it's there and is used for downscaling in most of the other modes of course. I'm much more interested in a camera that does 4K and 1080p better. I'd take Dual-ISO or eND over any increase in resolution any day of the week. We already have 400Mbps 4K 422 10-bit ALL-I, there aren't many people who can claim much benefit for a "better" output file than that, especially considering that the 4K killer mode is also already downsampled. EOSHD seems to be one of the most technically savvy and demanding community of GH5 users and have a look at how we're delivering. Resolution is not the answer.
-
I have a 32inch UHD display and the differences are obvious between 4K and 1080p. Having said that though, the differences between YT 4K and a 1080p Prores HQ export are slim, with the Prores having the advantage of course. It's all about bitrate, not resolution.
-
I think framerate is an artistic choice and I'm not much of a fan of the 60p look. I used to be pretty insensitive to it, but the more I get into film-making the more I see and now it looks strange and video-y. My internet is fine with 4K but can't do 4K60, so I notice whenever something is uploaded in 4k60 and the only ones I've seen that are have been shot in 60p too. Maybe others are frame-doubling but I haven't seen any. Here's a video uploaded in 1080 that has both:
-
True, but for each combination of resolution/framerate/DR there is very little you can do - that's what I mean by a brick wall. True, but probably not very useful. If you upload at a higher resolution then that resolution will have a higher bitrate, but the other resolutions don't. ie, if you upload at 1080p and watch at 1080p you get a certain bitrate, if you upload at 4K and watch at 1080p you get the same bitrate as before. You're only catering to the people with higher resolution displays, or those who manually override the resolution settings to stream in a resolution higher than their display. Exporting and uploading at a higher framerate probably hurts the aesthetic more than the extra bitrate helps, so that's not a particularly useful thing. I guess you could upload at double the framerate you shot at and just have every second frame the same in the file, but they'd move because the compression would make them different so it would still be a strange effect. Higher dynamic range is an interesting idea, but I'm not sure how you guarantee the same colour grade between those watching in HDR vs 709, so that's probably a wild-card too. YouTube is free, and the quality is "good enough". I think the strategy is to do our best and just work around it. It's not bad, and the content is what matters, rather than the image, after all 🙂