kye
-
Posts
7,835 -
Joined
-
Last visited
Content Type
Profiles
Forums
Articles
Everything posted by kye
-
It depends on the situation you're shooting in. Obviously if you're in a studio and have complete control over the lighting etc then consistency is possible. If you are shooting anywhere near natural light of any kind then there is always the possibility of lighting changes. Even high-end productions shooting on days when there are only blue skies might end up shooting pickups later in the day when the light has changed a bit. Anything shot anywhere near sunset is going to change shot-to-shot, and potentially even faster than you could adjust exposure and WB to compensate. What is invisible on set might well be visible in post, considering how controlled the conditions are in the colouring studio and that you'd be cutting directly from one shot to the other. The reality is that with modern cameras the amount of leeway in post is absolutely incredible - latitude tests routinely show that you can push a shot 2 stops up or 3 / 4 / 5 stops down and it's still completely usable. The idea that you'd try and shoot on set to require zero simple changes in post, which take literally a few seconds, is a false economy. Here's one test showing Alexa overexposure tests: https://cinematography.net/alexa-over/alexa-skin-over.html
-

End of the shallow DOF obsession? Is 2x crop more cinematic?
kye replied to Andrew Reid's topic in Cameras
Perhaps the most significant aspect of this whole thing, which is the elephant in the room, is that all movies and TV and videos are a fiction. Anything scripted is a fictional reality of course. Documentaries are a fiction too, taking hours of interviews, b-roll, on-location and historic footage and editing them down to a hopefully coherent string of snippets is a radical departure from the reality. In documentary editing they talk about "finding the story in the edit" - if I go out my front door into reality I don't have to "find the story in reality" and even if I believed that made sense how could it possibly occur? Wedding films are so romanticised that most wouldn't even call them a documentary, despite being made exclusively of filmed-on-location non-scripted cinema-verite. Even the walk-around videos shot by @markr041 are a long way from reality. If I was actually present in these locations then I could go wherever I want, talk to whoever I want, etc - the set of choices of each video represents one single possibility from an infinite number of creative choices, just like every edited film is one of an infinite number of possible edits that could be made. These films are edited in real-time, moment-by-moment, and cannot help but include an almost infinite number of creative choices. In this context, ALL choices are creative choices to contribute to the final film. So what does this mean? Well, if all work is fiction (of some sort or other) then every choice is a creative one. The choice of a high-resolution aberration-free lens is a choice just like any other. If I am shooting something modern then a modern lens is appropriate, if I am shooting something gritty then a gritty lens is appropriate, if I am shooting something vintage then a vintage lens is appropriate. But here's the kicker.... if everything is a fantasy, to some degree or other, then there is no such thing as a neutral choice. Clean lenses have just as much look as anything else, it's just an absence of technical aberrations. -
End of the shallow DOF obsession? Is 2x crop more cinematic?
kye replied to Andrew Reid's topic in Cameras
Yeah, that's what I said in my post. -
End of the shallow DOF obsession? Is 2x crop more cinematic?
kye replied to Andrew Reid's topic in Cameras
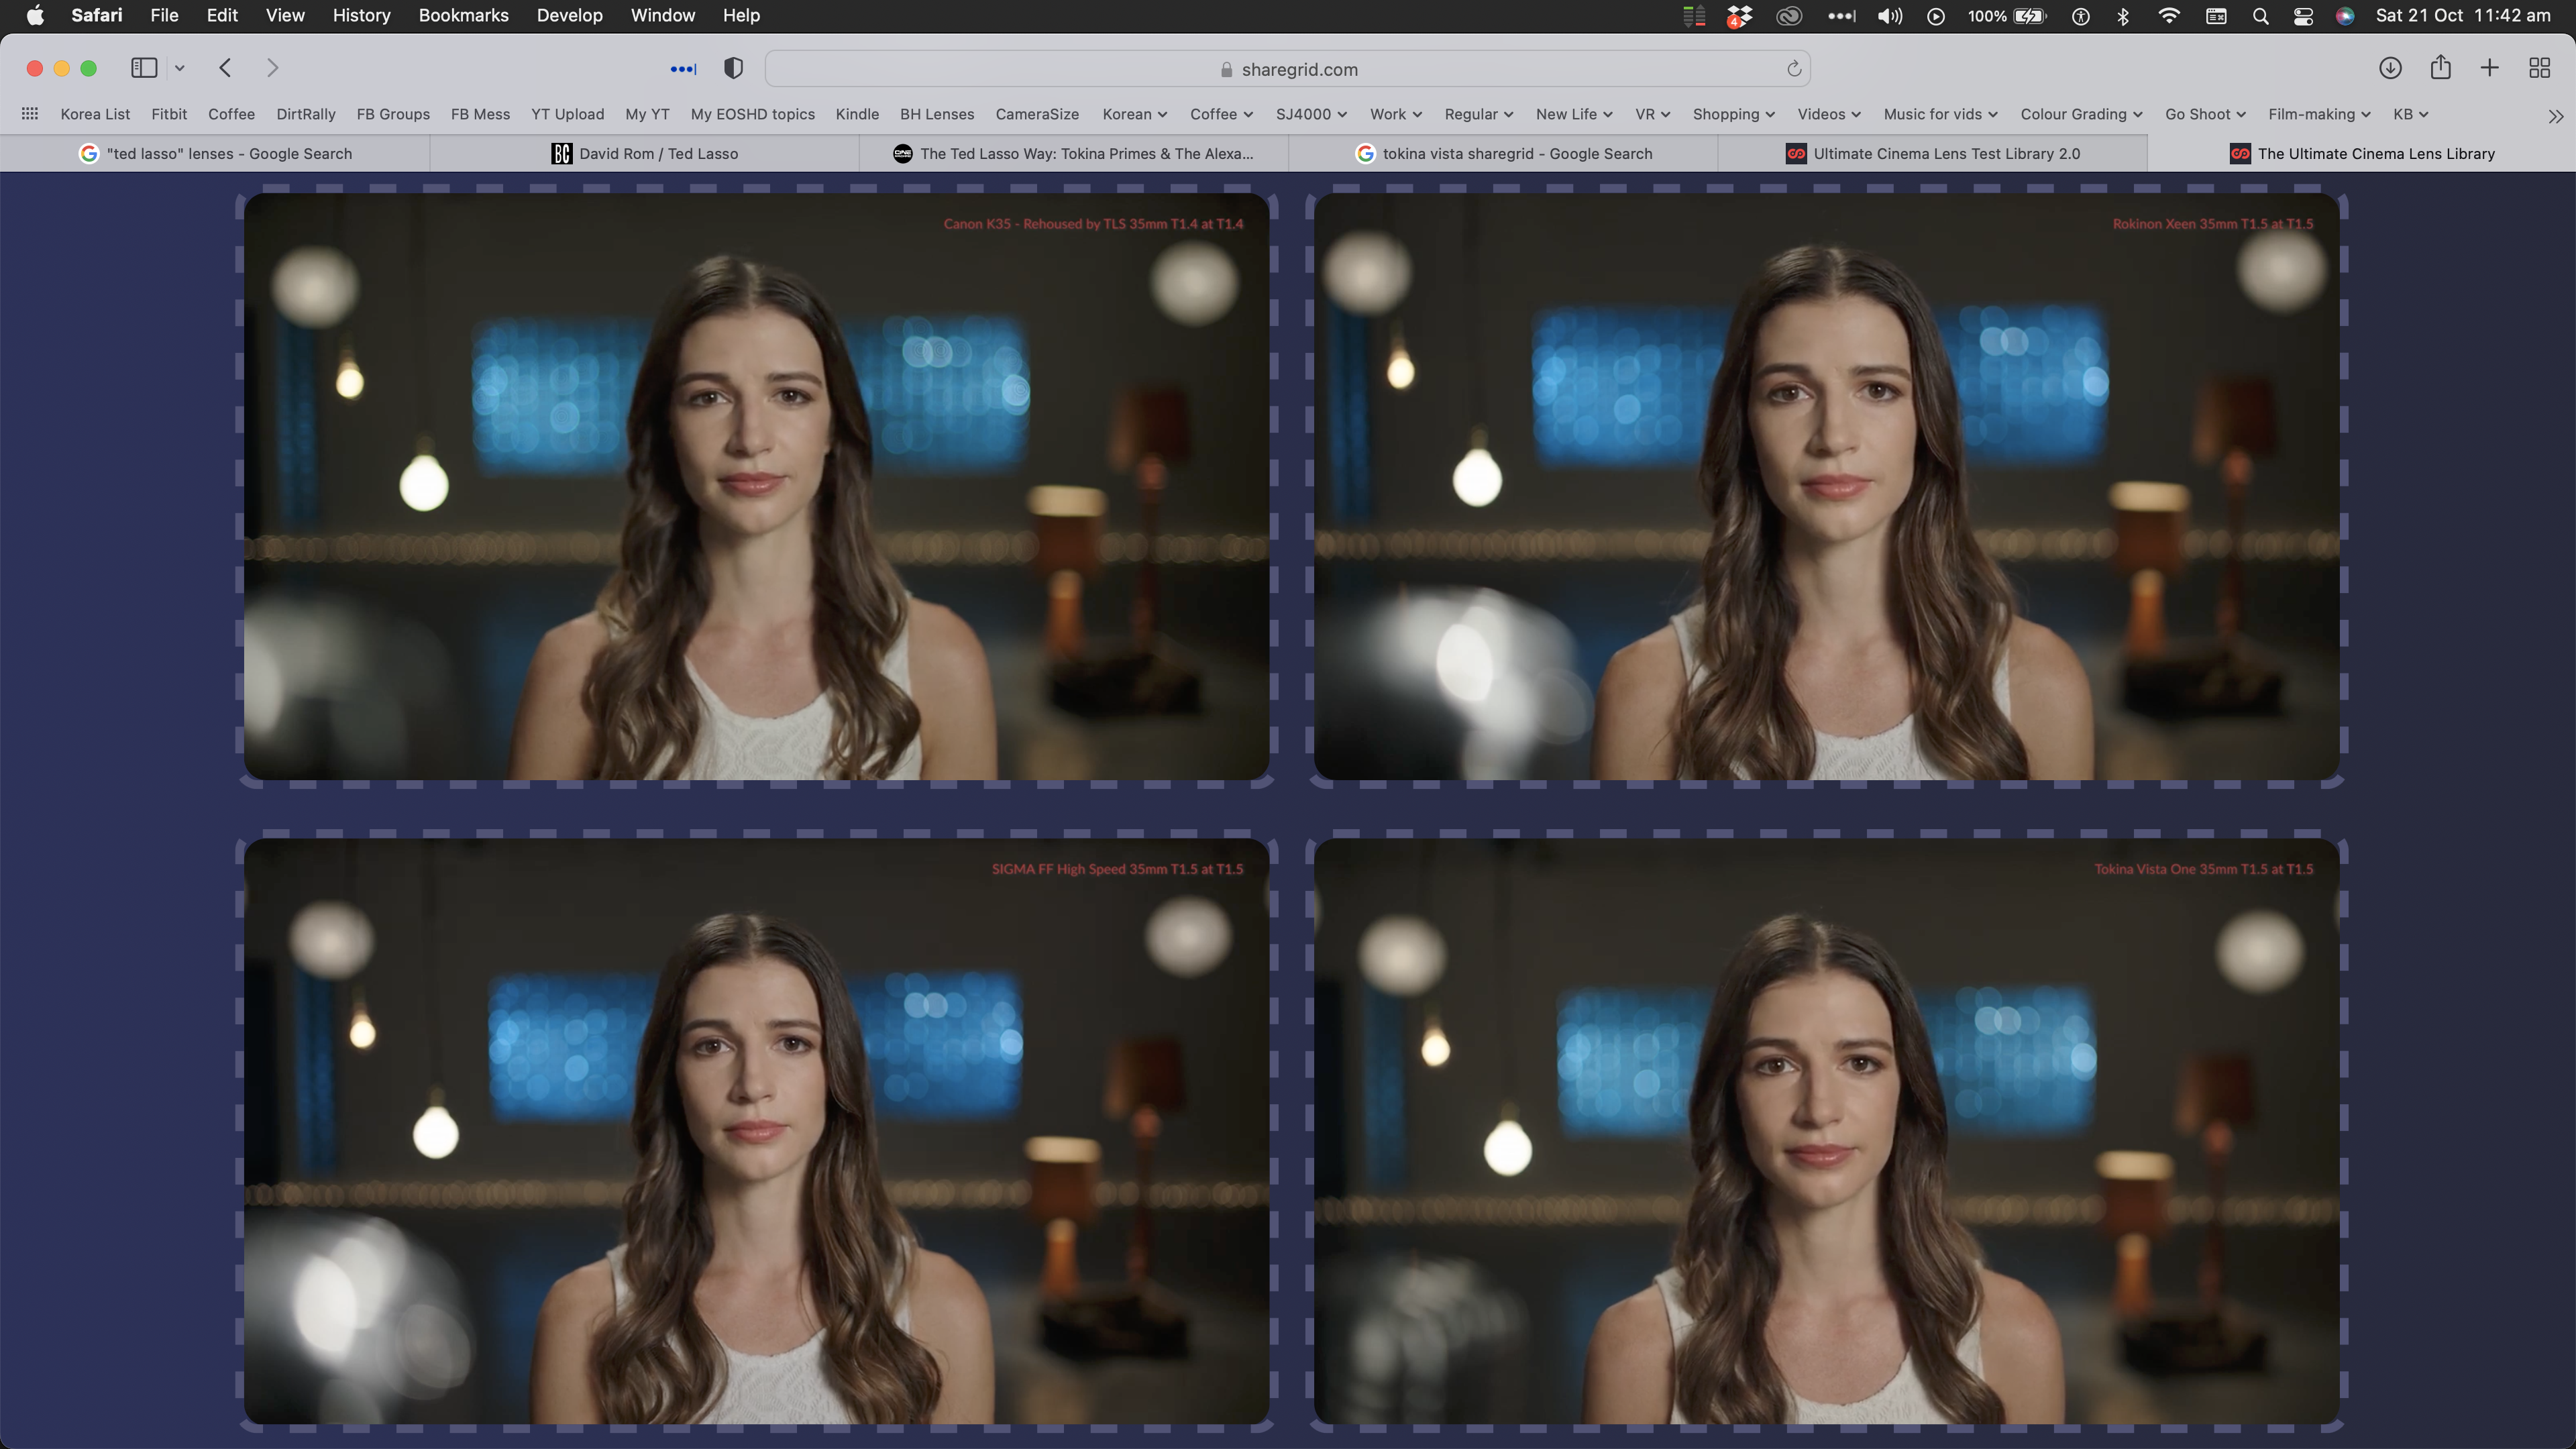
Specific examples are useful. The Tokina Vista lenses on Ted Lasso are relatively neutral but still do have a bit of character. Here is a comparison of them vs the ARRI Signatures nearest focal lengths and apertures. (Click to view image in proper resolution) I see differences in colour cast, contrast, background separation, and even aspect ratio perhaps? All lenses exhibit SOME character, although in the context of cinema, rather than TV, these lenses are relatively neutral. One thing to be aware of is how quickly we adapt to a look. Our eyes and visual system is incredibly adaptable, so much so that a significant element in colour grading is the design of the colour grading suite and workflows and processes so that your eyes continually have a neutral reference and so they don't gradually drift over the course of a project. With lenses etc there is no neutral reference. One thing that is interesting to look at is the VFX breakdown videos from shows like The Mandalorian where they show the process of making the 3D objects look as real as possible, then applying the same lens characteristics as the production used, which often has a significant effect aesthetically. Lens character is a tool that can be used to reinforce or undermine the creative intent of the film. It won't make or break your production, but it's available to you so why not use it?
-
My understanding that I have pieced together from snippets over many videos, articles, etc is that middle grey is important because it's where you would expose your skin tones, and then everything downstream of that makes sure to keep it in the middle and generally unmolested. It's very common for elements of a colour grade to find middle grey, go down a bit from there, then make some adjustment that goes from that point down to zero (e.g. making the shadows cooler), or to go up from middle grey a bit then make an adjustment that goes up to the whites (e.g. highlight rolloffs, warm up the highlights, etc). I don't think it's technically wrong to make an adjustment that messes with middle grey, but it's a convention that is useful. If you expose your material in this way, and everyone designs LUTs and curves and rolloffs and colour schemes etc that don't mess with it too much, then your skin tones will be preserved and come out the other end looking appropriate. It might seem a tedious and maybe OCD thing, but the opposite would be ridiculous - where no standard was the same and adjustments were all the Wild West and you would spend most of your time trying to find a series of adjustment that didn't push the skin tones down into the shadow region, then make them blue, then bring everything up so it's too high, then make everything slightly purple. It would be a nightmare. Well said. One thing I don't think younger people or non-professionals really understand is that up until very recently, video was completely dominated by a vast array of technical standards that were completely inflexible. I came to video from computers and the internet, so my perspective was that video is simply a series of images at a certain frame rate with a horizontal and vertical resolution with each pixel being a particular colour. This is mostly true now, where you can have 1920x1080 at 24 fps but just as easily have 1922x1078 at 21fps. But you don't have to go back in time very far before that wasn't the case. Take for example the BM Ultrastudio Monitor 3G, a USB hardware device that works with Resolve to provide a signal for your reference monitor: It has a TON of options for 2K: First up, these are 2K video STANDARDS. Also, note that there's 2Kp and 2KPsF - we all know that P means Progressive which means that each frame contains all the lines, which is different to Interlaced which is where each frame contains half the lines of the image and was a standard to sort of "fudge" extra resolution. But PsF is "Progressive segmented Frame (PsF, sF, SF)" and "is a scheme designed to acquire, store, modify, and distribute progressive scan video using interlaced equipment." If we look at the BM 4K Mini device that also does 4K outputs, we see that compatibility with tape machines is now no longer implemented for the UHD and 4K resolutions: So, as recently as the creation of the 2K video standard, these hardware compatibility work-arounds were still in full-effect. If we got further back and look at SD standards, there are only two! These are the only standards available, and the products don't even support outputting anything else. People who record digitally, edit digitally, and deliver digitally online, probably have no idea about the very recent past where video was about standards and technical compatibility. The creativity that was created by the ability to colour video digitally - the Digital Intermediary (DI) process. For reference, da Vinci 2K was the first system to support HD and 2K and was released in 1998 and cost $250,000 for the base price, with things like extra power windows costing extra (because they were additional hardware processing boards!). Before DI there basically wasn't any creative colour grading, beyond changing the way you treated the film by deliberately changing the exposure or colour casts of scenes or films. This adherence to standards and conventions is not only still very present in the minds of manufacturers and production professionals, it's the entire framework for thinking about how TV and cinema is made. The concept of "making a killer LUT" is as remote to the manufacturers as the idea of SMPTE or AESEBU standards compliance is to the LUT BROs of social media. It's also why the industry players are so conventional in their thinking and have so much inertia, and why innovations from outside the industry is what is really shaking things up (like BM, Apple, etc).
-
How interesting that it's the buttons that were the limitation. I guess it makes sense, but I wouldn't have thought of it. It's cool to see a software feature to get around it. I'm happy to acknowledge that GoPro have innovated, that's obvious, but criticism is a part of a balanced point of view, it's not irrational hatred. Everything has strengths and weaknesses, every product developed comes at the cost of the products that could have been developed but weren't. GoPro innovated, but didn't innovate as much as they could or should have, and one of the biggest criticisms is that they're not innovating enough to stay in business long-term, which I think is a fair criticism. It's also a reasonable criticism of almost all the camera brands. Those that think that camera brands are innovative should look at DJI and products like the Ronin 4D. THAT product is truly innovative. It includes more innovations in a single product than most camera companies make in a decade, or five decades. The really silly thing is that many of the innovations we see in todays products could have been made one, or two, or five product generations ago - there were no technical limitations - just leadership and product design laziness. It's not like creativity is scarce either, anyone who has spent any time with kids will know that ideas are plentiful. Had GoPro invited a stream of 5-10 year olds into their offices to play with the products and talk to the designers they'd have gotten dozens of actionable ideas faster than they could implement them. It's not like it's completely from left-field either... GoPro: "it goes to 30 feet underwater" Normal customer: "cool, why not more?" GoPro: "the water pushes the buttons down" Normal customer: "can't you make it go more?" GoPro: "how would you stop and start it? - you'd need some other way to communicate to the camera.. hmmm... well, we have the gyro now... that gives me an idea!" The idea of a second firmware with better codecs and disabling the buttons to go deeper is great, but it's not like they couldn't have done that on the Hero 5 Session - which was released 7 years ago.
-
End of the shallow DOF obsession? Is 2x crop more cinematic?
kye replied to Andrew Reid's topic in Cameras
I think a key piece of the puzzle is the human side - how we see and how our brains interpret what we see. Our eyes have an aperture range and focus just like a camera lens, so anything that is outside of this range isn't going to look natural. Images with slightly too shallow a DoF for the perceived subject distance will seem un-natural, but might be what we see if we have been poisoned or drugged and our pupils dilate beyond their normal range. If you go shallower than this range and it's just going to look completely wrong. It's AN aesthetic, but it might not match your DESIRED aesthetic. Our pupils dilate in low light conditions, so it's going to seem more plausible to open the aperture a bit in low-light situations. Our eyes do adapt the gain from our rods/cones so shooting with a fixed ISO isn't necessary as there is some flex there. In very low light we switch from the cones (which are the colour-sensing ones) to the rods (which are monochrome) which is why in very-low light we can't see much / any colour. Reducing saturation in colour grading might help in making scenes set in very low light feel more natural. Our pupils also dilate when we are looking at something we really like / love, and our eyes can adjust the gain down a bit to compensate, so opening up the aperture for romantic scenes is also appropriate. The other non-DoF element is in colour. We tend to remember scenes as being more colourful than they actually were, and I would theorise that this effect is greater if the memories were positive ones, so this could also be taken into consideration during post-production. I think a large part of film-making is using the equipment in ways that deliberately trigger the right emotional notes and psychological connotations, so knowing what these are and using them to your advantage is going to help your work be interpreted correctly, and the piece be more engaging. -
I'm thinking I'll grab either the 12-140 or the 12-60mm 2.8-4 in time for my next trip, whenever that ends up being. If I add it to the cost of the trip then maybe the wife won't notice! They're similar in size, and I'm not sure how much I would miss the extra extension TBH, but a bit of extra low-light might come in handy perhaps. Although there is a small difference in price...
-
My experience with shooting auto-WB is that almost all shots definitely need some balancing done. However, from all the (literally) hundreds of hours of colour grading stuff I've watched, it seems that every colourist always has a node for it, and talks about it like it's a thing they adjust on a regular basis. The thing about matching shots is often not discussed. Colour grading tutorials often just focus on grading one shot, so it makes sense that it's something that is sort-of implied too. I had an epiphany when I was doing the Walter Volpatto Masterclass (you can still buy the recording - link) and he explained the whole process. the entire production team design the overall look of the film and shoot and light each shot to have the right exposure and ratios (contrast) the colourist then gets the footage and their job is to take that work and make it look good on the target displays by doing the following applying a transform across the whole project to get the footage into the right display space (LUT, CST, etc) working with the bosses to develop a creative look (modern, filmic, vintage, blockbuster, etc) and then applying that to the whole project (they might develop a few looks that are applied to parts of the film, eg, vintage look for flashbacks, etc, but it's mostly one look, and they should always work together) performing minor adjustments to each clip to fine-tune elements like the WB or contrast (occasionally things change on set and you compensate for these, but mostly this stuff was determined by the camera and lighting on-set) troubleshooting any issues with various shots.. for example, distracting objects in the background, dust on the lens, maybe some shots need noise reduction, etc. then, only if there's time, would you look to finesse each shot and make it look glorious As you see, the look goes over everything, and the shots are then adjusted as needed. Often the colourist will apply the overall transform and look, then zoom out and just look at all the shots next to each other and looking for what stands out as being wrong or not fitting etc. This way you can quickly bring the footage into alignment by just looking at the issues straight-up. Then you start looking at each shot individually. They also recommend working in passes, doing WB / contrast / sat on each for example, then doing power-windows etc. This ensures that at any moment you have a film that is watchable. If you finesse each shot in sequence, you might get half-way-through and run out of time and then you're completely screwed. The way I do my projects (which are definitely NOT shot well) is to: Apply my default nodes, which include the input transforms from each camera space, an overall timeline adjustment with 709 conversion and look nodes setup, and the default node tree on each shot Adjust the overall look (choosing the transform, amount of subtractive saturation, etc etc) Then I go through and exposure / WB / contrast / saturation for each shot Then I go through and add power-windows to emphasise the subject(s) on each shot to direct the eye Then I go through and remove any background elements that are distracting (too bright, too saturated, etc) Then I fine-tune from there It's a different workflow and different approach. Despite shooting on full-auto, the cameras are getting better and they need less adjusting too. Not sure if you've come upon this before, but different countries / cultures often have wildly different colour preferences. They also potentially have very different viewing equipment and viewing conditions. At the same time that white people in the west were trying to look tanned, people across a significant proportion of the rest of the world were trying to look as light-skinned as possible, sometimes even risking their health with all sorts of skin bleaching and whitening products, and with darker skinned people often being discriminated against - colonialism really is the gift that won't stop giving. In such situations, how do you create a LUT that positions skin tones for these completely opposing preferences? Also, going back to the whole point of this thread - think about why the default transform isn't a final beautiful image.. it's not like manufacturers can't design a LUT with a strong look, YouTubers have no problems whatsoever doing it! It's that they know that there is no universally desirable look, so they don't even bother to try. Actually, that's partly incorrect. They DO create finished looks, they're the 709 colour profiles in the camera. It's assumed that if you're shooting LOG then you want to do it yourself.
-
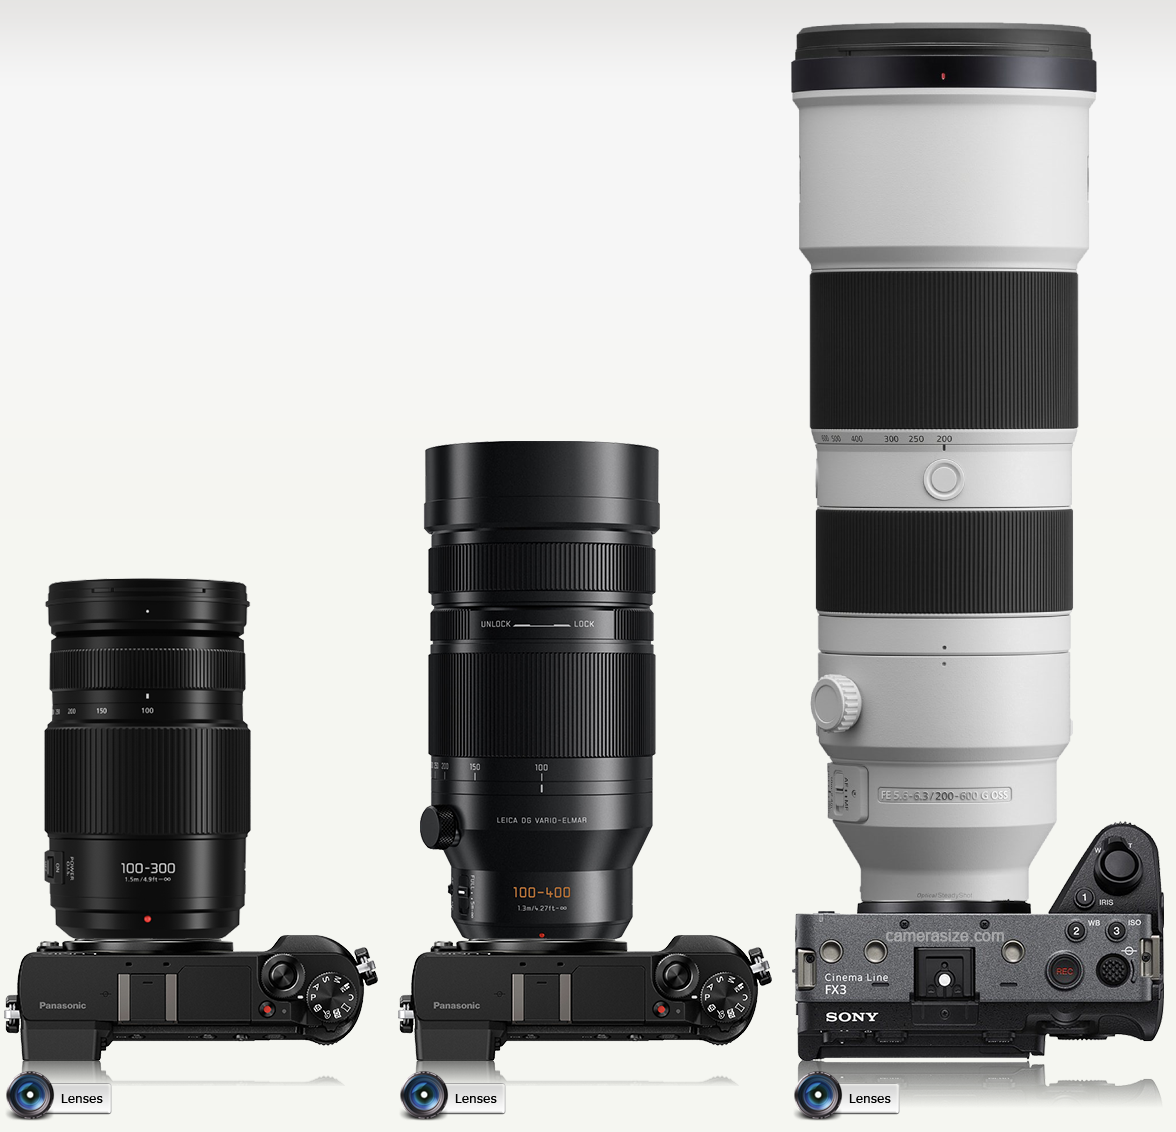
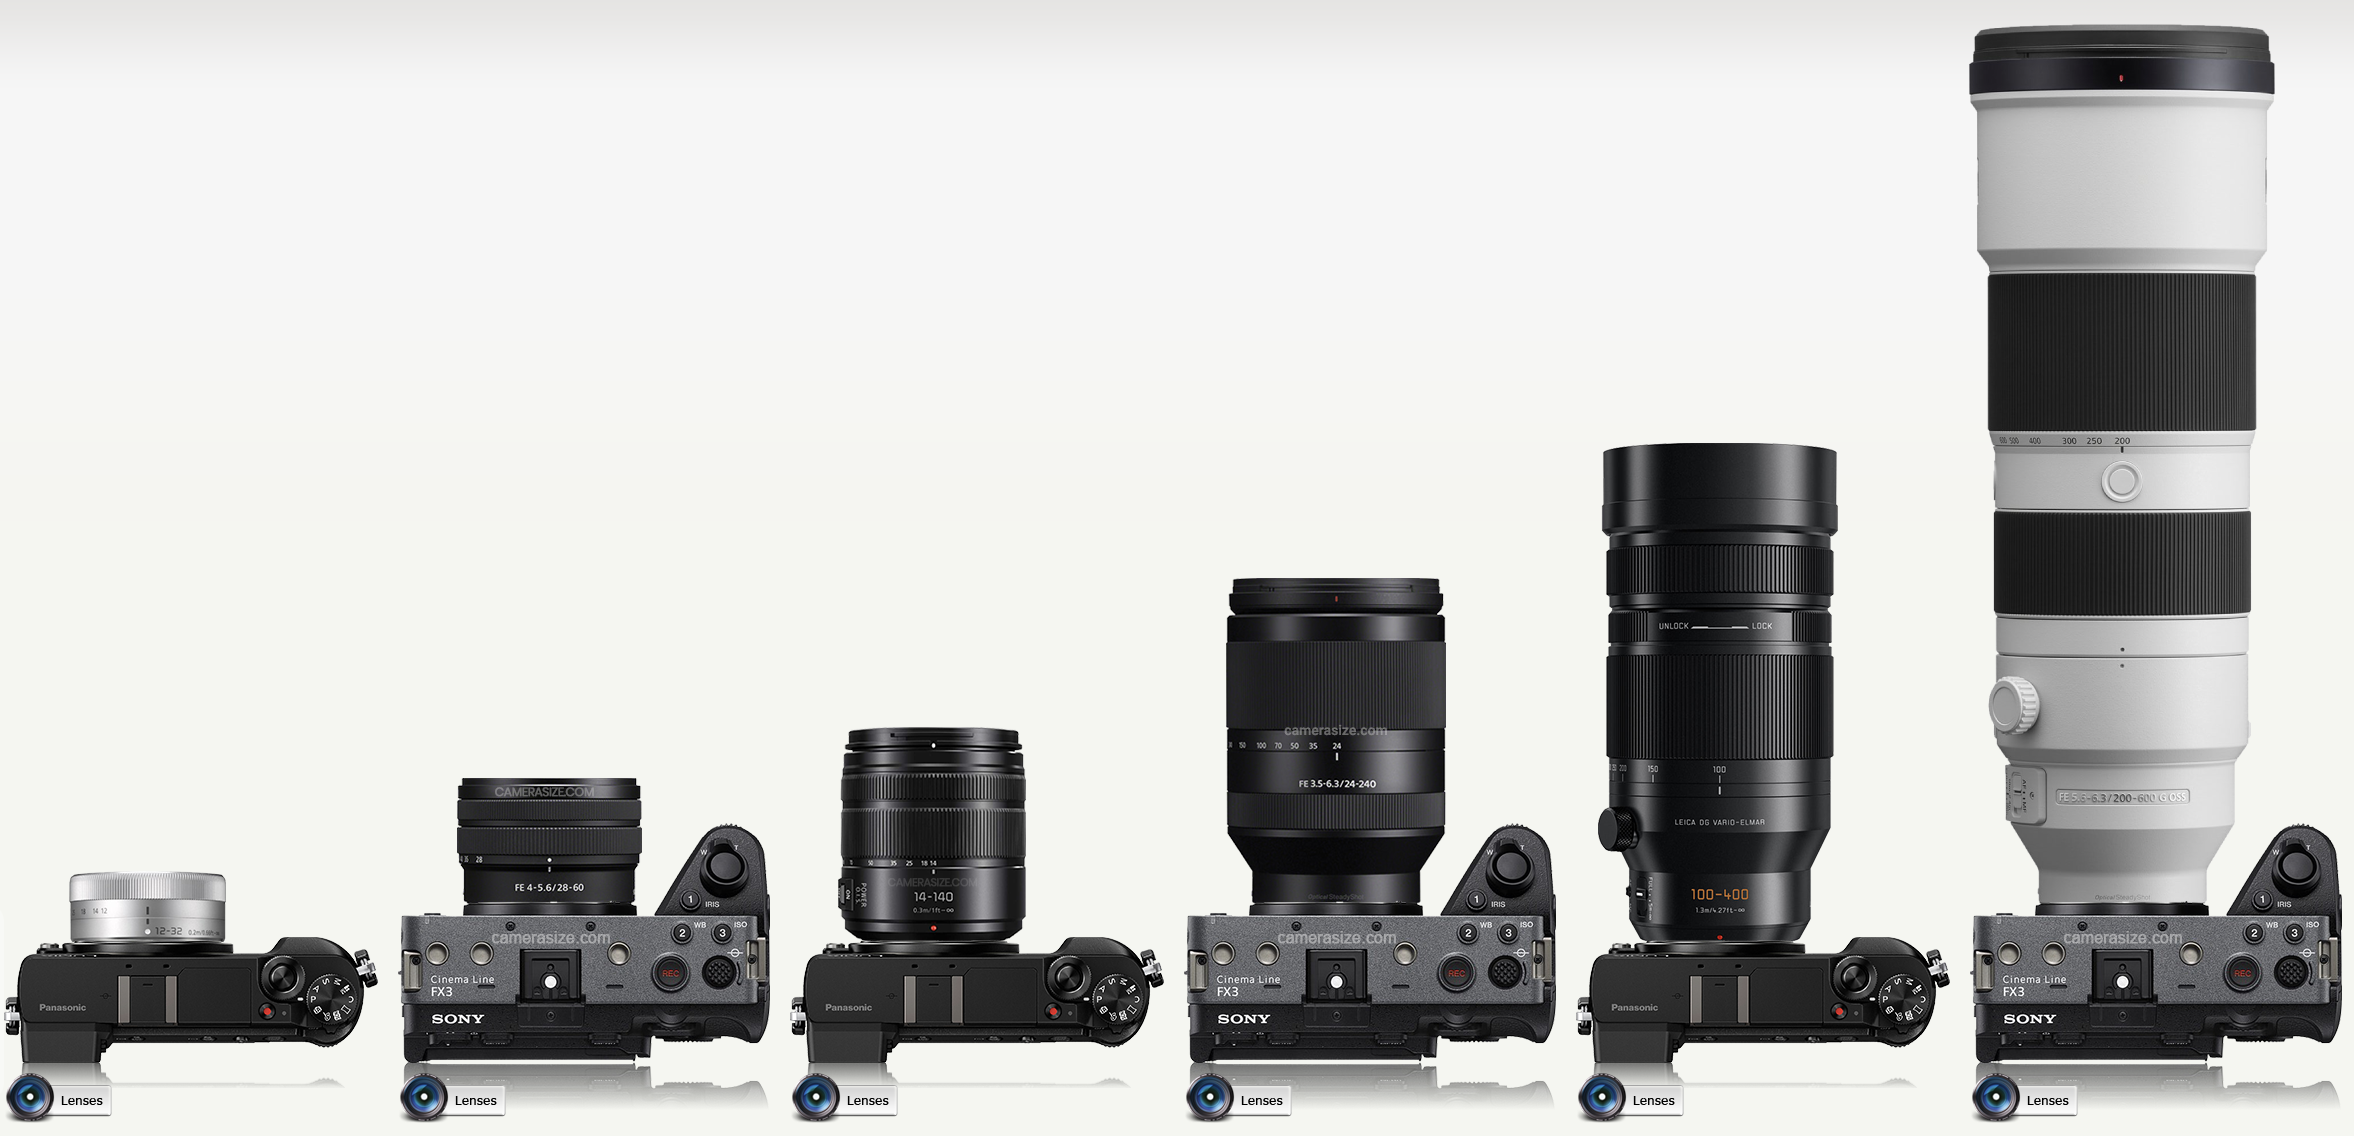
Actually, it's even clearer for the sports/wildlife when you include the MFT 100-300mm lens, which matches the zoom range on the FX3: I have no idea how much use the difference between 600mm and 800mm is, but if you want it, the MFT option is there. AFAIK there are no Sony FF zooms beyond 600mm, so that's a win for the MFT too.
-
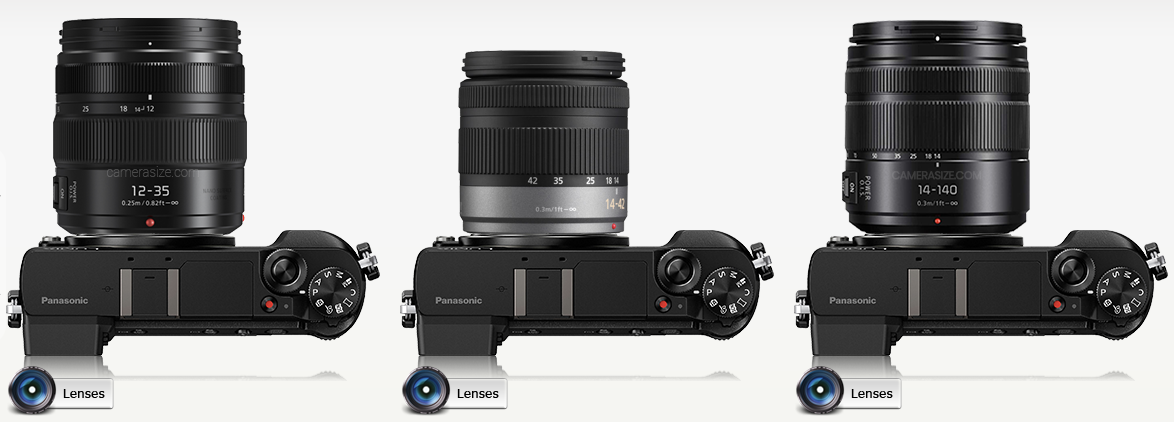
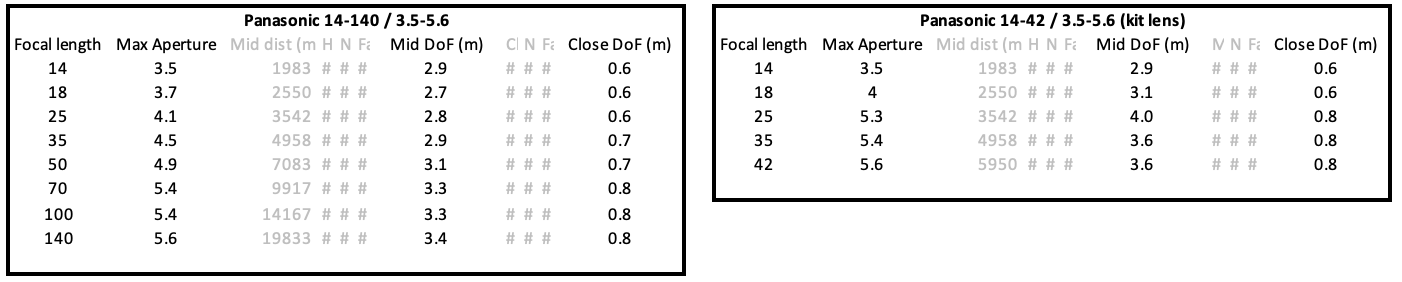
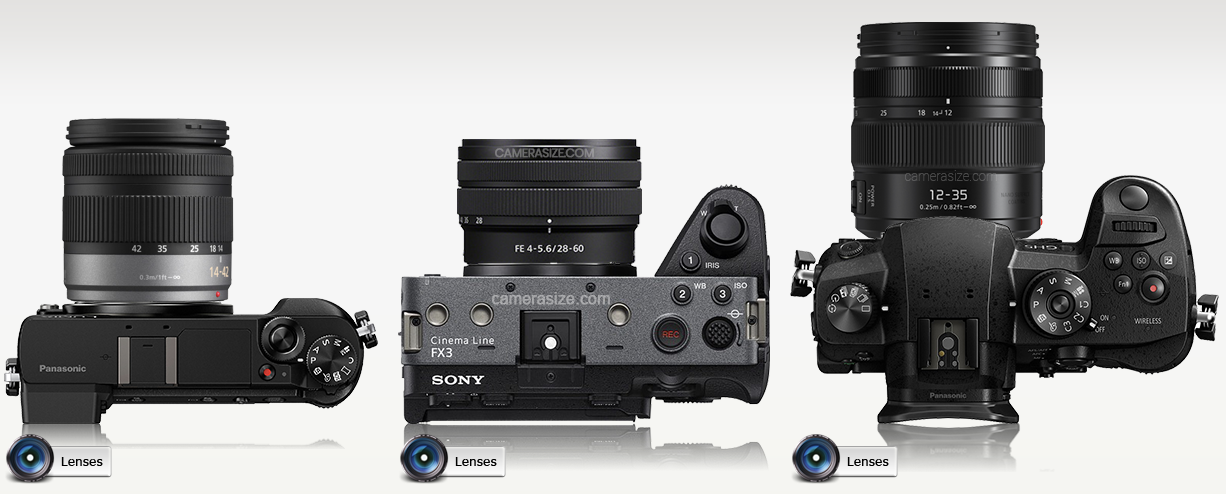
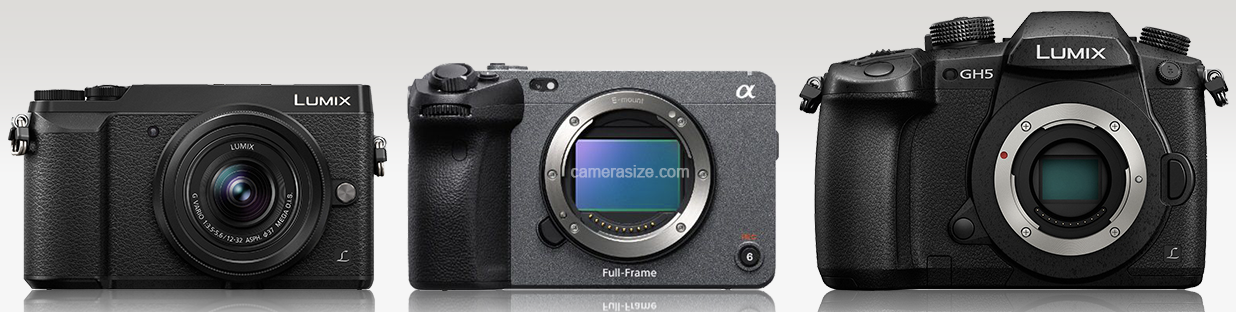
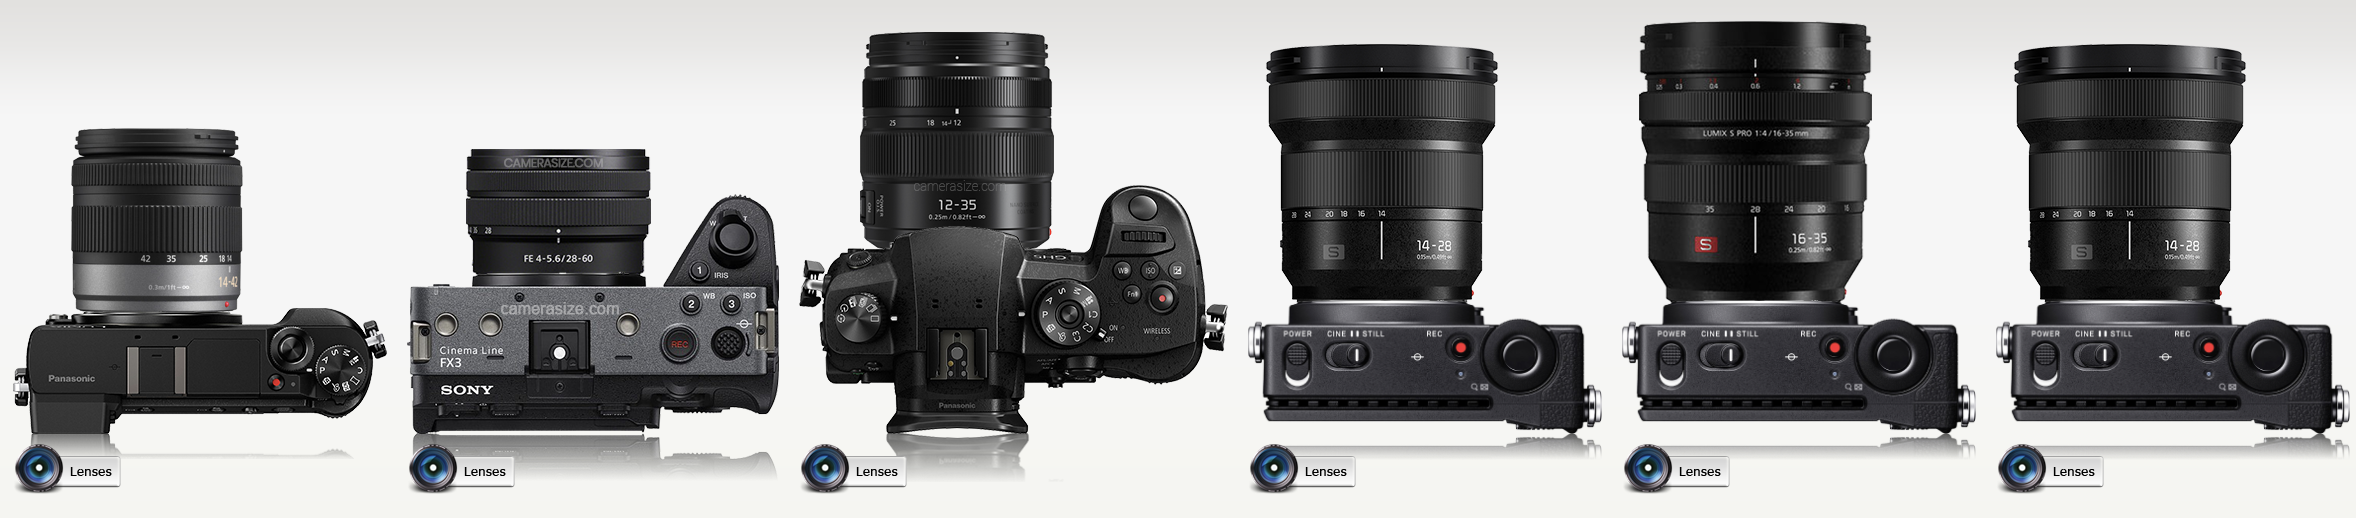
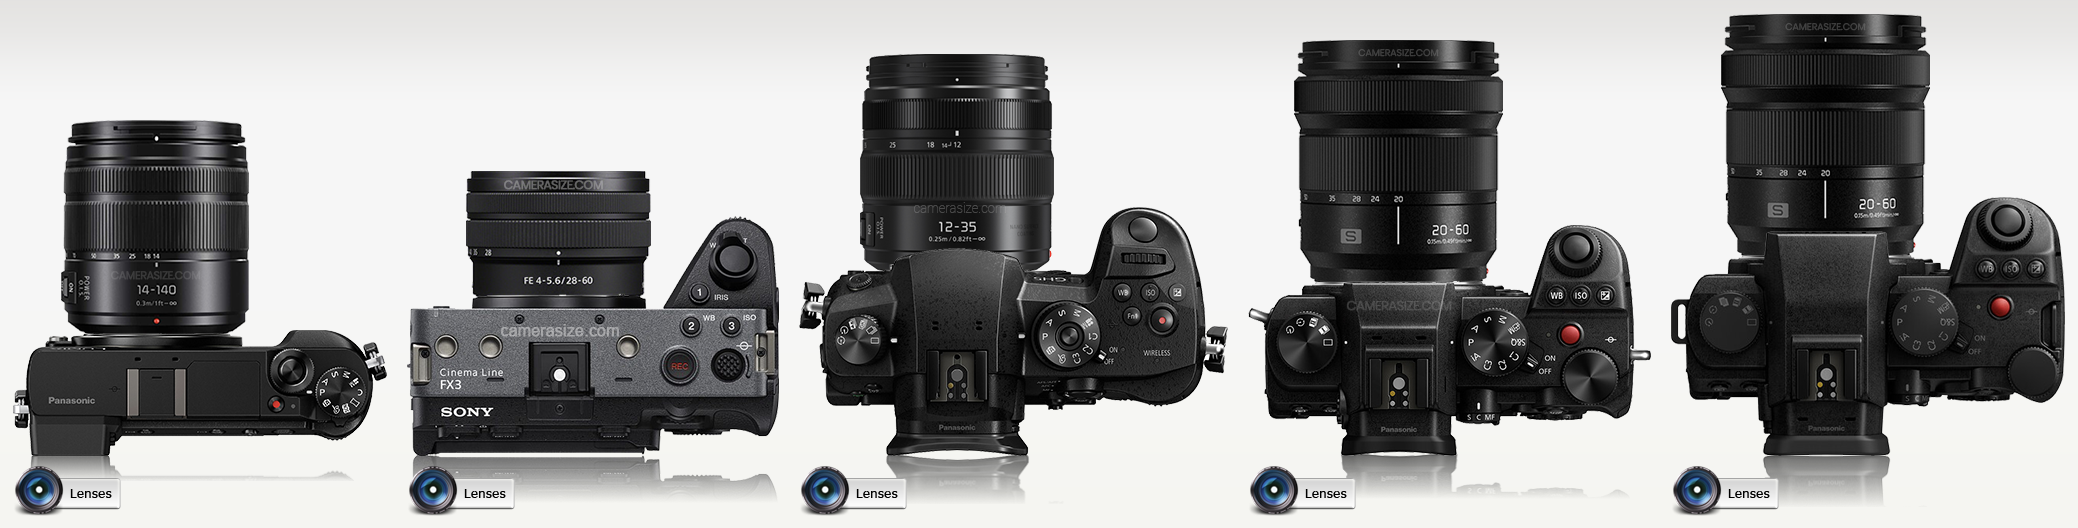
In my recent deliberations / fantasies / hallucinations, I've been contemplating my recent realisations, which include: I don't need or want super shallow DoF (beyond F4-5.6 FF) I want quick AF-S but don't care about AF-C I want maximum flexibility, and to include tighter FOVs, which means a zoom I want the lens to be as small as possible In this mindset, I discovered two interesting lenses. The first is the Panasonic 14-140mm F3.5-5.6 zoom. Obviously it's a 10X zoom lens, but it's a similar size as the 14-42 kit lens and the 12-35/2.8 lens! It's also faster than the kit lens! The second interesting thing I realised about the variable speed zoom lenses is that while they're not fixed aperture, they come pretty close to being fixed DoF. I worked out the distance to get mid-shot (waist-up) and close-up (shoulders-up) shots for each focal length, then calculated the DoF at each distance. We know that DoF gets shallower with longer focal lengths, but the variable zooms get slower with those longer focal lengths, and it turns out that these mostly cancel each other out. The 10X zoom lens only varies from 2.9-3.4m over the entire range. (For the imperial myopicists, a meter is roughly a yard...) On top of that, the 14-140mm lens also has pretty desirable DoFs.. If I am taking a mid-shot then, for my work at least, it's an environmental portrait and so I'd want to include a bit of the environment in it, but getting a bit of defocus is also desirable if there is some actual depth in the scene. 3m seems about right, as getting too much shallower than that will start to make it look like the person is in front of a green-screen. If I am taking a close-up then it's probably a shot that is either in isolation of the environment, or the environment isn't required if edited between two other wider shots with deeper DoFs. The other little rabbit hole I went down was looking at the FX3 / FX30 bodies and realising how small they were. Of course, then comes the question of lenses, and then I found this little beauty - the FE 28-60mm F4-5.6... it's tiny! That is the GX85 with 14-42/3.5-5.6 lens, the FX3 with 28-60/4-5.6 and the GH5 with 12-35/2.8. If I went full-frame I think I would look at the whole system and the size of the various lenses and that would be a huge determining factor. Also, because I am not pretending to be Zack Snyder, I'd much prefer to have a modest aperture lens and combine it with a camera with spectacular low-light. Unfortunately, my investigations showed that the L-mount system doesn't really have any compact zoom lenses at all.. That's the FP with 14-28, 16-35, and 20-60, but none of them have OIS. Combine that with the FP lacking IBIS, and you've got no stabilisation at all. If you add the S5 and S5iiX to get some IBIS, here's the lineup: Of course, the elephant in the room is that the other options are smaller, better, or both.. the GX85 has a 10x zoom range and dual IS and is smaller, the FX3 has dual IS and is smaller again, the GH5 isn't smaller but has dual IS, and the S5 combos are the largest and only have IBIS. Of course, if you take the Sony 28-60mm lens out of the picture, then the Sony system also reverts to tiny-body-huge-lens-syndrome too, but it's a serious advantage for the Sony. Of course, if you compare the GX85 vs FX3 for walk-around setup, 10X zoom, and wildlife/sports setups, then the situation is clear: If I was to go full-frame, it could only be Sony at the moment due to lens choices, and only because the FX3 has IBIS and they have that little 28-60mm zoom.
-
How do you know... you could have literally dozens of them on you right now without knowing!
-
You can see the lens in this shot.
-
Just found this... read the caption under the picture - one of those little things is a camera - imagine the circuitry inside it! https://spectrum.ieee.org/tiny-robot
-
My impression is that it's really about the right part for the job. Physically smaller resistors are easier to fit into smaller circuit boards and around small chips with lots of pins, etc, but also have lower power handling, so it really depends on the application. I think over time most electronic devices have a relatively constant number of parts. As time goes on and we want more features and higher performance you'd want to add more chips, but as we gradually work out common combinations of functions we create chips that combine many functions into one. For example, back when CD players were the thing, there would be a chip that read the signal off the disc, a DAC chip that converted it into analog signal, and then an amplifier that drove the CD player outputs which go to the preamp or amplifier. Later on they made digital processing chips that sat in-between the signal chip and the DAC. Later on they made chips that did all 4 of those functions. So regardless of the thing you want, there's likely to be a number of chips that you need to have, you'll need to make them work together physically and digitally (with the right configurations etc) and you'll need a controller chip to enable the user to instruct the chips what to do (change modes, change settings, record, stop, playback, etc).
-
Action camera with handle? They have audio inputs and are wider than 28mm. If the problem with the smartphone was fragility, put it in a protective case.... or maybe even mount it in something that gives it a handle and mounting points? It'd still be smaller than a mirrorless but has audio inputs. You could literally just use it as a camera and not even put a SIM in it.
-
The tips for networking I've learned for networking in the corporate world (which is likely to be broadly similar) are: Be brief - people like it when you respect their time Say something in the message that is unique to them - this shows them you haven't copy/pasted to a million people Tell them why they might contact you Tell them how to contact you Tell them how to check out your previous work A message as simple as "Hi - I loved your work on project X, I do sound on similar projects. I'd love to work with you - if you have something coming up get in touch! <link to bio>". What I learned about networking: People hire people they get along with, skills are necessary but are a secondary consideration When meeting people, establish rapport with the other person first, ask questions about their own work and projects, don't talk about yourself or pitch unless they ask If you can solve a problem for them or give them advice (that is welcome!) then you'll stand out and be seen as useful If they ask about your work, don't embellish or diminish it - successful people can often tell when people are bending the truth (even on gut-feel) and its an instant fail Focus on understanding their situation and challenges and try to help You probably know much of this, but in case you didn't, and also for the lurkers, thought I'd elaborate.
-
Electronics are so complicated now that it's almost impossible to build your own stuff without having thousands, or tens of thousands, or hundreds of thousands of dollars of equipment. My dad loves electronics and messes around with Raspberry Pi computers to make automated things (like a greenhouse where there is a fan and motorised window which he can control to keep a desired temperature range etc). He had sometimes had issues building the little temperature probes, which are little chips that you mount on little circuit boards. He printed out the circuit board pattern and etched the circuit boards himself, but when it came time to solder on all the components around it, he found that the surface mount resistors he'd ordered were too small for him to see! Not too small to pick up and work with (which they were) - they were literally too small to see on the piece of plain white copy paper he'd put them on. To give you an idea, they would easily fit into the grooves on your fingers that make your fingerprints! He had to order a new batch and hope that they were bigger (they were) but still very very difficult to solder by hand. You could just say "use human sized components then" and that works sometimes, but with digital communications lines between chips, the length of the trace between the two chips matters, because depending on the physical length of the trace they work like echo-chambers with the digital signal bouncing back and forth, and also as antennas both broadcasting the digital signal to the surrounding areas and also receiving other digital signals from surrounding areas, so even just by putting two chips the wrong distance apart they can fail to talk to each other. I wish it was easy, but it's really not. Plus, then you have to program everything. Have you seen the code for Magic Lantern? They're only modifying the firmware that Canon has written, you'd be writing it from scratch!
-
People seem to be obsessed with nit-picking the colour science of cameras, but indicate they don't colour grade for one reason or another. To me, even a few simple adjustments can improve the image so much more than the differences in colour science between manufacturers. In fact, the image out of camera is like a plain sponge cake straight out of the oven - it's nice and the quality matters but it's far from the final result. Colour grading is also talked about as being super complicated, and it can be, but it doesn't have to be. Simple grades can still be really powerful. Here are some examples from online, to show how much of a nice image is camera colour science and how much is colour grading. ARRI LOG: With ARRIs LUT: Grade: The above grade was done using only white balance, the lift / gamma / gain controls, a vignette, log wheels, in that order. To look at skin tones, the holy grail of camera colour science - here's a before and after.... before: Then on top of the previous look, here's additional treatments to give it more of a film look. These additional adjustments were: Gain (to lower exposure), white balance, saturation (lowered), darken shadows, in that order. Which was inspired by this frame from Sicario: Here's the video showing the whole grade: https://youtu.be/8GkcqEA72QM Next example - SOOC: with 709 conversion: Grade: Video link: https://youtu.be/fRDjEB6ryyQ Next one - with 709 conversion: Grade: Video: https://youtu.be/OmBBYHMi_ek Next one - SOOC: With 709 conversion: Grade: Video: https://youtu.be/UNW_8jcGJqw There are literally more examples online to count, but I just focused on the more neutral looking colour grades, as the people doing dirty film grades probably don't care about skin tone minutia when they're going to pummel the image with Dehancer etc. So, what's the TLDR? Even half-a-dozen simple steps applied in addition to the manufacturers LUT can make a huge difference It's about making small changes to make the image look slightly nicer, and they add up The reason that fancy cameras look incredible is because the colourist takes the great work done on set and expands on it How do I get started? Look at the image and work out what tool might improve it (if you have no idea, just try the basic ones) Wiggle whatever tool back and forth, deliberately going too far one way and too far the other way, then find the best spot Compare the adjustment you just make to see if it makes the image better or worse, if it's better then keep it, otherwise undo (sometimes a really good adjustment will look completely natural and the 'before' will look like something is being applied to the image and is damaging it) Go to 1. Repeat until you can't find anything that makes the image look better. If you're using another image to inspire your look, then for step 1, just look at both images and work out what looks different about yours, and try and fix it. Is it brighter? Darker? More contrasty? A different colour? More or less saturated? Adding a vignette to lighten your subject or darken the other areas of the frame is a good trick. Looking to find anything in the frame that's distracting and de-emphasising it is really useful too - even just lowering the brightness or saturation can really stop it from fighting for attention. Even by the time you've adjusted these basic tools, you'll be well ahead.
-
Smartphones tend to have a mic input, sometimes through an adapter, and the odd one has a larger sensor than normal. If you're ok with older small-sensor cameras then maybe a newer smartphone with larger-than-average sensor might be good enough?
-
That video has flicked a switch in my head. I have now gone from asking "what can I shoot with my phone?" to "is there any reason to not buy this and shoot everything with it?" and "why do I need a separate camera at all?". I genuinely think that none of my cameras can better those results - not the GH5 or even BMPCC / BMMCC. I'm not even sure if cameras like the S5iiX would do much better.
-
Yeah, that's the best result yet.. it's genuinely incredible!
-
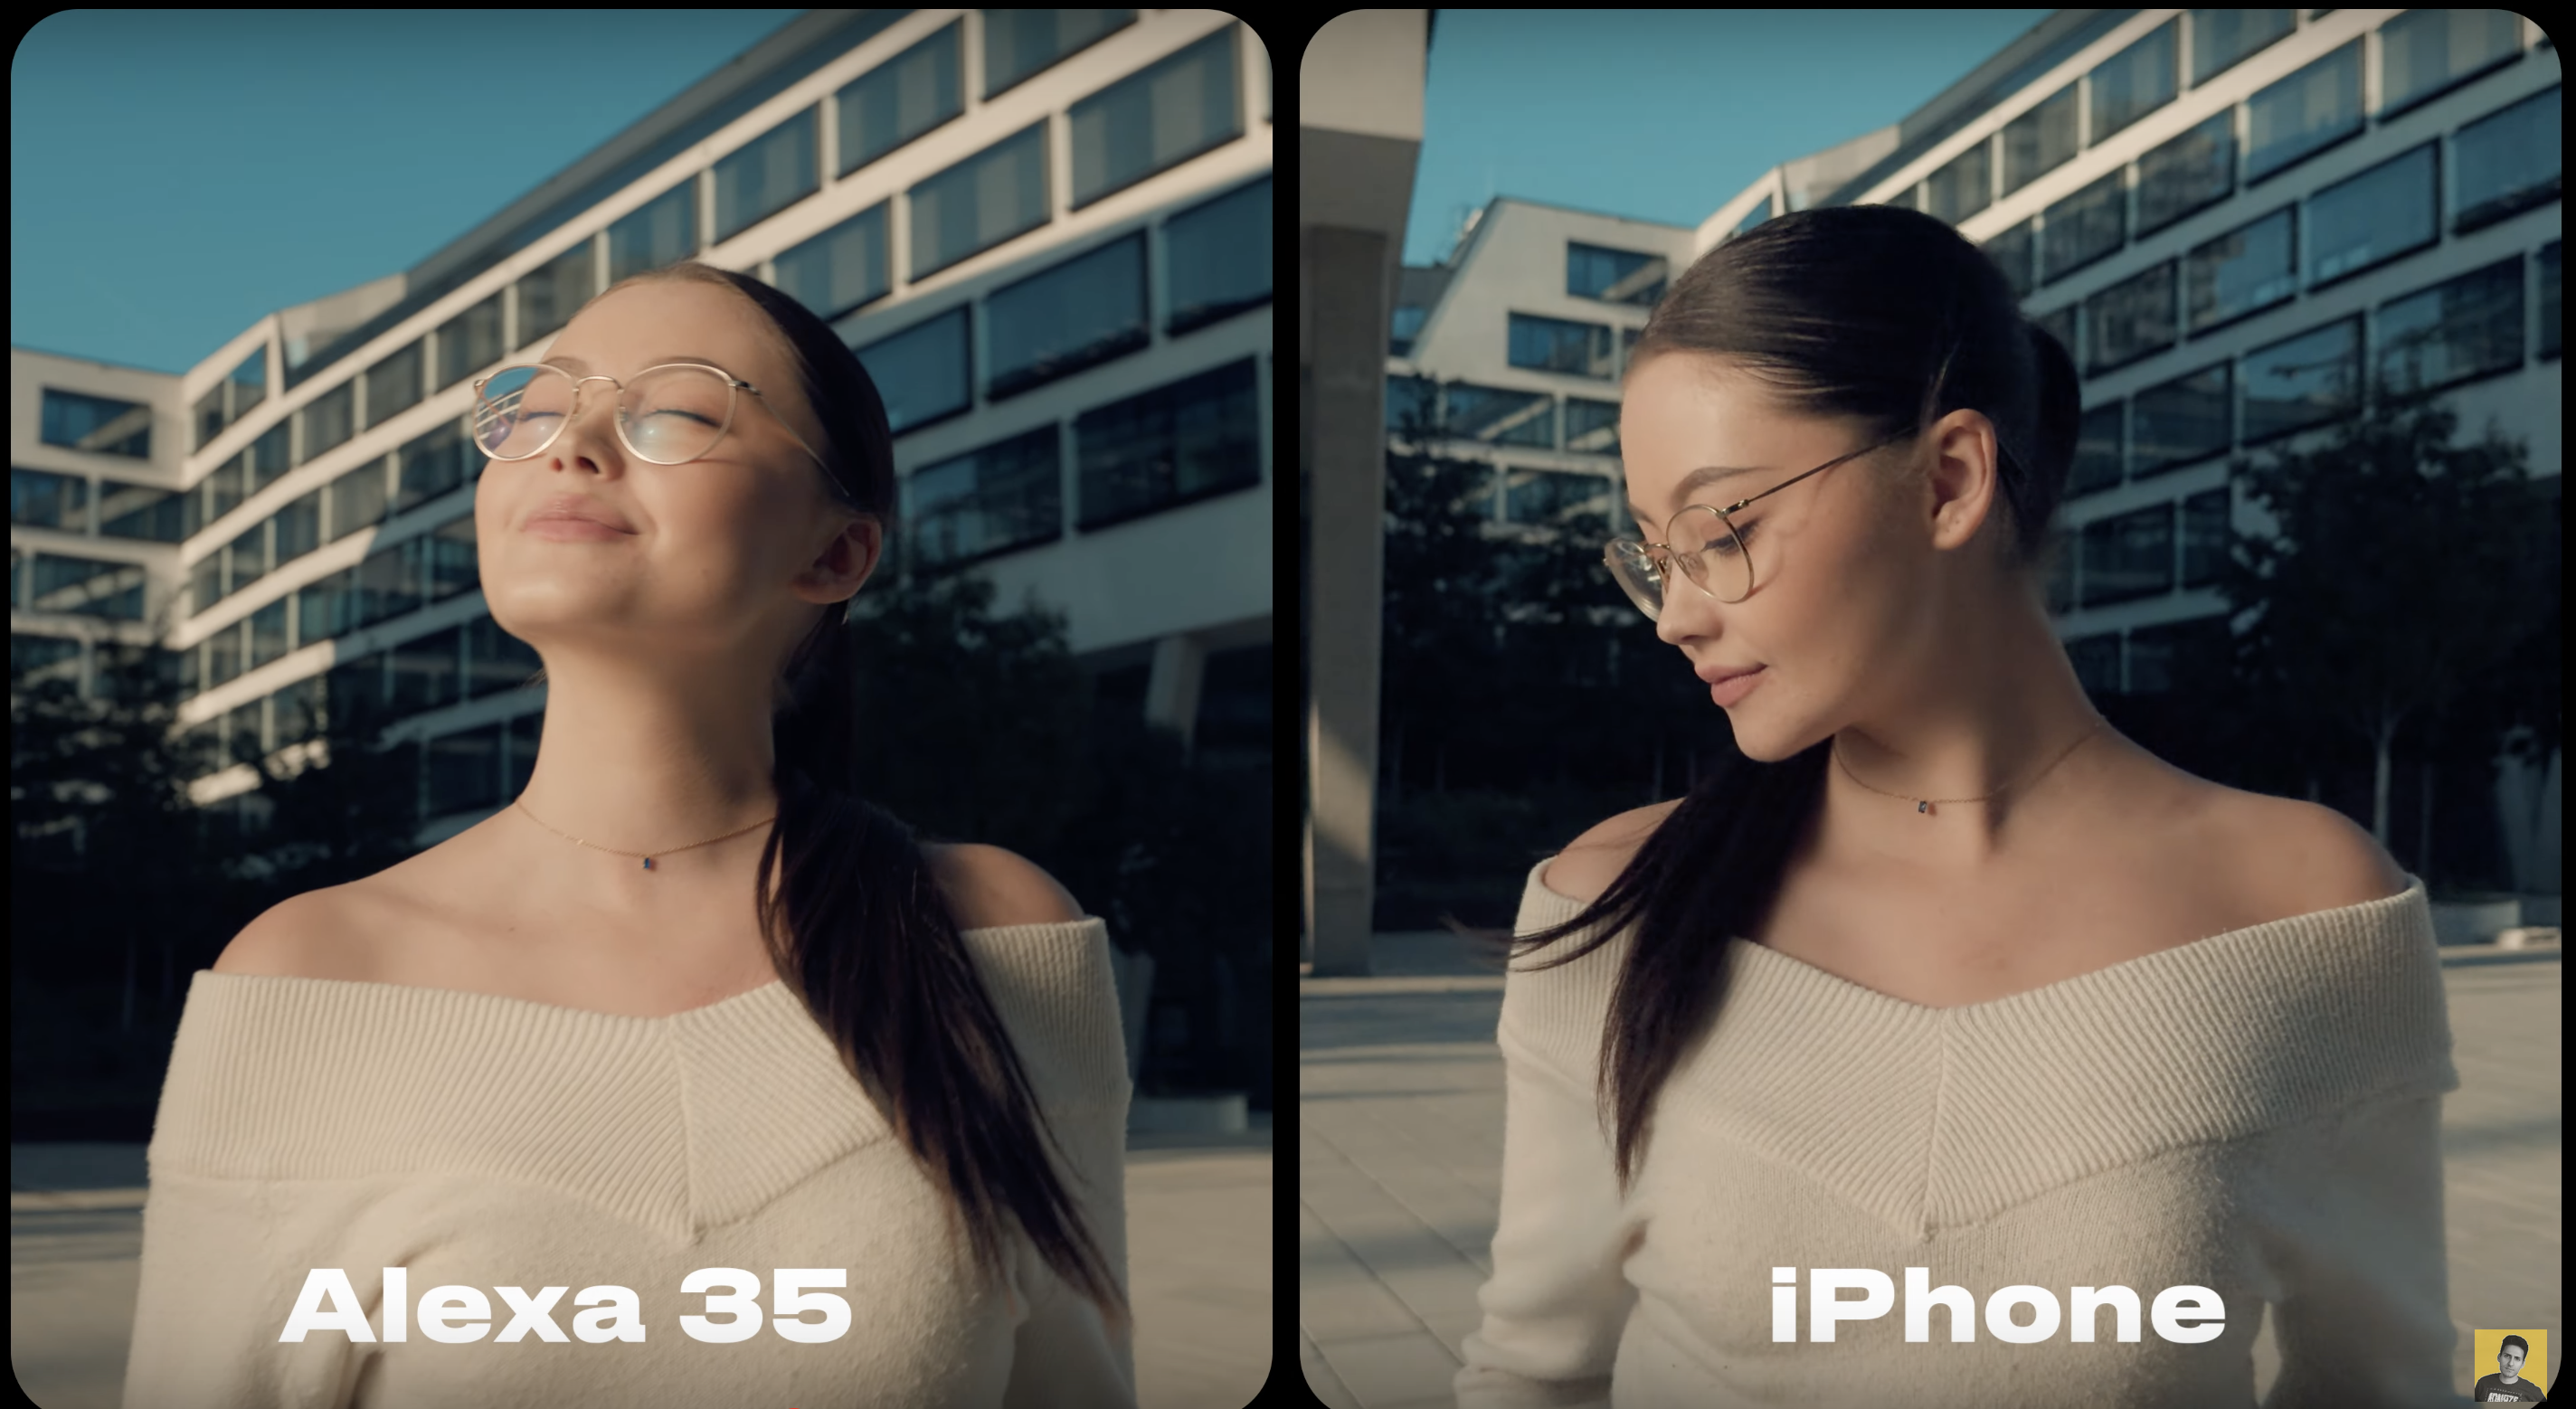
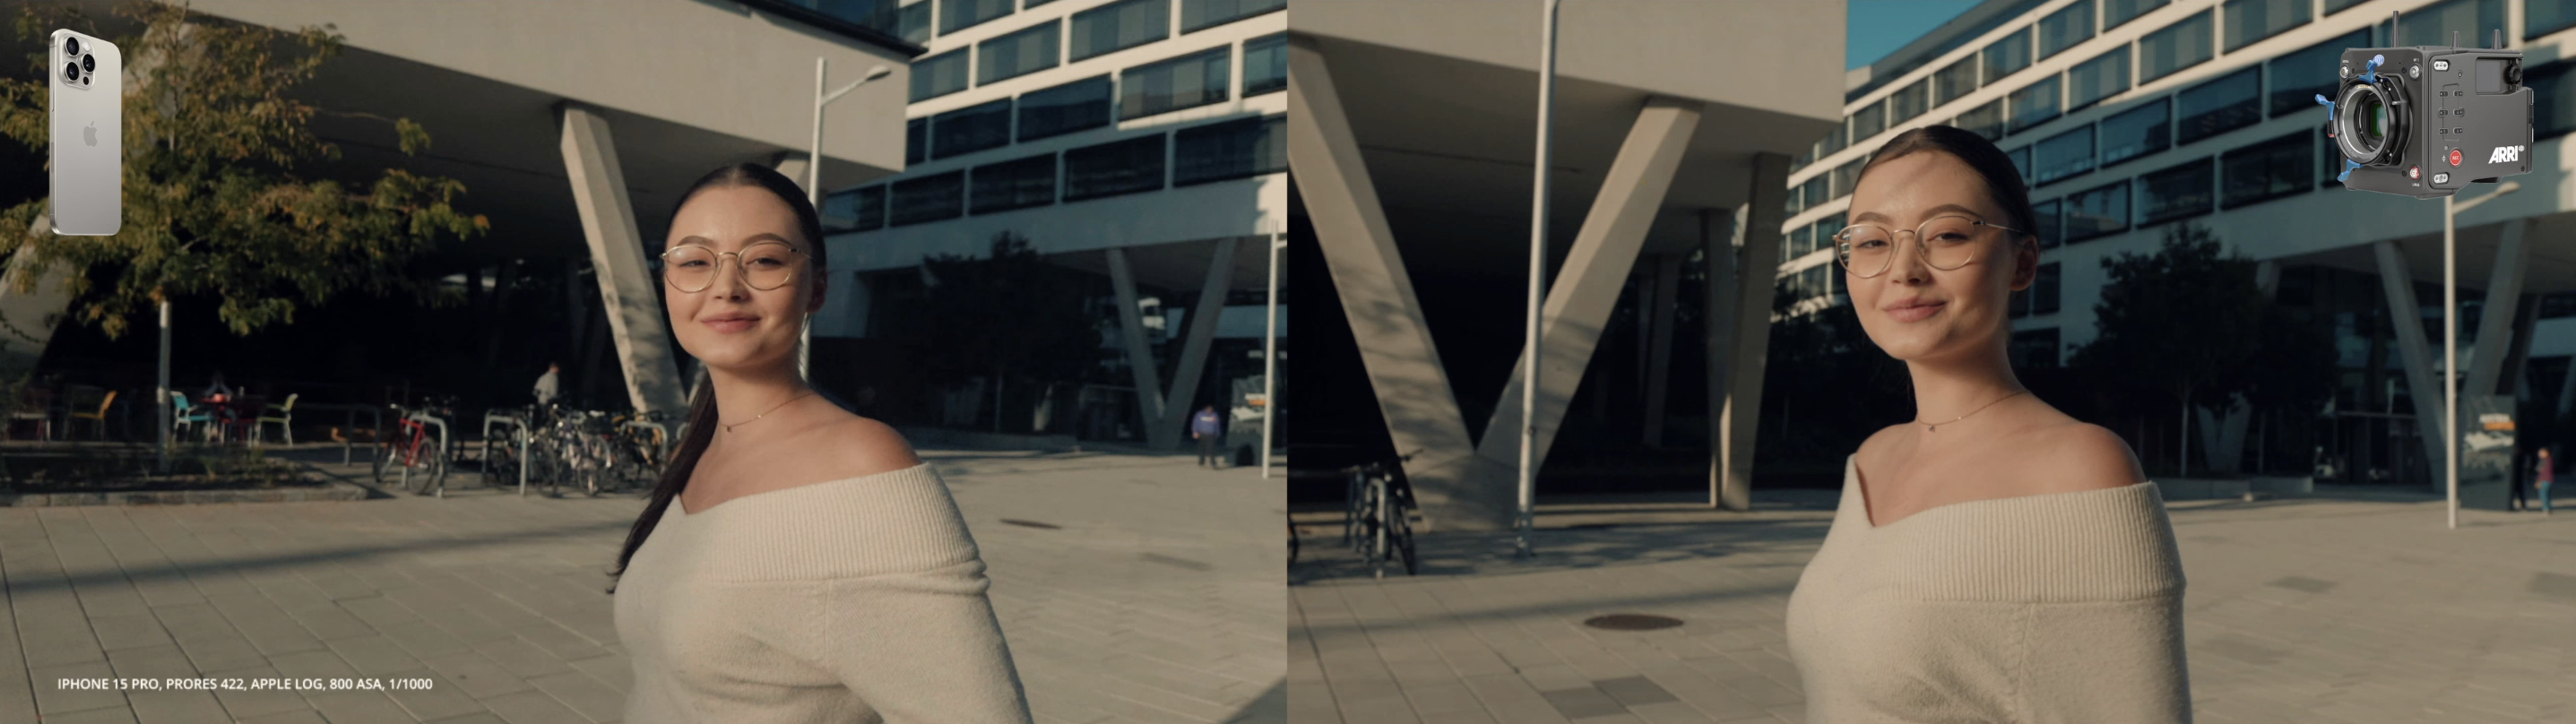
Controlled and properly shot/graded side-by-side Alexa 35 vs iPhone comparison.. It looks great but (spoiler alert!!) it's not as good as the $110K camera package, especially when pointing into the sun..
-
Looks like the project is progressing... we've talked about it a few times before: https://www.eoshd.com/comments/topic/44730-raspberry-pi-releases-an-interchangeable-lens-camera-module/#comment-354482 https://www.eoshd.com/comments/topic/61100-cinepi-2k-open-source-camera/#comment-471981 https://www.eoshd.com/comments/topic/73291-new-camera-with-global-shutter-for-rasberry-pi/#comment-563710 I don't recall the images being that interesting, but the 3D printed chassis reminds me of this thing, based on a deconstructed EOS M with Magic Lantern:
-
LOL about leeks.. I'd just go for potato and leek soup, which is quite lovely actually 🙂 In all seriousness, I think the biggest factor in any piece of equipment is how it makes you feel, because if you're feeling good then you'll make better compositions, people will react to you differently and you'll have an easier time and the people in the images will be happier and more at ease, etc. I get a good feeling when shooting with the GH5, knowing how nice the files are in post, and also with the GX85 because I like how it is to shoot with in terms of the size and form-factor. If you feel like you're fighting with the camera all the time, it won't matter what the colour science is like, the shooting and content will suffer more than the image can make up for.