kye
-
Posts
8,224 -
Joined
-
Last visited
Content Type
Profiles
Forums
Articles
Everything posted by kye
-
I got quite excited when they originally released the Prores support in their previous model as every camera I've seen with Prores had great images that had minimal processing, but unfortunately they just implemented it as a high-bitrate version of the same heavily processed mess that they sent to h265 compression. However, I'd be extraordinarily happy to be proven wrong! I use my phone as the second camera on my travels and it would be great if it could live up to its potential 🙂
-
 Maybe @Tito Ferradans might be able to elaborate?
 -
*shrug* only looked marginally better than my own footage from my 12 Mini. Until they stop pummelling the footage basically to death internally it won't produce anything other than a brittle digital looking image. I've just spent about 90 minutes trying every blur technique I can imagine on some sample footage I have from my 12 Mini and then jumped over to some similar shots from the GX85 and it was night-and-day different because it wasn't over sharpened before the compression. The GX85 is 8-bit vs the iPhones 10-bit, but the GX85 was still outright superior, despite both cameras being used outside during the day, so have absolutely tonnes of light, so both sensors would have been base ISO. The RAW footage from the android phones looked great - even after being put through the YT compression which is far more severe than the compression that is applied by any smartphone manufacturer. I don't know why Apple are so intent on ruining the video signal they're pulling off the sensor.
-
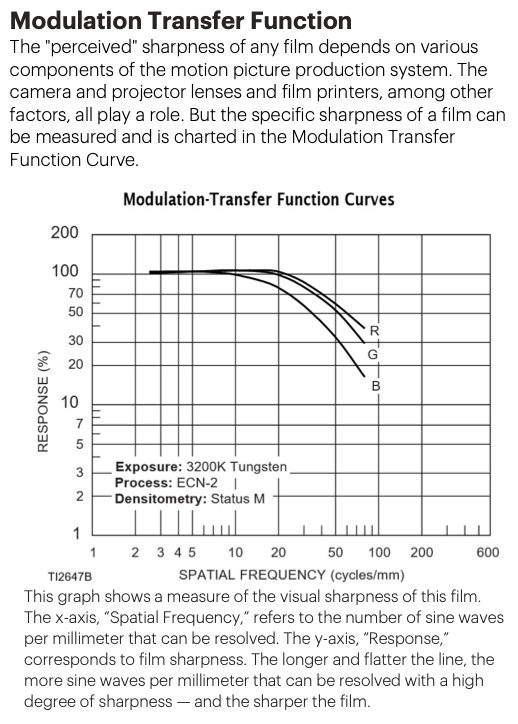
Sorry - just realised I screwed up the math so cut it out of the above posts while the edit window was still open, then re-thought it again. Here's the corrected version.... I'm confused about the math, depending on how you define "sine waves". Here's what I think is the correct one: At 10 cycles/mm, which is where there is no softening, on Super35 3-perf which is ~25mm x 14mm, that would be a horizontal resolution of 500 x 280. The curves end at about 75 cycles/mm, which is ~3750 x 2400, where the contrast has dropped to between 40-15% of the contrast in the scene. There is a chance they mean it in a different way, which doubles the resolutions to 1000 x 560 up to ~7,500 x 4200. I think the above one is more likely to be correct though. These curves are obviously dropping as the level of detail gets smaller, but if you were to extend them then they might have a 1% contrast response at over 600 cycles/mm, which would be approaching 30K resolution. This is an incredible assumption and should be taken with an entire bag of salt that you buy at the hardware store to put in your pool, but still..... this is why specifying the resolution of film in pixels is an inappropriate measure, it simply doesn't work like this. All this is just the resolution of the negative. I've heard knowledgeable people say that the resolution of film is a lot, but by the time that you print the negative, cut it up in the edit (in a purely analog pipeline), then duplicate that as a master, then take several prints off that to then duplicate to make the prints that go out to each megaplex, the resolution has been reduced to approximately 2K. This is why DI systems were at 2K for so long during the days of film acquisition and distribution. During that period people didn't suddenly start saying that movies were blurrier and asking for their money back - a 2K DI was sufficient.
-
Crap.
-
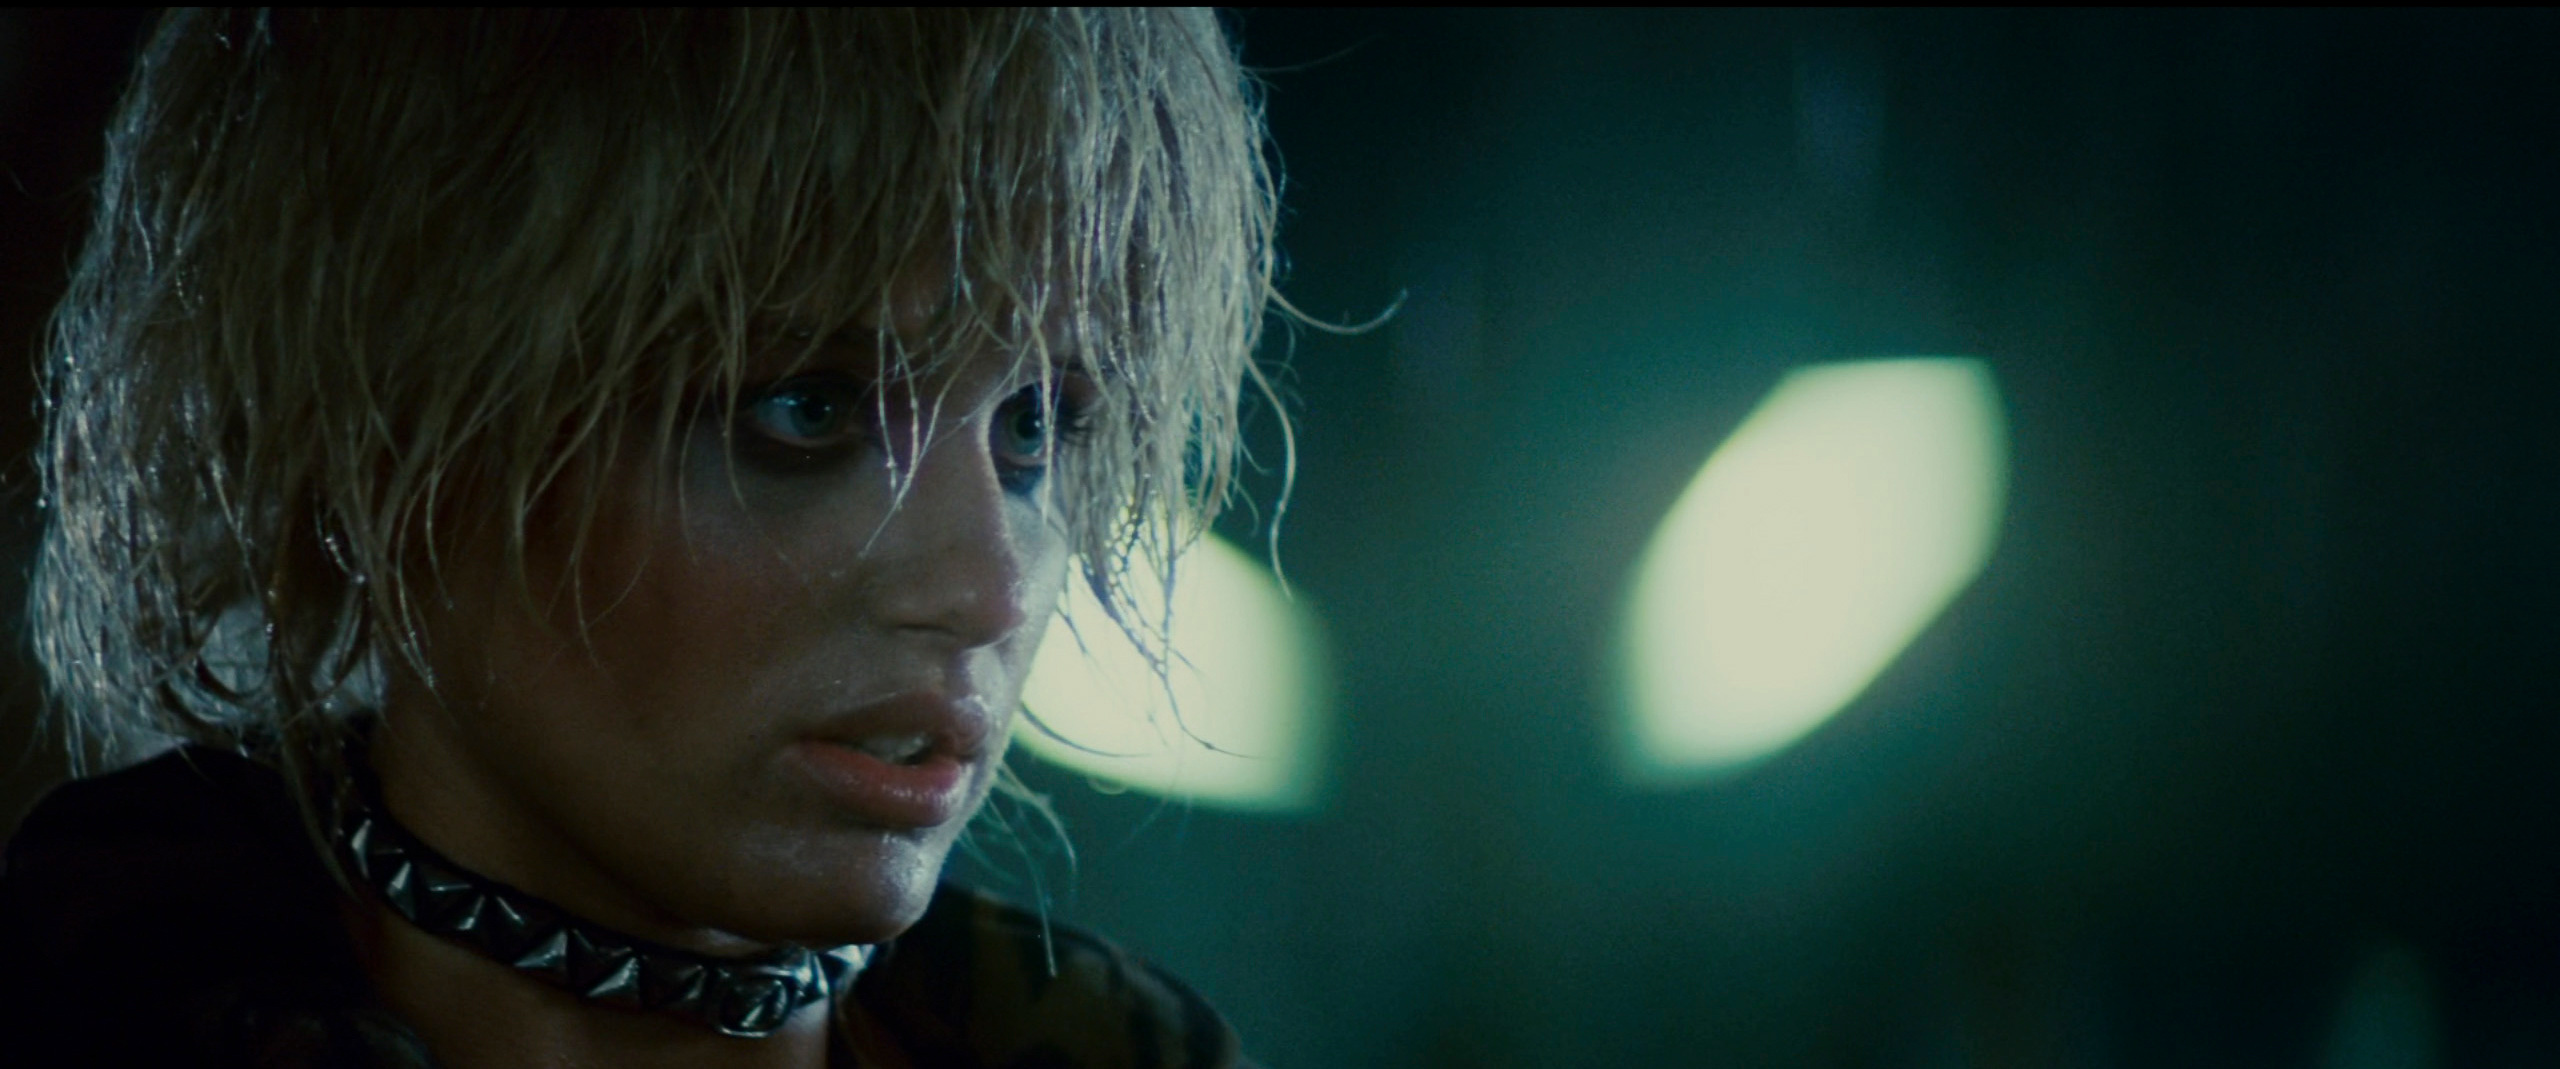
I've been looking at film, not as the ideal reference to replicate, but as a data-point to help understand what we are seeing. What I have been noticing is that on film, finer detail is present but at a lower contrast ratio, whereas digital keeps the same level of contrast regardless of the size of the detail (up to the sensor resolution limits, and subject to the lens characteristics of course). For example, here's an image from Game of Thrones, shot on Alexa/RED: and here's a closeup: Notice that the individual strands are basically as bright as the larger areas of his hair, right up to the resolution of the file. Same with this closeup of an image I posted earlier: There is a little bit of contrast loss in these examples, but lenses and compression are also in the mix too. Contrast that with this shot from the original Blade Runner, which was obviously shot on film: Here's a closeup from the above: Note how the individual strands have far less contrast with the background than the more solid areas with many strands of hair. Here is the MTF chart of Kodak Vision3 500T, which confirms these observations. So, what is the actual resolution? <snip> see below..... Ironically, digital sharpening methods have a completely inverse response - they increase the contrast on fine detail rather than decreasing it. So, digital cameras take a readout from the sensor that has an essentially flat MTF curve, and then apply a transfer function that does the exact opposite of what film did. Awesome..... screw you too! Food for thought.

-
In the description he also says: So overall, I don't know what to make of the video. Plus, when you eliminate all the fast cutting by watching it at 0.25x speed, it looks pretty sub-standard.
-
I watched that, and then right at the end there's a flash of this: So who knows.
-
Canon mirrorless market lead. What went wrong for Panasonic and Sony?
kye replied to Andrew - EOSHD's topic in Cameras
The domestic segment might be the part of the picture you're missing... I work corporate and the people who wear business attire to the office and are "into photography" tend to buy "the best" like the 5D and 24-70 F2.8. When I was filming my kids sports games the parents either used their phones or had enormous DSLRs like 5D or D800. When I used to go to photography meetups maybe 10-15 years ago about two thirds had pocket cameras and one third had 5D / D800 level cameras. One woman whose husband had a fancy job was a stay-at-home mum and had a 1DX and all three of the F2.8 zooms, but she had a longer lens too which was seriously long and looked ridiculous TBH. Looking at the lenses now I think it might not have been the 100-400, but might have been the 200-400mm F4. It was so long it made the 1DX look small. Obviously a low percentage of normal people are buying Canon DSLR / MILCs, but there are so many more affluent amateurs than there are professionals, it would be easy for the consumers to dominate the sales figures. They're also a hidden segment - unless you go to kids sports carnivals then you'd never know they existed. You could say that this market segment is driven by reputation, but let's be honest, for stills Canon cameras are absolutely spectacular. -
I recently got organised and pulled a selection of sample footage from each of my cameras to develop colour grading looks and do experiments. This includes the OG BMPCC and the BMMCC, Canon 500D with Magic Lantern as well as much more modern 4K cameras like the iPhone, XC10, GH5, GX85, GoPro and Sony X3000. The footage from the modern 4K cameras look like video, and whatever I do to them is only small incremental improvements, but the BM footage looks like cinema camera footage straight out of the RAW tab and with literally no grades at all. Something is seriously wrong when you can't grade GH5 or XC10 footage to look even remotely as good as ungraded footage from 2012.
-
That would have required work instead of waving it around, reading the spec sheet, and pontificating to camera!
-
Canon mirrorless market lead. What went wrong for Panasonic and Sony?
kye replied to Andrew - EOSHD's topic in Cameras
Canon are also one of the few that don't use Sony sensors. The colour science of the other brands has been gradually improving, but Canon had it right from the start, in addition to their lenses which was a huge advantage of course. -
Yeah, just a little frustrated about the whole world seemingly taking digital cameras and giving them a bunch of crap that is increasingly fringe and specialist at the expense of simply having nice looking images. Everyone loves how the Alexa looks, even the original, but then when it comes to what features we demand in a camera, somehow image quality comes last, with all the BS somehow being more important. Non-cinema cameras have worse image quality now than they did in 2013. No-one stopped to ask... if the first 2 million pixels looks like crap, why would I want to have 62 million more?
-
The original quote that I disagreed with was: So, @gt3rs, you're saying that because you, as a professional, are frequently asked for a mix of horizontal and vertical content, that the sensors in my phone, in my laptop camera, in my cars reversing camera, in every GoPro, in the GX85 update, in the Sony A7C, in the A6800, etc, should all be square? Really? I've said recently that the primary failure of folks is to not understand that others aren't the same as them, and the second failure is that when they learn of differences that they automatically think that everyone else is less valid than they are, less deserving, less relevant. To think that every camera on earth should be changed just because it would be nicer for you.... I mean, that's the complete peak of ignorance and arrogance, right?
-
However, what this does mean is that there's a tremendous opportunity for outsiders to make films themselves in a minimal way by understanding the process from end-to-end and eliminating all the non-essential rubbish. Noam Kroll speaks extensively about this, even suggesting that you start by listing the things you have access to and write a script that only requires what you have, so that you write a movie you can make yourself without having to go raise money etc before you can start. Of course, and this is the kicker, if you're going to do that, you have to have talent because you can't add special effects to distract from the fact that you can't write, direct, or shoot, and your actors can't act. This is the real reason that Hollywood makes so many films that rely on SFX and humour - it saves you from having to create characters that the audience cares about.
-
I don't think much will change. The studios are basically large corporations, and corporations are essentially assembly Iines for whatever they're doing, and they resist anyone trying to change the process. He said as much in the article. I also don't think many people are going to come along and challenge them the way he is. It sounds like he's capable of thinking about making movies in different ways because he's done lots of the parts himself and knows how things all fit together. This is rare. Most people only know how to do step 17 or step 89 of the process, and will resist trying to do it any other way because they are threatened because they think they'll lose their job, or threatened because they might be forced to learn something new.
-
Sure. Just get an L adapter and mount the camera sideways. BM cameras even detect the orientation and rotate their GUI. If they insist on having UHD vertical and also use the horizontal then shoot horizontally in 8K. If they insist on having greater than UHD vertically and also want horizontal video then: 1) ask a few probing questions to make sure they're not crazy, or the customer from hell, or both 2) ask them what the hell they're going to be displaying these ads on 3) rent a UMP12K - it's only a few hundred for a weeks rental, and your bizarrely spec obsessed customer should be fine paying extra for their unfathomable lust for superfluous resolution after you tell them the spectacular specs of the camera There's no reason to adjust every camera known to man to an aspect ratio that almost no-one will ever use, in order to avoid renting a camera for the specific purpose.
-
I completely disagree. People watch widescreen content on 40" or 50" or 60" or 70+" TVs at home, but only watch vertical video on sub-7"displays. Putting equal effort into both is ridiculous.
-
In terms of shooting LOG, the native HDR is actually rec2020 (I believe) which is sort-of LOG and fulfils the same purpose in many ways. The biggest difference between rec2020 and a log format is the level of saturation, where rec2020 has more saturation. This means that 1) rec2020 will clip colours sooner than a real log space, and 2) rec2020 has much greater fidelity with the colours that are not clipped. The challenge with iPhone shooting is to control the processing that the camera does - especially the sharpening. I spot insert clips from smartphones and action cameras in larger productions and it's always because of the texture, not the colour grading - they are always way sharper than the higher quality footage. I have talked about colour grading the iPhone here: https://www.eoshd.com/comments/topic/74148-making-the-most-of-the-iphone-gx85-and-gh5-and-shooting-in-the-real-world/ And am on a journey to counteract the sharpening here: https://www.eoshd.com/comments/topic/76313-optimising-resolution-sharpness-in-post/ I think that if you colour grade it properly and counteract the over-sharpening then you'll probably be surprised by the results.
-
Agree 100%, about the look and I'm not the only one. In terms of why that look seems to have disappeared, I have a theory..... https://www.eoshd.com/comments/topic/52175-are-sony-sensors-ruining-video-with-the-sony-look/ Every camera we can name that doesn't have a Sony sensor is known to look incredible. Just sayin'
-
Great point. Even an average MFT camera with a 7-8mm lens absolutely slaughters a GoPro once the sun dips below the horizon or you go inside a building. Camera manufacturers haven't just dropped the ball on the whole usability front, they were in a cafe with their friends pretending they were sophisticated and didn't even know there was a game being played at all. Needless to say, they got left behind. The workflow from any ILC camera for any amount of money is stone-age and has stayed that way. In pure economic terms they all deserve to die out completely. Obviously I hope that isn't the case, but yeah, your daughter isn't wrong. It's probably a translation error, but if there's "Mirrorless single-lens models" then where are the mirrorless multi-lens models?? Dear god would I be tempted by a camera with two MFT sensors and lens mounts! I'd put the 12-35mm F2.8 on one and the 7.5mm F2 on the other and I'd never miss a shot ever again! Size be damned! The school that the kids go to puts up signs on their events that says photography is allowed, but no-one can post a photo of any kid that isn't theirs online without written permission from their parents. Combine that with the low-light situation and good luck with your smart phones now......
-
I think the single biggest cause of all the angst online, regarding basically any product at all, is that people cannot imagine how different other people are from themselves. The second biggest issue is that most people then equate being different with being worse, like if someone else doesn't do the same thing in the same way as them then that makes them less somehow. I've asked colourists for advice on grading a particular shot that had a wedding in it and got replies as dismissive as "if this is just a wedding video I'd just WB it and move on". I've seen DoPs dismiss people because they shot their feature on a "video camera" when it was a Canon C-series or a Sony FS series camera. I've seen audio people say that using in-camera audio recording was worse than simply having no sound. Pettiness knows no bounds!
-
Next strategy is to blur the image and put the original over the top with a small opacity. The theory behind this is that if you blur the image slightly and put the original over the top then you're essentially "turning down" the differences, which will be the fine detail and sharpness of edges etc. I've been reviewing a lot of material shot on 35mm film and I suspect that this is what film does - beyond a certain point the finer the detail the more it is attenuated. This is different to the shots above with lowered resolution - in those the detail is eliminated completely, but in this method the detail is attenuated but still present. In theory we can have a larger radius blur using this method, because we're still adding in the original so the resolution isn't actually reduced at all but the sharpness definitely will be. I've used the built-in Blur tool in Resolve (which has very very course adjustment) because it is faster than the Gaussian Blur OFX and the results are indistinguishable at the right settings. I've lowered the opacity of the effect, so a 90% blur is 90% blurred image and 10% the original image. The Blur tool is neutral at 0.5, blurs with higher values and sharpens at lower values. Here are some sample shots. These are between the perceptual sharpness of the original image and the 960x540 image above, which I think is too soft for my tastes and only relevant when going for a strong retro/film look. Once again, you have to open the full res versions in a separate window in your browser to see any differences. I'm curious to hear any impressions people have. I'm also aware that streaming compression will have an effect, but I'm also aware that perceptual resolution seems to be increased when viewing moving images rather than stills, as if the eye is interpolating between frames. This is a whole other thing, but it's definitely an effect. When I start narrowing in I'll start exporting sample videos, and add grading too - the pale green of iPhone footage isn't so useful.
-
Have you reported it via the BM forums? https://forum.blackmagicdesign.com/viewforum.php?f=21 That's probably the best way to get their attention, and considering you have solid examples to post it would likely be taken seriously at their end.
-
Ah, interesting. With the right combination on metadata and gyro data it should be able to be corrected almost perfectly in post. It's encouraging to hear that this is done in Resolve. Resolve is often quite aloof in how it deals with things at the lower-end. It obviously supports all the high-end cameras and is used by very serious people for high profile work, but often it doesn't support things at the lower-end. I would have thought that gyro stabilisation might be too low to be fully implemented like this. LOL.. speaking about being aloof and out of touch... Sadly, the folks that operate with bigger budgets and with higher-end equipment are still human, and often arrogant and looking to get an ego boost by insulting others. I see this on a semi-regular basis unfortunately.