KnightsFan
-
Posts
1,328 -
Joined
-
Last visited
Content Type
Profiles
Forums
Articles
Everything posted by KnightsFan
-
Looks great! I think your color is spot on. I actually disagree on rigging expenses--particularly if you use a tripod or gimbal. I don't rig my M4 at all, and my 2nd hand iphone monitor was free. 3rd party NPF batteries are very cheap. You can add simple side handles for next to nothing as well. You can position an iphone above the handle and still have easy access to all controls as well. CFast is very expensive, that's my only complaint in terms of accessory cost. I have a single 32GB CFast card, and I'll probably get another before doing a long shoot. It would be nice if they had an SD slot as well, even if it could only do H265, or 4k60. Do you have HDMI set to 1080p or 720p? 1080p is of course sharper, but has very bad latency I found.
-
Does an APS-C Crop on a FF Sensor Increase Background Compression?
KnightsFan replied to herein2020's topic in Cameras
I've never heard depth of field described as "compression." Generally what people mean by "lens compression" is perspective distortion. (I assume this is what you mean by perception distortion?) Perspective distortion of a subject changes as a function of distance from the camera to the subject, and is not related to sensor size, focal length, or aperture. Perspective distortion applies to 3D graphics and your eyes by themselves, not just cameras. You can also look at nuances and distortions of individual lenses, e.g. barrel distortions, "3D pop" etc. but those are not perspective distortion. -
Does an APS-C Crop on a FF Sensor Increase Background Compression?
KnightsFan replied to herein2020's topic in Cameras
Thanks! Based on your screenshots numbers, an 80mm lens at f2.8 will produce shallower depth of field compared to a 50mm lens at f2.8. That's why in your screenshots the image on the left has more depth of field than on the right. That's also why (depending on what equivalence you are looking for), you also need to factor an aperture change into your crop factor equivalence calculations. Another aspect I tried to convey with the tool is that you should specify which dimension you are calculating crop based on. Typically people use the diagonal, but obviously with different aspect ratios that doesn't give the whole picture. A 16:9 video section of a 3:2 full frame photo sensor technically has a diagonal crop factor larger than 1. Just keep that in the back of your mind when comparing numbers as close as 1.5 vs. 1.6. -
Does an APS-C Crop on a FF Sensor Increase Background Compression?
KnightsFan replied to herein2020's topic in Cameras
@herein2020Not to self promote too much, but I made a comparison tool a long time ago that you might find useful https://gobuildstuff.com/tools/CropFactor/index.html There's no way to change the distance from camera to subject in this tool at the moment, maybe I should add that. -
You can assign a 3D LUT to the GUI monitor in settings. So if you create that LUT correctly, then your GUI monitor will be perfect, although it is just 8 bit I believe. Making the LUT with DisplayCAL is a royal PITA and there is so little information that it's impossible to know whether you've done it correctly. I've asked on here once or twice from people who say they have "calibrated their monitor" and they don't seem to know either, so I just followed DisplayCAL's somewhat sparse documentation and blindly trust it. If my understanding is correct (and please correct me if it is not!). On Windows if you run calibration software it will only change the desktop color. Software that outputs directly to the graphics card, including most NLE's, are not affected by your "system wide" icc profile. However, the gamma profile is applied system wide. So if you run calibration software, you need to create a LUT based on your calibration that modifies the colors, but not the gamma. The easiest solution is to get a monitor with its own builtin LUTs, like the SW320--just make sure your calibration hardware is compatible.
-
I got a refurbished BenQ SW320 for $700 and I've seen deals like that frequently with the SW320. You might find something better for $1k, but I doubt you'll find anything better for $700. And as mentioned above, you can use the extra money for a calibrator. I would disagree slightly, however. Once you're in the range of "good monitors designed for color accuracy", (i.e. NOT gaming monitors) then a calibrator really does very little. Conversely, a low end panel will never look very good even with calibration. Here are my +/-'s for the SW320: + Looks great. 32", IPS, UHD 10 bit panel. + Easy to switch between profiles (sRGB, aRGB, P3) - HDR isn't great. Part of this is Windows' fault for having terrible HDR support. You might have better results with Mac. - Response time is not good. Motion tends to tear or have other artifacts. It's pretty noticeable on even ordinary pans and can be pretty bad on footage with a lot of motion. It's a photography monitor, after all. I suspect that most color accurate IPS monitors will be similar, outside of very expensive ones made specifically for video work. But if you're coming from a gaming panel, it's a big difference for how it shows video motion. - Does not calibrate with Datacolor calibrators. If you really want to use a Spyder, you can calibrate with DisplayCAL software. On Mac I believe it's fairly easy to apply a system-wide LUT from DisplayCAL. However, on Windows, it is a nightmare. Honestly I might not have gotten this monitor if I'd known that its built in LUTs would be useless to me without further hardware investment. - USB hub and card reader isn't particularly accessible In terms of actually using the monitor for color grading, if you're using Resolve then remember that the best way to get an accurate signal is with a Blackmagic card like the Decklink. Another option would be a lower end 4k monitor for the UI, and a decklink + color accurate HD monitor for critical grading. I decided against it because I wanted color accuracy in other software as well, but if I was exclusively using Resolve then I would have done that for sure.
-
That's absolutely true, I forgot about that since it would sort of be outside my use case. I'm willing to put up with a few frames of drift when disconnected from a source if it means saving me hundreds or thousands of dollars, particularly since it's so easy to sync based on audio waveform if you know that you're within a reasonable margin of error to begin with. A year-ish ago I started used a low end smartphone as a TC master clock, sending LTC over bluetooth 4.0 audio which hopped between different bluetooth receivers in 3 second bursts of LTC, which was just as inaccurate as it sounds, but the entire process ends up with frame accurate TC after automated post processing. Now if I can just extend that to 32 bit bodypack receivers, that's virtually zero cost automation of some of the most tedious jobs. But it doesn't look like the F2 or Track E quite fit into my hacky workflow unfortunately.
-
Actually... if it's getting TC from an external source, it doesn't need its own TXCO at all. It's just reading serial input and writing it to the metadata of the file. And unless it has a very slow processor it will definitely be frame accurate.
-
Yes, it's a very bad thing to feed gullible people falsehoods that is personalized to appeal to them, and then ask them to vote in elections, be responsible for getting their own vaccinations and preventative healthcare, be responsible for the environment, or drive on the same roads as the rest of us. If people's actions only affected themselves then "ignorance is bliss" could be true, but when people's ignorance hurts others, there is no bliss.
-
If I'm not mistaken, though, the Track E does it via the 3.5mm input, which means you'd need to disconnect the mic, jam sync, then reconnect the mic. At that point you may as well set time of day at the beginning of the shoot and use that instead of TC to sync, which you can do on virtually any recorder. What makes a timecode crystal more expensive than normal time? I imagine that even without TC they keep track of time of day. That's not a bad idea, and at $350, it's same price as the Track E. I'm still not clear whether you can pair multiple F2's to the same app and have a single start/stop button for them, but even if so it is annoying to have another rec button to hit--or record all day and deal with a ridiculous file at the end. Maybe not a big problem for doc filming. If these devices had a TC input that could start/stop from signal presence like the F4, then for about $20/device I could add TC to each plus my F4, with a single rec button controlling all at once along with metadata.
-
Both these "timecode enabled" bodypacks are hamstrung by a hodgepodge of proprietary protocols. I wonder if a better approach would be a 3.5mm TC input on the bodypack and let users use their choice of TC system. Wired TC can't infringe on any patents, right? Bonus points if they can start/stop recording via timecode presence the way the bigger Zooms can.
-
Right, but what I was wondering is if the app can start/stop multiple F2's at the same time, or even a couple F2's and an F6 simultaneously? Because if not then it's fairly useless for a multi person setup.
-
I have an AMD CPU so might get different results. But my guess is that if its crashing with H265 files then it's something with the GPU, and since I also have Nvidia it might be the same story. That sounds like they're heading the right direction. One reason I don't use Fairlight is that the UI was so slow and sticky. Haha, I sure hope not! At least Blackmagic is honest about it being a beta.
-
This is cool. I was rooting for an F2 with 32 bit float on 2 XLR inputs and their new Zoom modules, more of a little brother to the F6. But this is a nice, cheap alternative to the Track E. I wonder if you can pair multiple F2's with the app and record them at the same time, maybe even in conjunction with the F6 which also connects to an app? Otherwise I can't see this being a useful replacement for lav mics, if each one needs to have the record button hit on each device individually. More useful for vloggers than filmmakers it seems.
-
@herein2020 Ouch. What hardware/OS do you have? I'll try it eventually and see if I have better stability. I guess the real headline should be that this is a beta, and if I recall correctly the 16 beta started off pretty unstable as well and went through many public iterations before coming out of beta.
-
Wow, I was not expecting this to have so many new and useful features. Useful to me: - collaboration with the free version: I have studio, but it would be beneficial to allow others to hop in and view the timeline - The color warper looks incredible - Fairlight improvements. We'll have to see how usable it is. Thus far I've dislike Fairlight, but it would be very nice to get all my post work into the same program. Reaper is very hard to beat, but I'll have to try out the new fairlight features. - H264/H265 proxies. If I can dial the bitrate and resolution way down, we can have native proxies that don't take up a ton of disk space. Previously I made ~1Mb/s proxies with ffmpeg, but Resolve doesn't play particularly nicely with outside proxies. Going native might solve those problems - Effects templaes - Audio waveform in Fusion--awesome! I'd love to also be able to see the timeline output on the Fusion page, I didn't see anything about that anywhere though. - Custom vector shapes. Would have been really useful for a project I did last weekend, and will come in handy once or twice per year.
-
I also got a Z Cam E2M4, though somewhat unwillingly if I'm honest. I got it for the image quality, frame rate options, and wireless control. If such a thing existed, I might have gotten a DSLR-shaped E2*. However, the benefit of the boxy shape is it's easier to balance on a gimbal, and I do intend to swap out the mount for a turbomount at some point, which is a useful modularity. I also really appreciate the NPF sled, which lasts forever without the bulk and extra accessories for V mount. The other aspect that I really like are the numerous 1/4-20 mounts. I generally use the camera pretty bare, but I have a NATO rail on either side and can slip on handles in 2 seconds for a wide, stable grip. A DSLR would need a cage for that. Most of the annoyances with DSLR-shaped camera come down to photo-oriented design, not the than non-modular design. Lack of easy, locking power connectors, lack of timecode, fiddly HDMI D ports, incomprehensible menus, lack of NDs--all could be solved while maintaining a traditional DSLR shape, and some camers do come along with some of them from time to time. On the other hand, cameras like the FS7 and C100 are packed with nice features, but I really don't use any of them apart from ND's and they just make for obnoxiously large bodies that are even harder and more expensive to use. My perspective though is from narrative shoots where we spend more time on rehearsals and lights than anything else, so we're never concerned with setup times for the camera. *before anyone mentions the GH5S, the E2's image is much nicer in my opinion and has way more video perks.
-
Image thickness / density - help me figure out what it is
KnightsFan replied to kye's topic in Cameras
@hyalinejimI don't disagree with anything you said. But I do think that the difference between the two images you posted is very subtle to the point that without flipping back and forth, neither one would really stand out as "thicker". That's why I'm saying thickness is mostly (not entirely, but mostly) about the colors in the scene, as well as of course exposure and white balance. There's a definite improvement between the pics, but I don't think that it makes or breaks the image. On the other hand I think the colors in my phone pics went from being stomach-turningly terrible to halfway decent with just a little water. Another way to put it, is I don't think you'd get a significantly thicker image out of any two decent digital/film cameras given the same scene and sensible settings. You can definitely eke small gains out with subtle color adjustment, and I agree with your analysis of what makes it better, I just don't see that as the primary element. -
Image thickness / density - help me figure out what it is
KnightsFan replied to kye's topic in Cameras
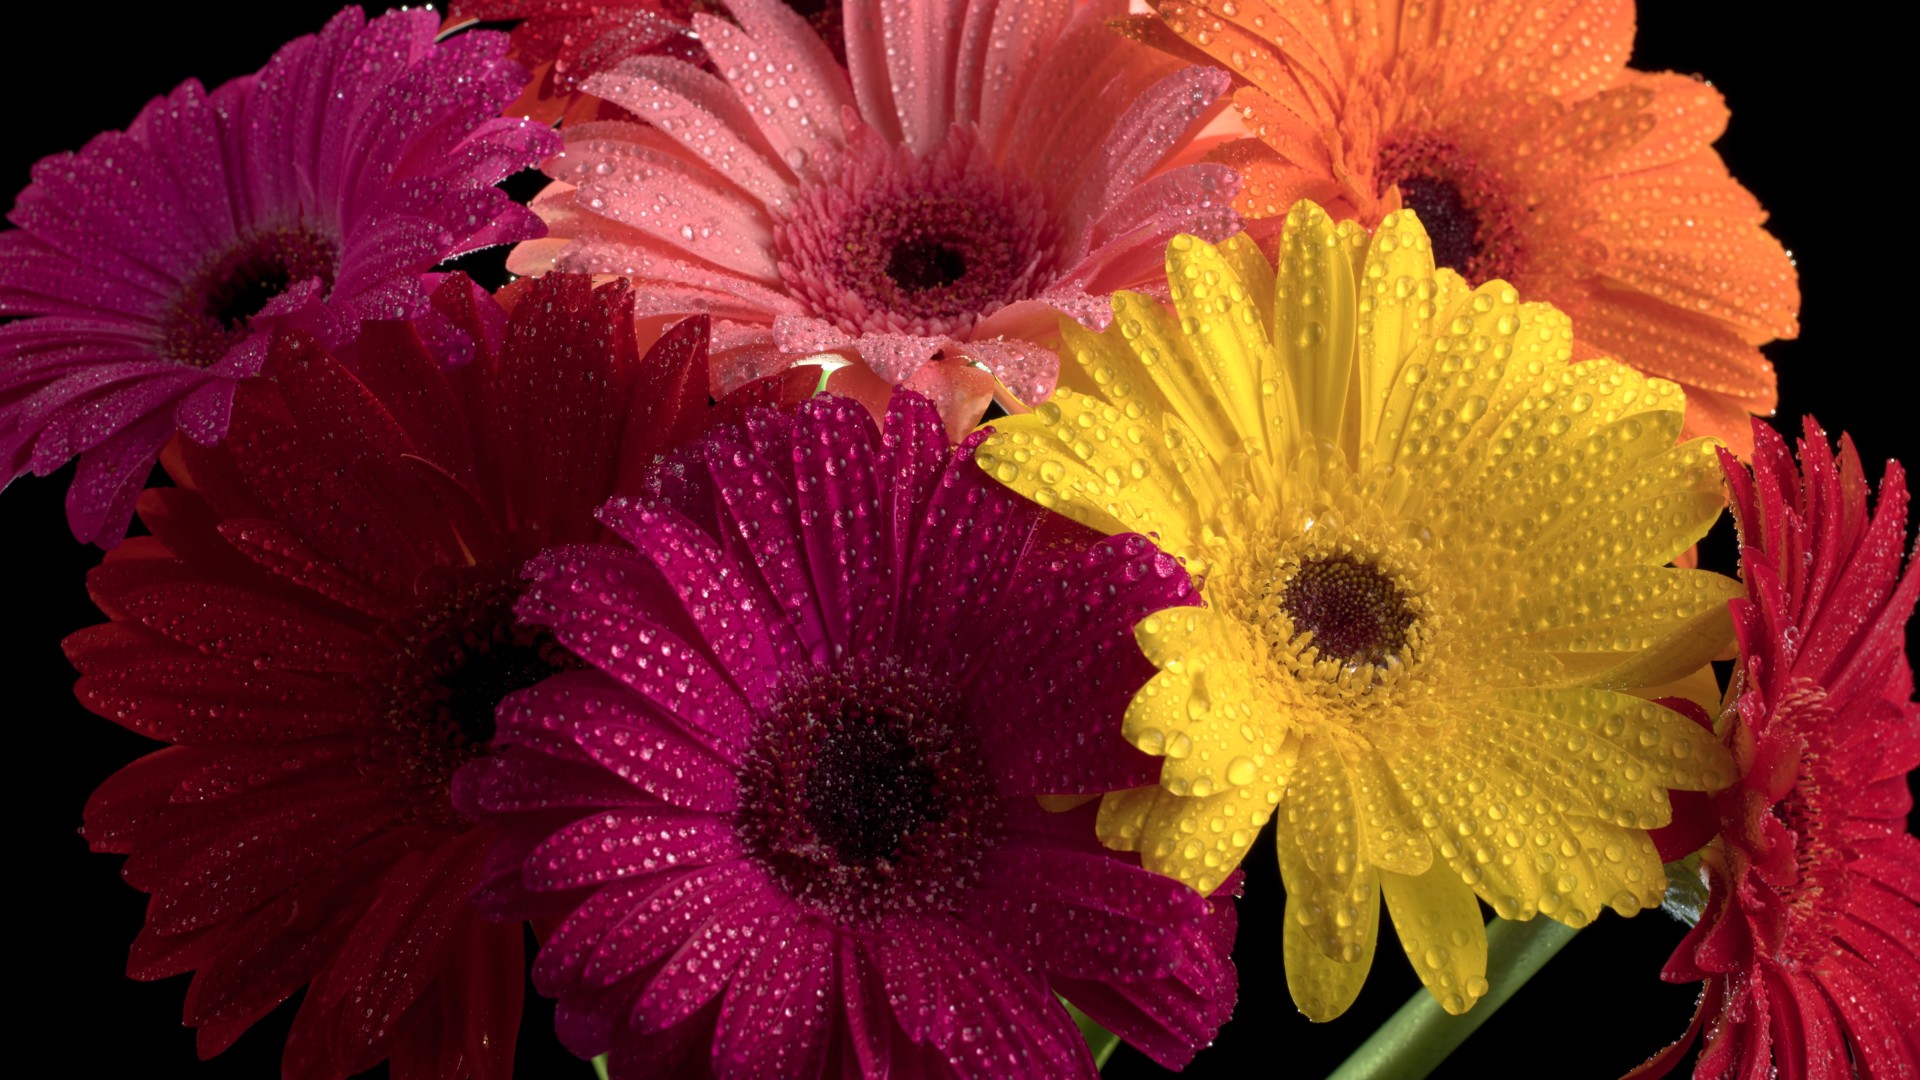
Quick demo of the effect of water on image thickness. Just two pics from my (low end) phone cropped and scaled for manageable size. These may be the worst pictures in existence, but I think that simply adding water, thereby increasing specularity, contrast, and color saturation makes a drastic increase in thickness. Same settings, taken about 5 seconds apart.
-
Image thickness / density - help me figure out what it is
KnightsFan replied to kye's topic in Cameras
A lot of our examples have been soft, vintage, or film. I just watched the 12k sample footage from the other thread and I think that it displays thick colors despite being an ultra sharp digital capture. So I don't think that softening optics or post processing is a necessity.
-
Image thickness / density - help me figure out what it is
KnightsFan replied to kye's topic in Cameras
Yes, I think the glow helps a lot to soften those highlights and make them dreamier rather than sharp and pointy and make it more 3D in this instance where the highlights are in the extreme background (like you said, almost like mist between subject and background). I agree, the relation between the subject and the other colors is critical and you can't really change that with different sensors or color correction. That's why I say it's mainly about what's in the scene. Furthermore, if your objects in frame don't have subtle variation you can't really add that in. The soft diffuse light comign from the side in the Grandmaster really allows every texture to have a smooth gradation from light to dark, whereas your subject in the boat is much more evenly lit from left to right. I assume you're also not employing a makeup team? That's really the difference between good and bad skin tones, particularly in getting different people to look good in the same shot. -
Image thickness / density - help me figure out what it is
KnightsFan replied to kye's topic in Cameras
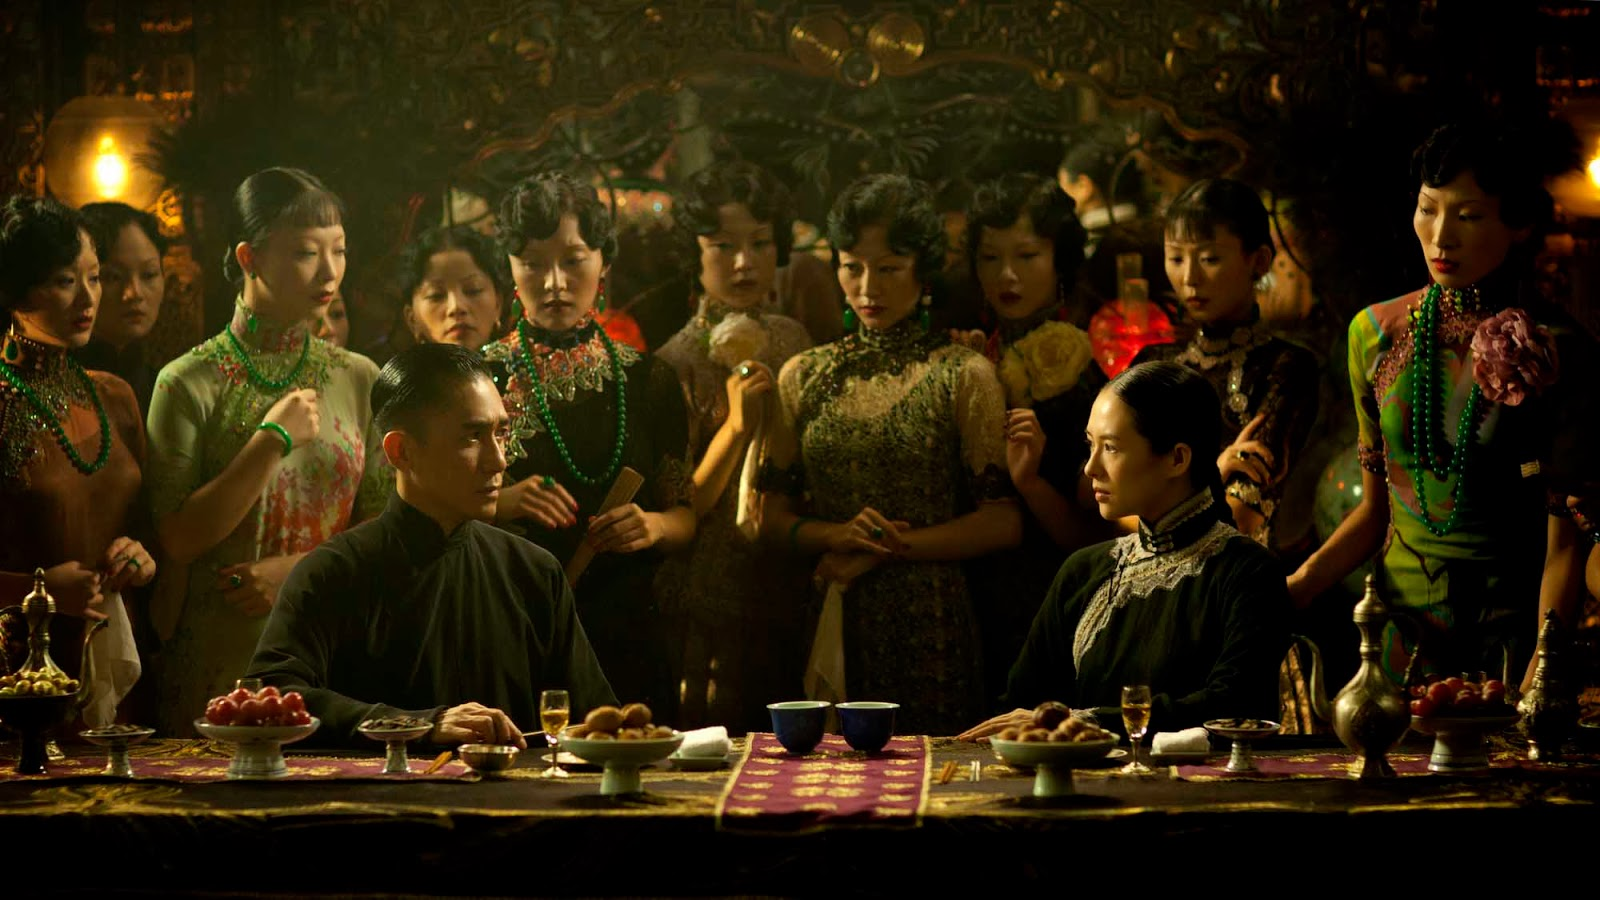
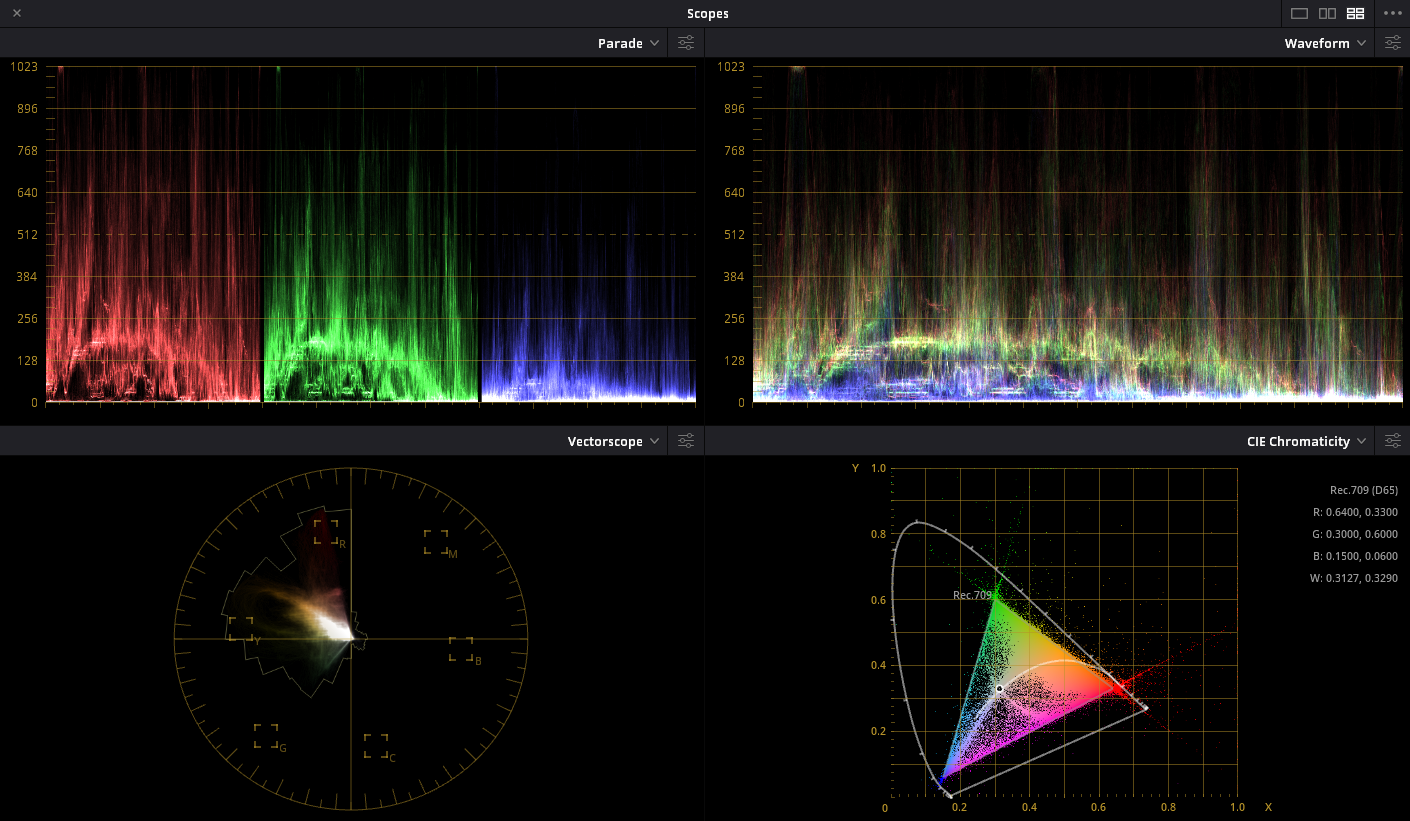
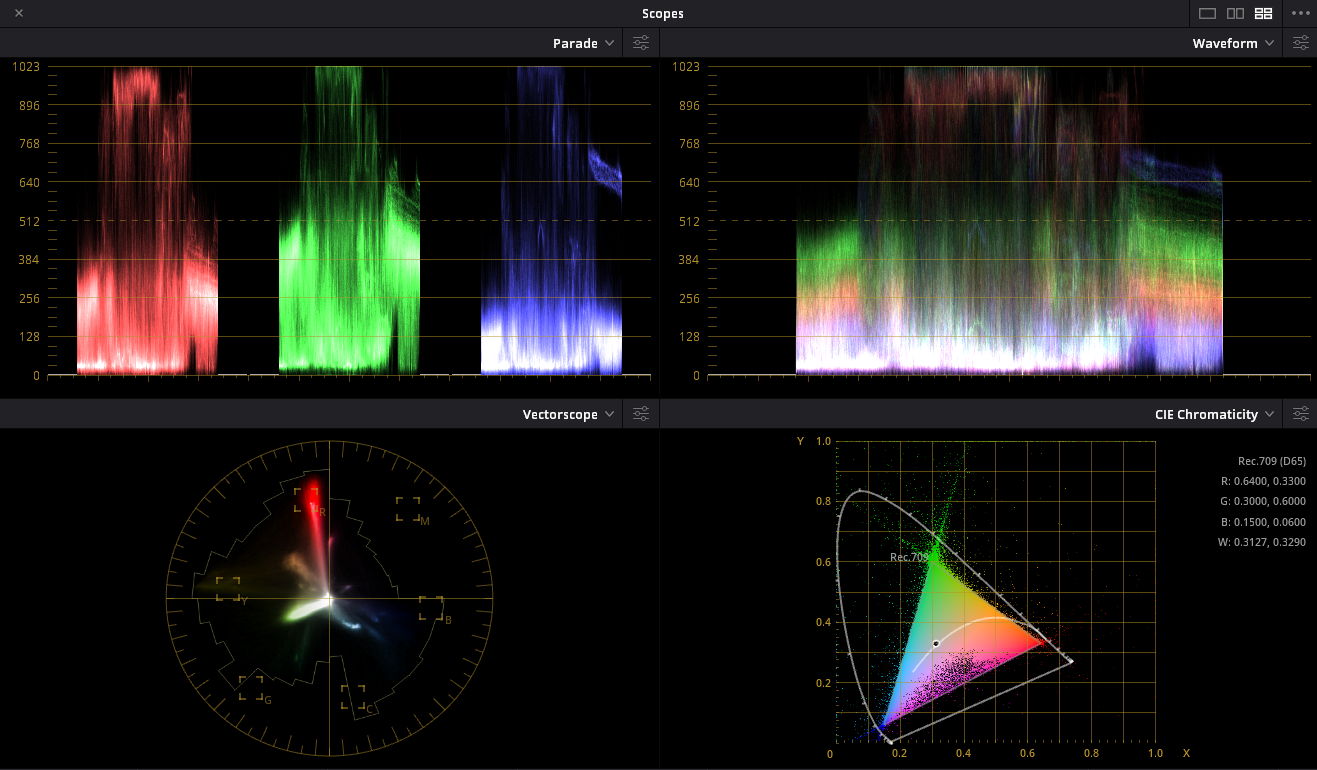
@kyeI don't think those images quite nail it. I gathered a couple pictures that fit thickness in my mind, and in addition to the rich shadows, they all have a real sense of 3D depth due to the lighting and lenses, so I think that is a factor. In the pictures you posted, there are essentially 2 layers, subject and background. Not sure what camera was used, but most digital cameras will struggle in actual low light to make strong colors, or if the camera is designed for low light (e.g., A7s2) then it has weak color filters which makes getting rich saturation essentially impossible. Here's a frame from The Grandmaster which I think hits peak thickness. Dark, rich colors, a couple highlights, real depth with several layers and a nice falloff of focus that makes things a little more dreamy rather than out of focus. And the scopes which clearly show the softness of the tones and how mostly everything falls into shadows. For comparison, here's the scopes from the picture of the man with the orange shirt in the boat which shows definite, harsh transitions everywhere. Perhaps, do you have some examples? For example that bright daylight Kodak test posted earlier here Has this scope (mostly shadow though a little brighter than the Grandmaster show, but fairly smooth transitions). And to be honest, I think the extreme color saturation particularly on bright objects makes it look less thick.
-
Image thickness / density - help me figure out what it is
KnightsFan replied to kye's topic in Cameras
@tuppMaybe we're disagreeing on what thickness is, but I'd say about 50% of the ones you linked to are what I think of as thick. The canoe one in particular looked thick, because of the sparse use of highlights and the majority of the frame being rather dark, along with a good amount of saturation. The first link I found to be quite thin, mostly with shots of vast swathes of bright sky with few saturated shadow tones. The kodachrome stills were the same deal. Depending on the content, some were thick and others were thin. If they were all done with the same film stock and process, then that confirms to me that it's mostly what is in the scene that dictates that look. I think that's because they are compressed into 8 bit jpgs, so all the colors are going to be smeared towards their neighbors to make them more easily fit a curve defined by 8 bit data points, not to mention added film grain. But yeah, sort of a moot point. -
Image thickness / density - help me figure out what it is
KnightsFan replied to kye's topic in Cameras
Got some examples? Because I generally don't see those typical home videos as having thick images. They're pretty close, I don't really care if there's dithering or compression adding in-between values. You can clearly see the banding, and my point it that while banding is ugly, it isn't the primary factor in thickness. -
Image thickness / density - help me figure out what it is
KnightsFan replied to kye's topic in Cameras
I've certainly been enjoying this discussion. I think that image "thickness" is 90% what is in frame and how it's lit. I think @hyalinejimis right talking about shadow saturation, because "thick" images are usually ones that have deep, rich shadows with only a few bright spots that serve to accentuate how deep the shadows are, rather than show highlight detail. Images like the ones above of the gas station, and the faces don't feel thick to me, since they have huge swathes of bright areas, whereas the pictures that @mat33 posted on page 2 have that richness. It's not a matter of reducing exposure, it's that the scene has those beautiful dark tonalities and gradations, along with some nice saturation. Some other notes: - My Raw photos tend to end up being processed more linear than Rec709/sRGB, which gives them deeper shadows and thus more thickness. - Hosing down a scene with water will increase contrast and vividness for a thicker look. Might be worth doing some tests on a hot sunny day, before and after hosing it down. - Bit depth comes into play, if only slightly. The images @kyeposted basically had no difference in the highlights, but in the dark areas banding is very apparent. Lower bit depth hurts shadows because so few bits are allocated to those bottom stops. To be clear, I don't think bit depth is the defining feature, nor is compression for that matter. - I don't believe there is any scene where a typical mirrorless camera with a documented color profile will look significantly less thick than an Alexa given a decent colorist--I think it's 90% the scene, and then mostly color grading.