Tired of rendering the timeline and transcoding footage off a memory card in Final Cut Pro?
CUDA is a technology from NVidia which allows a programmable GPU to act like a CPU (graphics processing unit) and now Adobe Premiere CS5 supports it.
GPU (3D graphics accelerator chips) are designed for huge throughput of menial chores whilst a CPU is more ‘general purpose’. The GPU, then, is perfectly suited to video decoding and encoding – huge throughput of instructions one after the other, again and again. CPUs tend to be bad at this because they’re more flexible and lack the brute force punch of a graphics accelerator chip.
So CUDA unlocks a HUGE performance boost for editing video. For example you can have RED R3D, Canon DSLR, ProRes 4-4-4 and native AVCHD clips all overlapping each other on the same timeline simultaneously, playing back in real time and Premiere CS5 barely breaks into a sweat. Your CPU is also freed up and the laptop should run cooler.
The performance boost also means rendering becomes a thing of the past. Transitions, split screens, scaling of clips, SFX and green screen keying – all in real time and no need to render!
As well as that, stable native editing of AVCHD on a Mac for the first time, along with DSLR H.264 footage which doesn’t need transcoding – simply drag the footage from the memory card, edit and export. No waiting around.
Yes that’s right – goodbye rendering and hasta la vista transcoding.
Unfortunately CUDA’s designed to support a select few high end NVidia PC graphics cards, and for a combination of political and performance reasons Macbook NVidia cards aren’t officially supported or enabled by default.
There is also an issue of CUDA reporting that it needs 768MB of video RAM – just 256MB more than the 512MB featured on the latest Macbook Pros. (Note this is graphics RAM not system RAM!) Poppy cock, we can get it to work with less!
Now I can reveal a hack which enables CUDA on a Macbook Pro with 512MB of video RAM. The only catch is you have to have one of the latest unibody Macbook Pros with the NVidia GT 330M 512MB onboard. This won’t work on older Macbook Pros with the NVidia 8600M with 512MB RAM – at least not yet.
Here is how to enable super-fast editing on a Macbook Pro with Adobe Premiere CS5.
- First see if you have a GeForce GT 330M – go to the Apple logo top left and click About
- Click More Info and select Graphics/Displays, it should mention the GeForce GT 330M
- If that’s the case, proceed. First install these CUDA drivers (click to download)
- Make sure Adobe Premiere CS5 is updated to the latest version, at least 5.0.2. Go to Help menu and choose Updates, or download from here
- Go to Applications > Utilities and load Terminal
- Cut & paste this into the Terminal and press enter: sudo nano /Applications/Adobe Premiere Pro CS5/Adobe Premiere Pro CS5.app/Contents/cuda_supported_cards.txt
- Cursor key down to the bottom of the text, cut & paste this into the TXT file: GeForce GT 330M
- Press CTRL + X, type Y to save and press enter. The text editor will close, keep Terminal open.
- Cut and paste this into the terminal: /Applications/Adobe Premiere Pro CS5/Adobe Premiere Pro CS5.app/Contents/GPUSniffer.app/Contents/MacOS/GPUSniffer
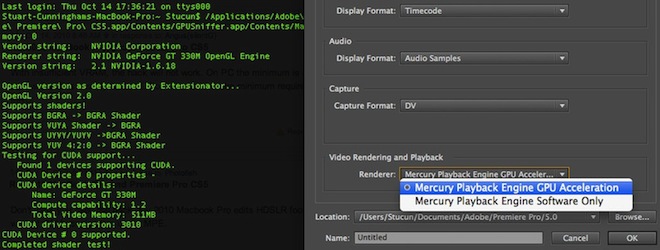
You should now see this:
Texture memory: 0
Vendor string: NVIDIA Corporation
Renderer string: NVIDIA GeForce GT 330M OpenGL Engine
Version string: 2.1 NVIDIA-1.6.18
OpenGL version as determined by Extensionator...
OpenGL Version 2.0
Supports shaders!
Supports BGRA -> BGRA Shader
Supports VUYA Shader -> BGRA
Supports UYVY/YUYV ->BGRA Shader
Supports YUV 4:2:0 -> BGRA Shader
Testing for CUDA support...
Found 1 devices supporting CUDA.
CUDA Device # 0 properties -
CUDA device details:
Name: GeForce GT 330M
Compute capability: 1.2
Total Video Memory: 511MB
CUDA driver version: 3010
CUDA Device # 0 supported.
Completed shader test!
Internal return value: 7
Now open Adobe Premiere CS5 (restart if already open) and go to the Project menu, select Project Settings and click General. Make sure the Mercury Engine is enabled in the drop down box as shown below. Usually this would be greyed out but after the hack it should look like this when clicked…

Let me know if you are successful!


