The EOSHD Panasonic GH4 Shooter’s Guide is now available
8bit DSLR codecs get quite a lot of bashing for banding, and it is something we’re well used too… A sky or a wall taking up half the shot with only 4 or 5 shades where there should be a silky smooth gradient with thousands of tiny steps in-between darker and slightly lighter areas of the image.
However one of the first things I noticed with the Panasonic GH4 was that banding was greatly reduced and it looked like my 10bit Blackmagic footage, even though it was still an 8bit codec (internally with 4K). Why such a turn-around for an 8bit codec? It turns out the 4K mode on the GH4 holds the key to hiding this banding… yet it is something we can apply to all DSLRS…
Here’s how…
I use a lovely Apple iMac 27″ display as my main screen, but like most displays it is an 8bit panel.
This means all colours are generated from a mixture of red, green and blue channels, each with 256 levels of brightness (luma). For example let’s say we have a shade of red, from bright red to black.
Bright red would see the red channel maxed out at 255 with the green and blue channels at zero – 255,0,0.
Absolute black would be 0,0,0.
In-between 0-255 are all the shades of that particular red and if we increase the blue channel by 1 we begin on the path to purple and eventually pink. Check out the Photoshop colour picker and see the R, G, B values change as you move the cursor around the palette.
Clearly an 8bit camera can put a lot of colours on screen.
However each shade of colour only consists of 256 levels of luminosity. On a DSLR, a blue sky may have very subtle variations in one colour… with very little variance. Here the dreaded banding can arrive, because the tonal precision of 8bit is not enough to render such subtle colour with thousands of tiny variances in luminosity. A blue for example which would only vary a little across a large area of sky, might look like this in RGB terms.
0,100,0
0,101,0
0,102,0
0,103,0
Or similar this on your screen… distinct bands, not nice…

So why does the Panasonic GH4’s 4K mode not suffer so much from this?
The answer is that the extra resolution maintains a fine grain to the image.
This grain or noise is called ‘dithering’ when you apply it to shades and gradients.
If you remember back to the 8bit era of computer games like Mario for instance, these often were very limited to how many colours could be displayed on-screen at once. The solution the graphic designers used was dithering.
Meet the Dither Rabbit…

Mr Dither Rabbit is sad because he only has 4 shades of brown. He really wants a rich flaxen brown fluffy coating, so the dotted areas are used to blend the distinct bands of brown. When you look at a distance or blur your vision, the dotted areas look like new shades… shades that don’t actually exist. On a small bunny, you may not even need dithering as the bunny on the screen will likely be tiny… but on a gradient in the sky (again think of retro games) you definitely do need it to blend the banding.
This makes use of resolution to scatter two shades of colour across the transition of two bands of colour, to make them blend.
Here’s the exact same 8bit image from above, but with monochromatic noise added in Photoshop…
Goodbye banding –

As you can see the gradient looks far smoother because the distinct bands are blended into each other by the noise.
There’s still only a few colours in the image, but it looks much smoother, just like GH4 8bit 4K compared to the 1080p mode.
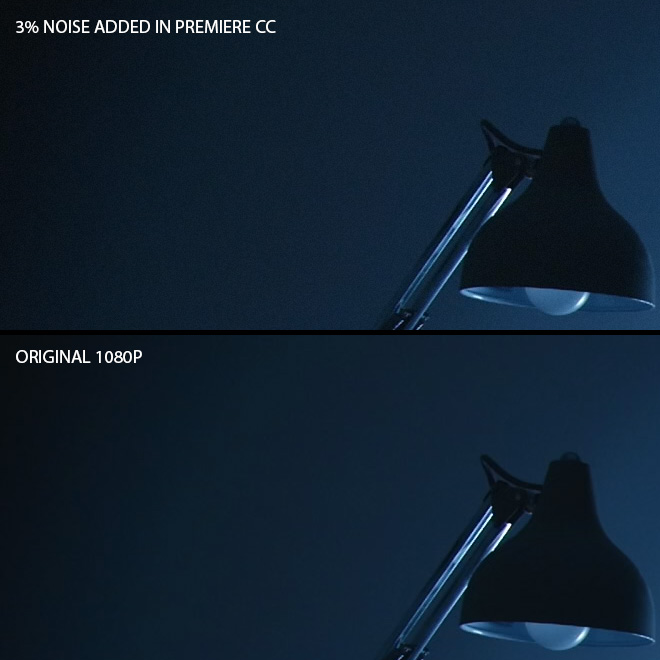
The image at the top of the page shows dithering in Premiere on the internal GH4 1080p to reduce banding. The Canon C300 also maintains a fine grain texture to the image, which helps dither shades together in the 8bit codec it uses. But shooting 4K is still an advantage as we can downsample it to 1080p in post for better colour sampling and 10bit luma.
On most DSLRs however, compression and noise reduction remove the dithering effect entirely and give us banding.
How exactly do we do this to our DSLR footage?
In Adobe Premiere Pro it’s very easy, simply use the Noise effect on your timeline clips.

You only need a very small amount of noise. We’re not trying to make our footage look noisier here, but smoother.
The popular plugin Film Convert Pro 2 can also add a fine grain of noise, especially if you select Full Frame 35mm grain. You don’t need to have the film emulation effect – you can turn on just the noise by putting film colour to 0%.
Now the GH4 isn’t perfect of course and there are times we should do the same even to the 4K footage.
Once such time is when the GH4’s 100Mbit/s compression is overwhelmed at high ISOs in low light situations, where there’s a very low contrast and little variance in areas of large shadows.
Here you will get banding caused by a combination of high compression in the lows and 8bit colour.
Adding the noise in post will dither these macro-blocked areas so they appear far smoother.
NOW GET DITHERING!
A note from Andrew Reid, editor of EOSHD…
Recently in a few EOSHD forum posts I teased an upcoming announcement the day before it was due (June 3rd) for an unspecified product related to the Blackmagic Pocket Cinema Camera and Panasonic GH4. This announcement date has now changed and out of respect for the company I cannot reveal why or any details about what the product is. However I want to make something absolutely clear amidst the silence. This is a product that IS coming out, it has been slightly delayed NOT cancelled and it IS worth the wait…I am still involved in testing it and once all the bugs are ironed out, we will soon have something very exciting in our hands…


