With the new version of Blackmagic DaVinci Resolve (10.0) you can grade and edit 5D Mark III raw DNG sequences, with image quality at the Adobe Camera Raw level for the first time and performance through the roof.
EOSHD Film LUT is an instant cinema style which quickly and easily improves the look of 5D Mark III raw video in Resolve 10. No grading skills required.
This LUT gives you a more film-like image, a less harsh electronic look compared to the standard Rec.709 colour space and default settings. It gives you more detail in the highlights and a smoother more natural feel to colour.
Image quality has improved with a new debayering engine in Resolve 10, performance is amazing and Cinema DNG support has been broadened to support even standard DNG sequences made with Magic Lantern’s “raw2DNG” converter.
This is a VERY quick workflow. You have a very fast conversion from the master raw files to DNG using “raw2DNG” in one step.
No more slow ProRes transcoding, or round trips to After Effects.
Resolve 10 does realtime playback of 1080/24p DNG raw from the 5D Mark III. It now does so on both NVidia and AMD cards with GPU acceleration. Even on a modest $200 NVidia card with CUDA I have seen 40fps render times from DNG raw to ProRes. That compares to 2fps in After Effects CC!
Editing is greatly improved in Resolve, we now have full audio track support on the timeline for example. However if you’re a Premiere or FCPX user and just want to use Resolve to convert raw to ProRes and apply a LUT, performance is frankly incredible. Adobe After Effects CC still does not support the GPU for render tasks so Resolve is much better for transcoding DNG to ProRes at almost double realtime speed.
Until now I had been using Adobe After Effects because the image quality was better but that’s no longer the case.
Of course editing and playback of raw video is seamless and I’m only using an Nvidia GTX 560Ti with 1.25GB of video memory. I am upgrading this to a NVidia GTX 670 with 4GB of video-RAM (which cost a modest 250 euros on eBay) as the new temporal noise reduction feature in Resolve needs at least 2GB of dedicated video memory.
EOSHD Film LUT
By default raw DNG sequences in Resolve 10 use a basic Rec 709 colour space and highlights are somewhat clipped. Combined with Canon’s already too punchy colour, this renders a harsh image with over saturated colour and high contrast, lending a more digital feel to the 5D Mark III’s raw output.
Resolve has a built in LUT for handling Blackmagic raw video but nothing for the 5D Mark III. So I have created my own.
Advantages:
- Optimal image quality with 5D Mark III raw DNG or Cinema DNG footage in Resolve
- Greatly improves the look of highlights (recovers detail and smoother roll off)
- Smoother gradation
- More film like overall colour and contrast
- Improves the look of skin tones and corrects the pink hue of olive skin that Canon’s default colour sciences creates
- More realistic look to reds and oranges (no longer a neon purple cast to strong reds)
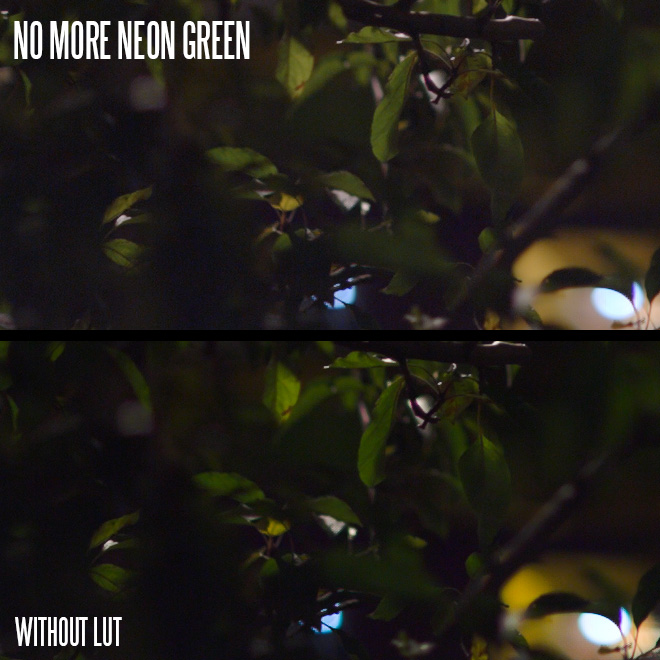
- More natural greens, less neon-looking
- Lessens aliasing and noise when applied in unison with the complete settings (see below)
Advantages of Resolve 10
- Noise reduction is now supported. Some chroma noise reduction is applied by default in Adobe Camera Raw but Resolve 9 lacked it altogether
- Greatly improved debayering so overall image quality is now up there with Adobe for stills (amazing considering the full quality debayer is done at 40fps)
- Improved debayer means less false colour, less noise, less aliasing and more resolution
- User-selectable playback quality like in Red Cine X
- Free Lite version now supports resolutions greater than 1080p. You can edit 2.5K or 3.5K raw sequences shot in crop mode on the 5D Mark III and 1280p 3:2 sequences shot with an anamorphic lens
- Finally some love for AMD graphics card users, with full GPU acceleration of raw video for CUDA *AND* OpenCL
- After Effects is painfully slow compared to Resolve 10 as it doesn’t utilise the GPU for render jobs
- Adobe Premiere CC is currently a long way behind Resolve in terms of Cinema DNG support (image quality and colour grading)
Advantages demonstrated:
Improved highlights. More realistic reds and oranges. Improved skin tones. Less noisy red channel.
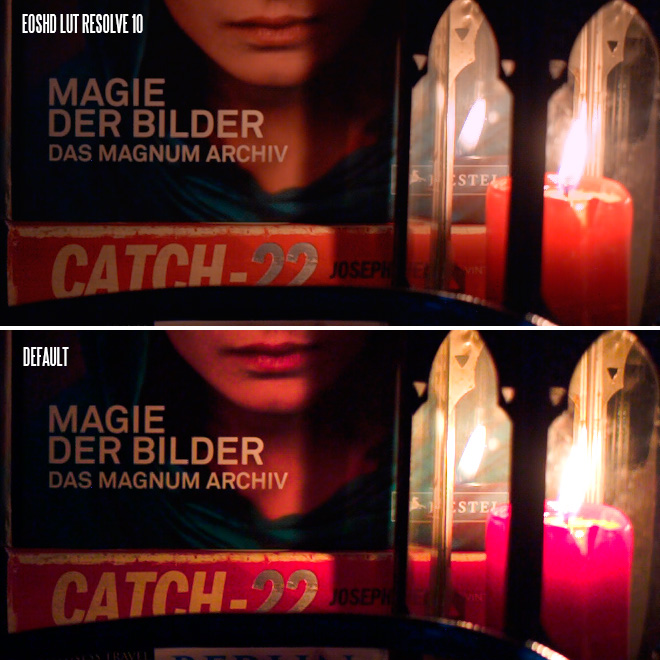
A softer, less harsh digital look to the image (more like the Alexa).
Plus a less green-cast on the default settings.
You can change the cast and white balance yourself – this is not baked in.
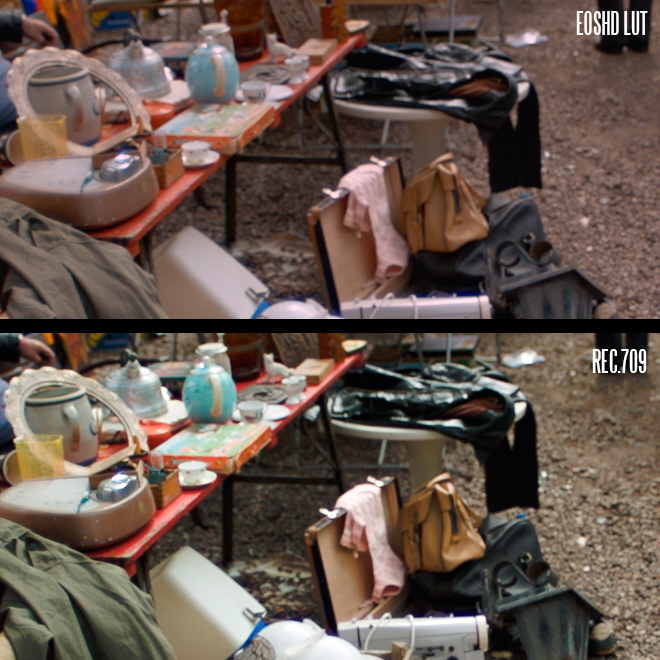
The LUT gives a nice lift to low light scenes without introducing too much extra noise.
It doesn’t give you hazy grey shadows… Inky black contrast is maintained.
The EOSHD LUT also gives you more realistic rustic green tones for foliage rather than the neon-green from the default Rec.709 colour space.
The guide
1. First download the EOSHD Film LUT here for the 5D Mark III. (You’re welcome also to try this with the 7D and 50D – I have not yet tested it with these cameras but it should work fine).
2. If you haven’t yet done so, upgrade to DaVinci Resolve 10. Those with a license dongle (like the one which comes with the Blackmagic Cinema Camera) can download the full version. If you don’t have this, select the Lite version. Both versions are downloadable from the Blackmagic Support website here for Mac and here for Windows.
3. Open Resolve 10 and your project
4. Go to the Project Settings (gear icon, bottom right)
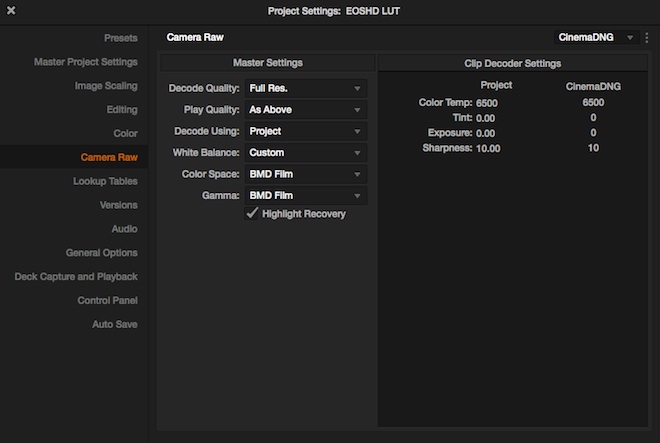
5. Go to Camera Raw and select Cinema DNG instead of Arri Alexa in the top right, then change Colour Space to BMD Film along with Gamma to same (see below). Be sure Highlight Recovery is ticked. If you want to reduce aliasing set sharpness to 0 instead of 10, but bear in mind the image will look very slightly softer. NOTE: you will need to set white balance per individual clip on the timeline later while colour grading.
6. Go to Lookup Tables and click Open LUT folder. Copy the EOSHD LUT “.cube” file to that folder in the Finder (Mac) or Explorer (PC) window that has opened.
7. Remaining in Lookup Tables, click the Update Lists button and choose “EOSHD Film LUT 5D3 Raw” for the 3D Output Lookup Table. Leave others as-is.
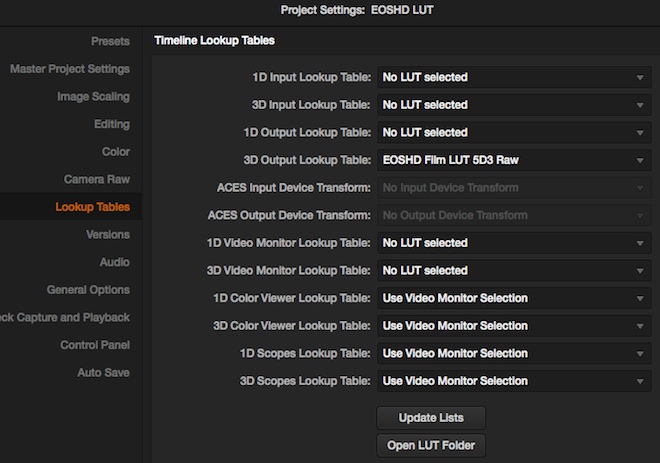
The LUT is now applied to your footage.
8. Please share your sample shots, experience and feedback on the EOSHD Forum here
Notes and tips
If you want to apply different LUTs to individual clips or only want to apply this LUT to a single clip, skip step 7.
Instead right click the node or clip in the Color tab of your Resolve project.That presents you with an option to choose a 3D LUT. Select the EOSHD LUT or a LUT of your choice.
Note that a LUT is ‘destructive’ so if you’re doing further heavy colour grading on top of it, with multiple nodes, only apply the EOSHD LUT to the final node.
Minimum system requirements for editing raw video from the 5D Mark III
- NVidia GTX 560Ti with 1GB+ video memory
- 8GB system RAM
- RAID array of 2+ HDDs or 1x standard SSD
Recommended system requirements
- You should have 16GB of main system RAM. It’s so cheap, the upgrade over 8GB is a no brainer. Add as much as your system will take
- Nvidia GTX 670 4GB offers great performance for the price ($300 – $400)
- Quad core CPU recommended. I’ve not tested the older Core 2 Duo chips or on a MacBook Air with 2-core Intel i5
- RAID of at least 3 hard disk drives. You can’t get realtime raw playback at 1080p from a single hard drive. It can be edited from a single SSD but you will run out of space pretty quickly. I use 3x 3TB standard 5400RPM hard drives in my system which cost a modest $150 each
