DOWNLOAD 2.5K BLACKMAGIC H.264 FOOTAGE HERE
(Important: on the Vimeo page for this clip, click download to get the 2.5K 80Mbit clip. Don’t bother watching it full screen from the stream as it is a pale imitation of the full 2.5k file)
I’ve been experimenting today with Blackmagic Cinema Camera workflows.
I use Adobe Premiere as my main NLE. I am not an FX guy so rarely use After Effects. But it comes in very handy here.
Premiere cannot yet edit the CinemaDNG files natively, performance is very limited, it interprets the footage at 1fps, requiring you to fix this for every clip and image quality suffers greatly, possibly because it doesn’t allow you to edit in glorious 12bit.
Here’s the solution that’s working best for me…
In After Effects (AE CS5.5 or CS6) CinemaDNG chooses to play nice. You can grade with the common Photoshop raw controls and drag the clips right in, before rendering them out in a 2.5K lossless format for editing on a timeline in Premiere.
It is fast, easy and maximises the quality of the footage.
Editing 2.5K raw is very demanding, but with this method you won’t need a monster computer. The lossless files don’t use complex compression algorithms.
You can apply grading to the clips in After Effects as soon as you open them or you can choose to grade the lossless clips in Premiere. I did some light grading in the Photoshop style raw colour corrector to bring up the shadows, flatten the image and tweak the white balance before rendering them out from After Effects.
So here’s my workflow in full:
In After Effects
- Right click the raw file in AE. Choose Create Proxy > Movie to create a clip composition
- Select the Render Queue tab, the clip will be added to the list
- Under Render Settings bring up the full diaglog box by clicking Draft Settings, change it to Best Settings in the quality drop down and Full in resolution. Also select the frame rate to match your footage. Close the dialog box and return to the render queue.
- Select the small arrow next to Output Module and choose Lossless. This gives you the best performance and quality in Premiere especially if you are editing on a laptop
- Click the filename next to Output To and enter your choice and choose a directory to render the files to
- Finally click render to export the clips
The resulting Quicktime files will be playable in Quicktime X, VLC Player and 100% editable in Premiere. They will grade very well too. But unlike the ProRes option in-camera you are getting the full 2.5k resolution and believe me 2400 x 1350 makes a huge difference over 1080p!
In Premiere
- Now simply drag the lossless clips to Premiere where you can smoothly snip and colour correct away just like with DSLR footage.
- It doesn’t matter what sequence preset you use, when you drag the clip onto a blank timeline for the first time you should be prompted whether you want the sequence settings to match the clip. Select ‘yes’.
You don’t need the CinemaDNG plugin or any workarounds. I am editing on a Macbook Pro 17″ i7 with 8GB RAM and an SSD as the main working drive, and didn’t have any problems.
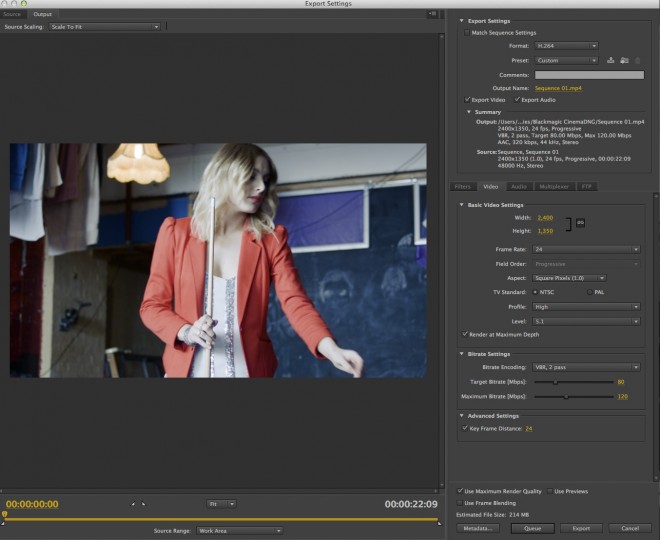
So how about for export to Vimeo? At the moment Vimeo doesn’t playback higher than 1080p but you can still use it to share the clip or as hosting for the full 2.5K file. Here are the 2.5k export settings I’m using in Premiere for the final 24p master.
- Set Format – H.264
- Below under Basic Video Settings before entering the resolution – select profile ‘High’. This refers to the version of H.264 used
- Select Level as 5.1. This allows the higher resolutions.
- Now enter the width and height as 2400 x 1350
- Select frame rate to match your footage
- Select aspect Square Pixels 1.0
- Tick ‘Render At Maximum Depth’
- Under Bitrate Settings select VBR 2 pass
- I’ve used a target bitrate of 80 Mbit and a maximum of 120 Mbit to keep that fine noise grain and uncompressed look. You may get away with lower if you want dramatically reduced file sizes.
- Tick ‘Use Maximum Render Quality’
- Finally, click Export
My export settings for 2.5K H.264 – click the image to enlarge
And that’s it. Goodbye CinemaDNG plugin you aren’t needed here!
Playback
Need a 2.5K display to view it on? Get the Dell U2711 IPS 27″ monitor for around $699 on eBay
Of course, the resulting file plays back no problem in Quicktime or VLC, etc.
Those with the newer Macbook Pro 15″ 2.5K screens will enjoy this.
I’ve had stunning – no – eyeball popping playback on my Dell U2711 screen too. Essentially this is a matte version of Apple’s Cinema Display but without the fancy chassis and Thunderbolt connectivity. Since you will want to free up a Thunderbolt port for the Blackmagic Cinema Camera anyway, the Dell is a good option as it has a Displayport on the back. You will need to use this to get the full resolution from a Mac, as HDMI only goes up to 1080p.
The screen resolution is 2560 x 1440 and the IPS panel size is 27″ so it has no trouble with 2400 x 1350 Blackmagic Cinema Camera material.
As for projectors and TVs unfortunately 2.5K ones are extremely rare if not almost non-existent. The good news is that exporting from a 2.5K workflow maximises the resolution of the camera and it will look like the sharpest 1080p output on earth. When 4K projectors and TVs (Sony has one on the way) become more affordable, 2.5K will also upscale very nicely – especially since it comes from raw – compared to 1080p.
The quality of the 2.5K CinemaDNG from this camera is insane. Hopefully I will be getting my Blackmagic Cinema Camera very soon from CVP in the UK.
I will be doing a full review of it here on the blog to see what kind of step it is up from DSLRs and may be able to set up a comparison with the Alexa and Scarlet in Berlin. Stay tuned…
HUGE THANKS TO John Brawley, KJ Halverson and James Miller


