What is the real advantage of installing Magic Lantern for raw video on your Canon DSLR, specifically the powerful full frame 5D Mark III?
Is it possible to finally SHOW it? Yes it is.
Here is the most in-depth comparison yet between the standard video mode and raw and why the image quality is worth your attention.
Tonality and skin tones
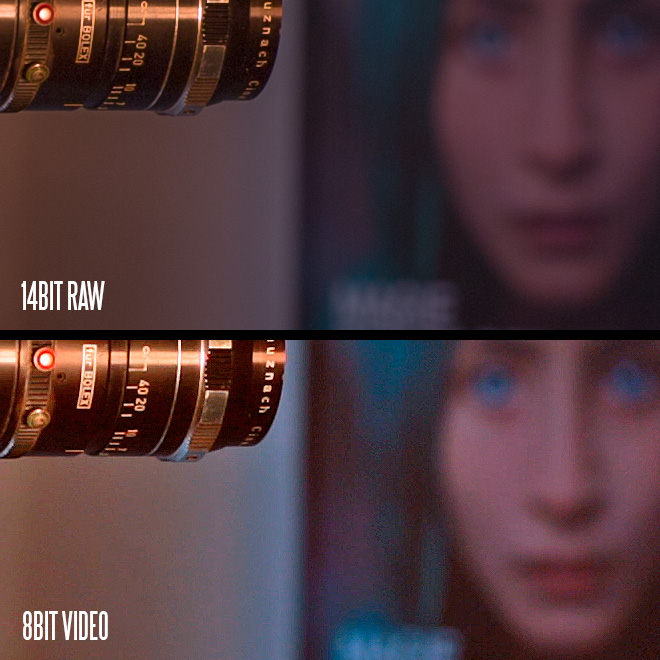
Look to the shot at the top of this article. Look especially at the eyes in the photo on the book cover. They’re weirdly inhuman on the standard video mode shot.
That’s a pretty good representation of why you need raw to avoid your actors looking like aliens. Why go to the effort of hiring them, if you’re not going to do their presence justice with the most critical tool on set – the camera?
The shot above is only the tip of the iceberg. The face is in the background so the out of focus ‘bokeh’ region requires smooth tonality to look correct.
Skin tones are also terrible in compressed 8bit when backlit or exposed to the left. Many top cinematographers like to shoot in backlight for continuity and depth. Blade Runner and Tree of Life used backlighting on their cast to great affect. Emmanuel Lubezki (Gravity, Tree of Life) is a big fan of shooting that way, and this is where raw REALLY comes in handy.
8bit only has 256 shades of each colour. Less depth and bigger steps between shades. Compression also hacks away at the smooth velvety tones of the original raw image. The grade and colour correction place further demands on it.
Skin tones for example look awful even on the $12,000 Canon 1D C in 8bit 4K MJPEG when you grade for maximum dynamic range or have a backlit face, because the tonality of colour is compressed into fewer steps – like just 5% of the available 256 tones per colour. When you require 5,000 tons of pink, 4 is bound to look odd.
By taking the raw image straight from the sensor, you have 14bit colour depth. That’s 16384 of shades per colour versus just 256.
Pretty big difference.
Highlight handling
When the 11 stop dynamic range of the 5D Mark III’s sensor is pushed to the limit in raw, the image maintains its realism. The ALl-I 8bit video mode from Canon however, looks like HDR puke.
Exactly the same grade was applied to both the raw and 8bit video frame below, with the aim to bring out the maximum shadow and highlight.
(Note – in each comparison shot, 5D Mark III raw is top with the stock Canon 5D Mark III video frame below it)
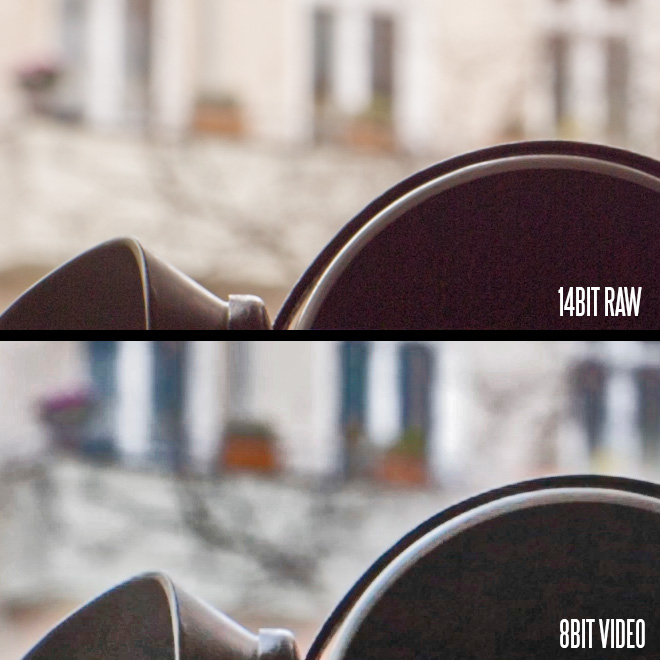
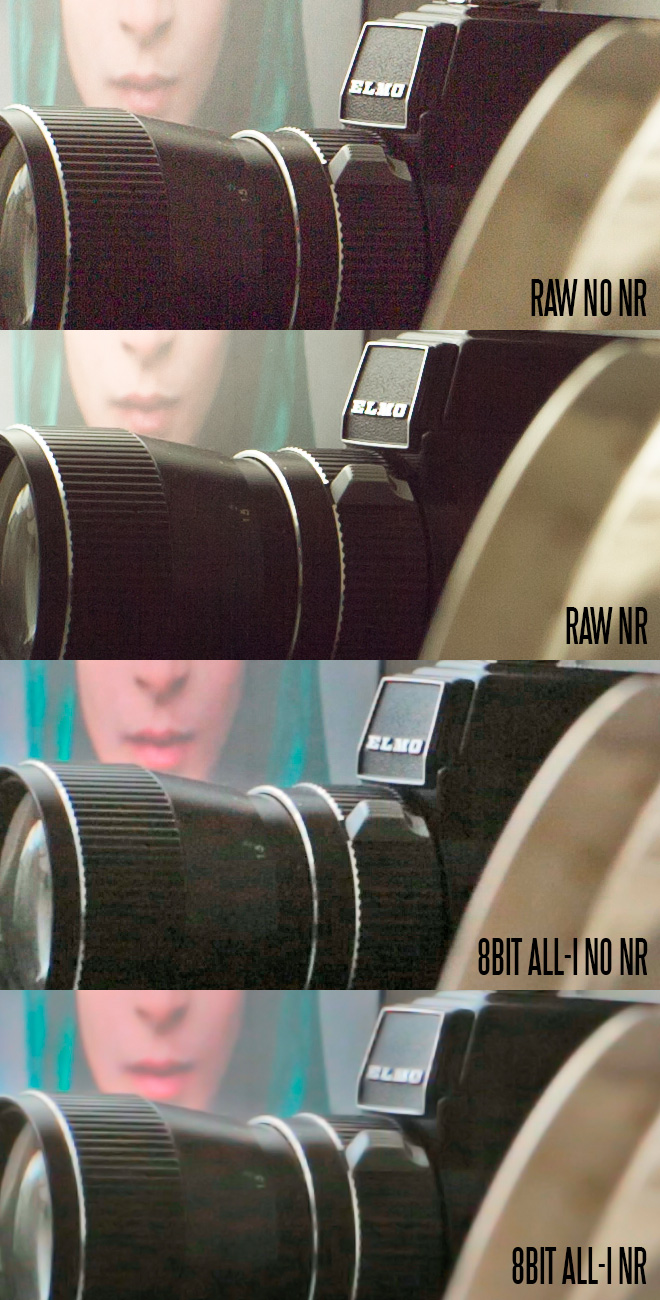
Also take note of the character of the noise over the silhouetted camera…
It’s awfully ugly on the standard video mode.
That noise is there in the shadows of every shot no matter what the ISO. Only by crushing the shadows to black do you get rid of it, losing you further usable dynamic range.
Colour
The thing I notice before anything else when switching between a normal DSLR video mode and raw video on the 5D Mark III, is colour. On all current 8bit cameras it looks weird.
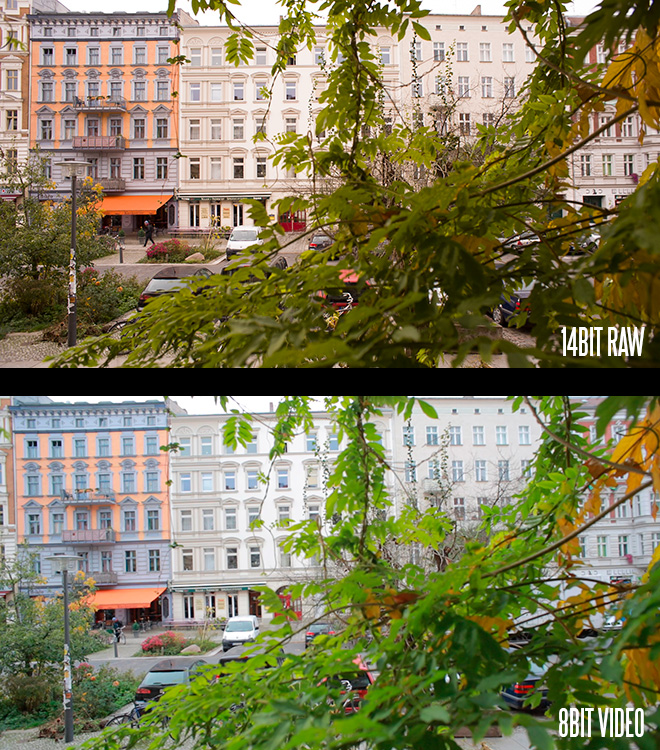
Colour is way more natural with raw – like looking through a window on the real world. The greens in the shot below are how my eyes see them. The shot below that is from the standard ALL-I video mode shot at the same time in the same light with the same white balance. The camera has hyped the oranges of the leaves on the right but completely destroyed the natural brownish green of the other leaves. They now look less like nature intended, more like a neon slime from a nuclear power plant.
Also since the buildings in the background are compressed into a tiny dynamic range towards the highlights, they’ve lost the warm daylight tones and look washed out. This 8bit shot would be impossible to fully correct in post.
(Note – in each comparison shot, 5D Mark III raw is top with the stock Canon 5D Mark III video frame below it)
Resolution
Let’s look at a 1:1 crop of the frame used to test colour above. Shot at wide angle on a 20mm Zeiss, the resolution gain of raw is so apparent I don’t even need to label the shots…
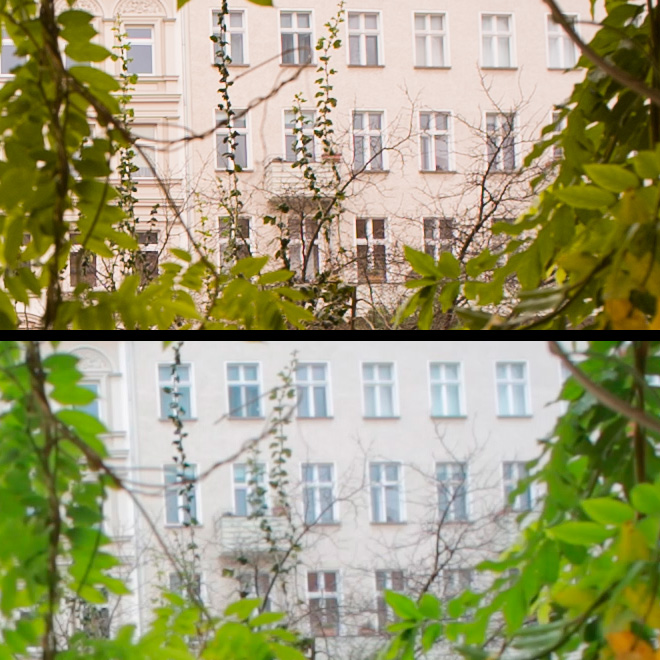
When combined with the colour advantage especially, 5D Mark III raw is like a veil has been lifted.
Resolution is way short of 1080p unless you shoot raw on the 5D Mark III.
Noise grain and low light performance
Film has plenty of noise even at ISO 800 but we never complained about it at the cinema.
That’s because it has such a fine texture that it actually, arguably, improves the image and prevents it from looking too clinical, too plastic.
Noise becomes a problem with 8bit cameras like the Canon C300, Sony FS700 and DSLRs not because there’s too much of it – these cameras are extremely sensitive to light.
It becomes a problem because of the poor grain structure and not just that, but the way it moves across the image.
Film grain has a random pattern. Digital grain has fixed patterns inherent in the randomness. Furthermore film grain doesn’t intrude on motion at 24fps but digital gain crawls horrifically.
The compression of a DSLR codec and to a lesser extent the broadcast ready 50Mbit codec on the C300 makes for a less film like grain than raw on the 5D Mark III and Blackmagic Cinema Camera.
Also, being able to apply noise reduction in post with 5D Mark III raw does not smear away too much detail.
Dynamic range
Cinematographers paint with light and shadows. That contrast between the dark areas of the image and light areas is measured in dynamic range.
If you have seen one of those ugly extreme dynamic range photos done with multiple exposures, you will know that’s not the way cinema works. You still need dark and light areas. When everything is bright and a mid-tone the image looks weird.
So for me dynamic range is not about getting a shadow and lifting it so far it isn’t dark any more, or getting a highlight and bringing it down to the mids do it isn’t bright any more.
Dynamic range for me is the QUALITY of shadow detail and the QUALITY of highlight detail.
With an 8bit compressed codec, the heaviest compression happens in the shadows. There you will find the most noise and macro blocking, the most smearing of detail. Raw on the 5D Mark III is uncompressed so you see literally everything the sensor is able to see.
In terms of the highlights, what is important is they look realistic. When colour and detail gets close to the limits of the 256 shades of an 8bit codec, the camera runs out of space to accurately represent bright tones. Often bright colours clip to white or begin to wash out.
Raw maintains rich colour right up towards the clipping point. So if a vivid colour just so happens to be bright, it’s still vivid. Equally in the shadows if you have rich colour in the shadows, it won’t desaturate to a mushy grey.
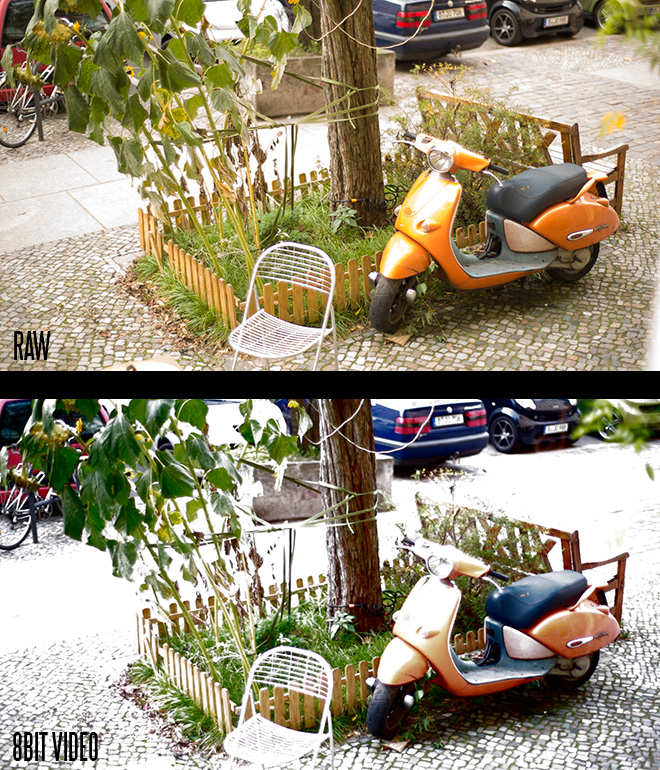
The best way to illustrate dynamic range on the 5D Mark III is to exposure to the right. This is a useful technique which gives you a cleaner image with less noise and better highlight roll off.
Here’s the corrected ETTR image shot in both raw and standard video mode on the 5D Mark III –
Compression
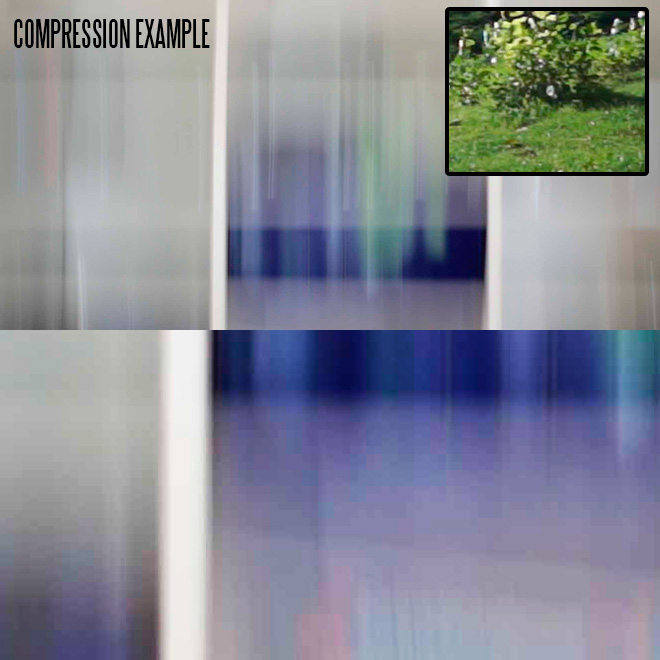
Of course the main reason the standard video mode is the way it is on the 5D Mark III is that it trashes your image, literally trashes the image data – instead of storing it all on your card.
Filmmaking is a big effort. Shouldn’t a camera make the same effort to capture it? Canon didn’t seem to think so when they implemented the ALL-I codec on the 5D Mark III. The bitrate is plenty – at over 80Mbit. But the implementation of the codec as a whole means there’s still a lot of compression visible in the image.
Raw may give shorter recording times per 64GB or 128GB card and may need processing in post, which takes some extra time, but the advantages outweigh that for me. It is uncompressed – removing any chance at all of mosquito noise, mud and macro blocking.
Macro blocking is most noticeable on fast action, motion blur and foliage like grass (inset) and trees. Raw is the only bullet proof way of avoiding it other than to buy an external recorder.
Banding
Compressed 8bit video does not have the tonal precision to accurately represent every subtle shade.
What aggravates this problem is when the compression is high and the image is scaled.
DSLRs and cameras which shoot 1080p from a 4K sensor must scale down the full resolution image to 2 megapixels.
Inaccurate shading across gradients (commonly seen in shots with large areas of blue sky) tarnish the image and appear as oddly coloured bands. Scaling, as you can see from the example below, makes this worse by compressing the bands closer together making the contrast between bands increase.
Although the 5D Mark III must still scale the sensor to produce 1080p raw, it has the tonal precision to perfectly represent every subtle shade so no banding occurs when the sensor output is scaled.
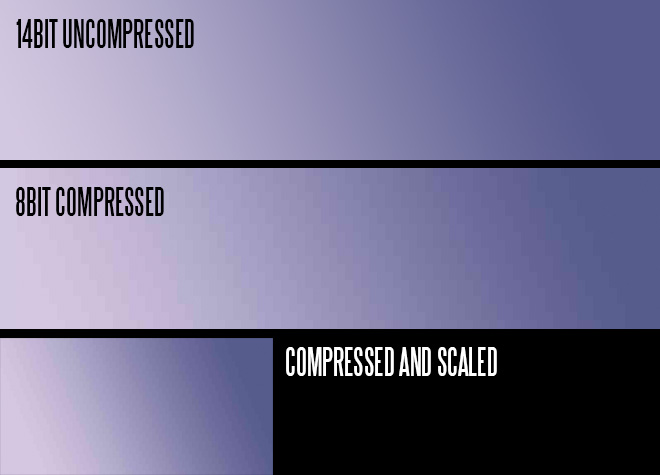
As you can see, purple has crept into the sky from the simulated compression above. The colours were taken from a real 5D Mark III frame shot at a warm colour temperature (around 6500k). The final compressed AND scaled output is very reminiscent of just about how every DSLR on the market renders a sky! I’ve seen the banding many times before. To be free of it in raw video on the 5D Mark III is liberating.
Other differences
Many people have been lead to think of compressed video vs raw as like JPEG vs raw, in the stills world.
The comparison doesn’t hold tight. It’s a myth.
Both JPEGs and raw video start off as raw image data but because the 5D Mark III does not shoot JPEGs at 24fps, it has time to think. Therefore the debayering quality is far better on a JPEG than it is on a frame of video.
There’s another difference is that JPEGs contain the full pixel readout of the sensor; so the full colour, dynamic range and resolution is available for the debayering engine. That’s far more information than a 1080p frame has to go off (which is 2MP compared to 22MP for JPEG on the 5D Mark III).
All that information packed inside a JPEG helps compensate for the downsides of 8bit colour space and compression (though you still can’t grade a JPEG still as well as raw video).
Then there’s white balance.
White balance is done in post with raw so you can apply different white balances to different light sources in the image. This is very useful for when you have mixed temperatures of light in one shot – i.e. an interior lit with practical lights at 3200k and a window onto an outside scene at the daylight temperature of around 5600k. If your interior shot is too orange and your window is too blue, that can be fixed with raw video. With normal compressed video it can’t be fixed as the colours are baked into the image permanently.
Conclusion
The message is simple.
If you’re not shooting with the best possible image quality you’re letting your content down.
